"In-Depth Guide on Using Annotations for Marketing for 2024"
In-Depth Guide on Using Annotations for Marketing
How to Use YouTube Cards and Annotations?

Richard Bennett
Oct 26, 2023• Proven solutions
YouTube Annotations and Cards are both tools for linking viewers to your other videos or to off-YouTube webpages. Two of the major differences between them are:
Annotations are not clickable on mobile devices.
You cannot choose the size or positioning of Cards.
This article will teach you about both Cards and Annotations and discuss the best uses for each of them.
Part 1: Annotations
Annotations are messages that float overtop of your videos in the YouTube player. Usually, annotations are clickable and take users to other content created by you.
Section 1: Types of Annotations
There are five types of YouTube annotations:
Notes are colored boxes placed over the top of your videos.
Speech Bubbles look like dialogue boxes in a comic strip. They have tails that you can adjust so it looks like one of the people in your video is saying what is written in the annotation.
Spotlights have a subtle border and are completely clear inside. Your text only appears when a viewer’s cursor hovers over top of these annotations.
Labels are like spotlights except that viewers do not have to hover over them for your text to be visible.
Any of these annotations can be used to link viewers to other videos, or as subscribe links. You can also add a simple Title to your video through the Annotations menu.
Section 2: How to Use Annotations
*Note: the above video mentions Pause annotations, which are no longer available.
Here are two of the best uses for annotations:
Clickable End Cards / Outros
One of the best ways you can use spotlight annotations is to create clickable end cards for your videos.
When your video finishes playing the YouTube player will display a selection of suggested videos that might direct viewers away from your channel. You can keep more of these viewers watching your content by creating your own ‘suggested videos’ card and putting it at the end of your videos.
Put thumbnails of two or three of your other videos on your end card, or use ‘picture-in-picture’ to actually imbed footage from them. Then, after you upload your video, go in and place clickable spotlight annotations over top of your video thumbnails.
This is one use for annotations that cannot be duplicated with cards.
Promoting Your Videos
You should not wait until the end of your video to start linking viewers to other content. Many viewers will click away before they see your end card because your video is not exactly what they were looking for. By placing note or speech bubble annotations occasionally throughout your videos you can catch some of these people before they click off of your channel.
This works especially well if you link to videos on similar subjects to the one you are annotating.
Instead of just linking to another video of yours, try to link to that video on a playlist. Once a viewer is on a playlist your videos will auto-play after each other, which is good for both your view count and watch time.
You can also use the newer YouTube Cards for this, but Annotations might still be a better choice because viewers only need to click once vs. twice for Cards.
Try both and see which performs best for your channel. It might be in your best interest to keep on using both as they target different audiences – Cards are clickable on mobile devices, for example, but Annotations are not.
Part 2: YouTube Cards
YouTube Cards are newer than annotations and a lot of people believe they will one day replace Annotations. While there are benefits to Cards – like embedding images to represent your links – you cannot choose the shape, size, or placement of them. This means they have limited uses.
When viewers click on a Card they are shown additional information and a thumbnail representing the page they will be taken to if they choose to click again. This extra step could be either help viewers decide to click your links or give them a second chance to decide they would rather not.
Section 1: When to Use Cards
A linked Annotation is simply a call to action viewers can click on. A Card is a call to action as well, but instead of taking the viewer directly to where its link leads when it is clicked a Card opens up into a larger version of itself with a thumbnail image.
Crowdfunding pages (Patreon is a great choice for video creators), charity fundraising pages, and merchandise stores are all examples of links that benefit from the format of YouTube Cards.
When you link a viewer to a non-YouTube page you break up their session time, which negatively impacts your watch time and SEO ranking. You want to make sure that the viewers you are directing away from YouTube are the ones most likely to convert after they leave. By ‘convert’ we mean to contribute to your Patreon campaign, donate to the charity you are promoting, or buy some of your merchandise.
Giving viewers more information and a thumbnail through a Card can help ensure the most interested viewers are the ones clicking your links.
If you want to find a video editing solution that empowers your imagination and creativity yet takes less effort, please try this robust and user-friendly video editing software Filmora, which is equipped with its own footage stock Wondershare Filmstock and will definitely enhance your productivity and helps you to make money by making videos much easier.


Richard Bennett
Richard Bennett is a writer and a lover of all things video.
Follow @Richard Bennett
Richard Bennett
Oct 26, 2023• Proven solutions
YouTube Annotations and Cards are both tools for linking viewers to your other videos or to off-YouTube webpages. Two of the major differences between them are:
Annotations are not clickable on mobile devices.
You cannot choose the size or positioning of Cards.
This article will teach you about both Cards and Annotations and discuss the best uses for each of them.
Part 1: Annotations
Annotations are messages that float overtop of your videos in the YouTube player. Usually, annotations are clickable and take users to other content created by you.
Section 1: Types of Annotations
There are five types of YouTube annotations:
Notes are colored boxes placed over the top of your videos.
Speech Bubbles look like dialogue boxes in a comic strip. They have tails that you can adjust so it looks like one of the people in your video is saying what is written in the annotation.
Spotlights have a subtle border and are completely clear inside. Your text only appears when a viewer’s cursor hovers over top of these annotations.
Labels are like spotlights except that viewers do not have to hover over them for your text to be visible.
Any of these annotations can be used to link viewers to other videos, or as subscribe links. You can also add a simple Title to your video through the Annotations menu.
Section 2: How to Use Annotations
*Note: the above video mentions Pause annotations, which are no longer available.
Here are two of the best uses for annotations:
Clickable End Cards / Outros
One of the best ways you can use spotlight annotations is to create clickable end cards for your videos.
When your video finishes playing the YouTube player will display a selection of suggested videos that might direct viewers away from your channel. You can keep more of these viewers watching your content by creating your own ‘suggested videos’ card and putting it at the end of your videos.
Put thumbnails of two or three of your other videos on your end card, or use ‘picture-in-picture’ to actually imbed footage from them. Then, after you upload your video, go in and place clickable spotlight annotations over top of your video thumbnails.
This is one use for annotations that cannot be duplicated with cards.
Promoting Your Videos
You should not wait until the end of your video to start linking viewers to other content. Many viewers will click away before they see your end card because your video is not exactly what they were looking for. By placing note or speech bubble annotations occasionally throughout your videos you can catch some of these people before they click off of your channel.
This works especially well if you link to videos on similar subjects to the one you are annotating.
Instead of just linking to another video of yours, try to link to that video on a playlist. Once a viewer is on a playlist your videos will auto-play after each other, which is good for both your view count and watch time.
You can also use the newer YouTube Cards for this, but Annotations might still be a better choice because viewers only need to click once vs. twice for Cards.
Try both and see which performs best for your channel. It might be in your best interest to keep on using both as they target different audiences – Cards are clickable on mobile devices, for example, but Annotations are not.
Part 2: YouTube Cards
YouTube Cards are newer than annotations and a lot of people believe they will one day replace Annotations. While there are benefits to Cards – like embedding images to represent your links – you cannot choose the shape, size, or placement of them. This means they have limited uses.
When viewers click on a Card they are shown additional information and a thumbnail representing the page they will be taken to if they choose to click again. This extra step could be either help viewers decide to click your links or give them a second chance to decide they would rather not.
Section 1: When to Use Cards
A linked Annotation is simply a call to action viewers can click on. A Card is a call to action as well, but instead of taking the viewer directly to where its link leads when it is clicked a Card opens up into a larger version of itself with a thumbnail image.
Crowdfunding pages (Patreon is a great choice for video creators), charity fundraising pages, and merchandise stores are all examples of links that benefit from the format of YouTube Cards.
When you link a viewer to a non-YouTube page you break up their session time, which negatively impacts your watch time and SEO ranking. You want to make sure that the viewers you are directing away from YouTube are the ones most likely to convert after they leave. By ‘convert’ we mean to contribute to your Patreon campaign, donate to the charity you are promoting, or buy some of your merchandise.
Giving viewers more information and a thumbnail through a Card can help ensure the most interested viewers are the ones clicking your links.
If you want to find a video editing solution that empowers your imagination and creativity yet takes less effort, please try this robust and user-friendly video editing software Filmora, which is equipped with its own footage stock Wondershare Filmstock and will definitely enhance your productivity and helps you to make money by making videos much easier.
Richard Bennett
Richard Bennett is a writer and a lover of all things video.
Follow @Richard Bennett
Step-by-Step Tutorial: Designing Striking Video Thumbnails for Social Media Success
How to Make Video Thumbnails for YouTube
Richard Bennett
Oct 26, 2023• Proven solutions
The video thumbnails you use for YouTube are vital to getting views and subscribers. There are a lot of things that go into making people watch your videos, but your video thumbnail might be the most important factor.
Here are 5 easy tips for creating thumbnails that get views.
- Have a Consistent Layout
- Use Your Face
- Use Graphics/Emojis That is On Topic
- Make Your Text Huge
- Keep It Clutter-Free!
Contest now closed.
Edit Your Videos Before Creating Video Thumbnails
1. Have a Consistent Layout
Your thumbnails all must look like part of the same set. You want viewers to recognize your videos like yours, and they are more likely to do that if you build up a standard layout that they can start associating with you.
An example of a standard layout could be you in the middle of the screen wearing an expression that matches the theme of your video, with your title written underneath your face. Every individual thumbnail would still be different, but you and the text would always be in the same spot.
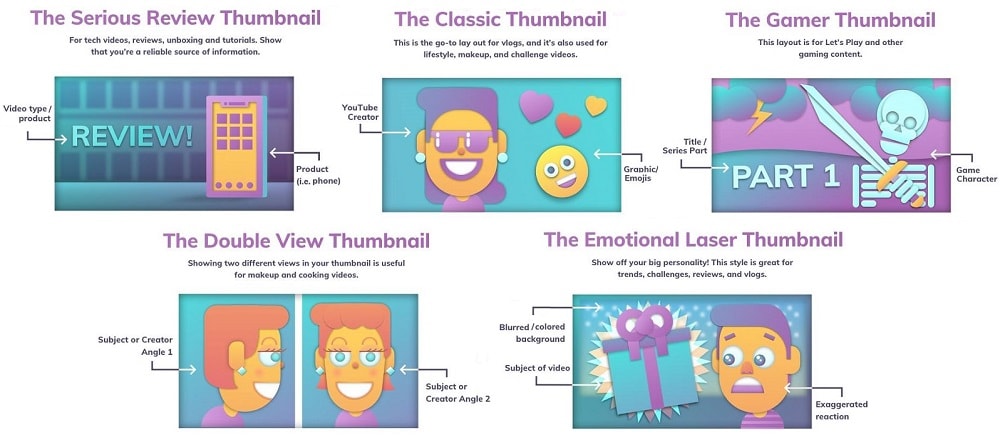
2. Use Your Face
People feel automatically connected and drawn into images that make eye contact. This makes thumbnails which feature faces more click-able than thumbnails which don’t, in most genres (i.e. if you make food videos then this may not apply – featuring the food might be more important than featuring your face). Check out more tips like this here .
Also, if somebody recognizes you in your thumbnail from a previous video of yours, that will go a long way towards making them click.
3. Use Graphics/Emojis that are On Topic
Anybody can take a screenshot of themselves in their video and use it as a thumbnail. To make your thumbnails look polished, consider using small images (like emojis or hearts) to stand out. This will add color and personality to your thumbnail.
Make sure the images you choose are relevant to the topic of your video.
4. Make Your Text Huge
If you use text in your thumbnail (you don’t have to) then it should be to add context. For example, if the main image is just you smiling then you might need some text to let viewers know the video is a makeup tutorial.
Thumbnails might look large while you’re putting them together in your image editor, but when they’re displayed on YouTube they’re a lot smaller. That goes double if a viewer is watching on their phone. So, make sure that any text you use is large enough that it can be read easily on small screens.
5. Keep it Clutter-Free
It’s great to add text and emojis to your thumbnails, but you do need to be careful not to add too much. You never want your thumbnails to look cluttered. Viewers should be able to glance at your thumbnails and know exactly what kind of video to expect – that’s difficult to do if there’s too much to process.
A good rule for text is to use only 1-3 words. That way they won’t clutter your screen, and you can make them large enough to read on small-screened devices.
For even more tips on making great YouTube thumbnails, click here .
Use these tips to make video thumbnails for YouTube, and tell us what kind of results you get!
Richard Bennett
Richard Bennett is a writer and a lover of all things video.
Follow @Richard Bennett
Richard Bennett
Oct 26, 2023• Proven solutions
The video thumbnails you use for YouTube are vital to getting views and subscribers. There are a lot of things that go into making people watch your videos, but your video thumbnail might be the most important factor.
Here are 5 easy tips for creating thumbnails that get views.
- Have a Consistent Layout
- Use Your Face
- Use Graphics/Emojis That is On Topic
- Make Your Text Huge
- Keep It Clutter-Free!
Contest now closed.
Edit Your Videos Before Creating Video Thumbnails
1. Have a Consistent Layout
Your thumbnails all must look like part of the same set. You want viewers to recognize your videos like yours, and they are more likely to do that if you build up a standard layout that they can start associating with you.
An example of a standard layout could be you in the middle of the screen wearing an expression that matches the theme of your video, with your title written underneath your face. Every individual thumbnail would still be different, but you and the text would always be in the same spot.
2. Use Your Face
People feel automatically connected and drawn into images that make eye contact. This makes thumbnails which feature faces more click-able than thumbnails which don’t, in most genres (i.e. if you make food videos then this may not apply – featuring the food might be more important than featuring your face). Check out more tips like this here .
Also, if somebody recognizes you in your thumbnail from a previous video of yours, that will go a long way towards making them click.
3. Use Graphics/Emojis that are On Topic
Anybody can take a screenshot of themselves in their video and use it as a thumbnail. To make your thumbnails look polished, consider using small images (like emojis or hearts) to stand out. This will add color and personality to your thumbnail.
Make sure the images you choose are relevant to the topic of your video.
4. Make Your Text Huge
If you use text in your thumbnail (you don’t have to) then it should be to add context. For example, if the main image is just you smiling then you might need some text to let viewers know the video is a makeup tutorial.
Thumbnails might look large while you’re putting them together in your image editor, but when they’re displayed on YouTube they’re a lot smaller. That goes double if a viewer is watching on their phone. So, make sure that any text you use is large enough that it can be read easily on small screens.
5. Keep it Clutter-Free
It’s great to add text and emojis to your thumbnails, but you do need to be careful not to add too much. You never want your thumbnails to look cluttered. Viewers should be able to glance at your thumbnails and know exactly what kind of video to expect – that’s difficult to do if there’s too much to process.
A good rule for text is to use only 1-3 words. That way they won’t clutter your screen, and you can make them large enough to read on small-screened devices.
For even more tips on making great YouTube thumbnails, click here .
Use these tips to make video thumbnails for YouTube, and tell us what kind of results you get!
Richard Bennett
Richard Bennett is a writer and a lover of all things video.
Follow @Richard Bennett
Also read:
- [New] In 2024, 1-#5 Best Editors Apart From YouTube Platform
- [Updated] In 2024, Affordable PC Display Recorder Apps
- [Updated] In 2024, How to Effortlessly Record Movies on Win10
- 2024 Approved Exploring the Essence of YouTube Live Imagery Language
- 2024 Approved In-Depth Analysis The Top 7 Android Apps to Combat Ads Effectively
- 2024 Approved Prime Selection Top 8 Webcams to Upgrade Streaming
- 2024 Approved Sky-High Streamer Success Channel Growth Through Monetizing Every Device
- 2024 Approved Spoof Spectacle Steps to Create a Parody
- 2024 Approved The Director's Eye 15 Essential Camera Shots Explained
- 2024 Approved Top 7 Android Ad Blockers Your Choice Comparison
- 2024 Approved Unleashing Creativity How to Convert Your Favorite Youtube Videos To Gifs
- Essential Silicon Insights, Lost But Now Found - Top 4 Discoveries!
- Facebook Fiasco? Getting Back to Social Networking
- How to Change Your Vivo S18 Pro Location on life360 Without Anyone Knowing? | Dr.fone
- In 2024, Boosting Viewership and Fanship Through Strategic IGTV Hashtag Use
- In 2024, Frame by Frame The Smartphone Storyteller's Path to YouTubes Thumbnails
- In 2024, Harnessing Video Magic Channel Creation Wizardry
- In 2024, How To Activate and Use Life360 Ghost Mode On Xiaomi Redmi K70E | Dr.fone
- Kitchen Kings & Queens Crown Your Channel With a Name for 2024
- Title: In-Depth Guide on Using Annotations for Marketing for 2024
- Author: Thomas
- Created at : 2024-11-21 19:04:25
- Updated at : 2024-11-24 20:19:18
- Link: https://youtube-help.techidaily.com/in-depth-guide-on-using-annotations-for-marketing-for-2024/
- License: This work is licensed under CC BY-NC-SA 4.0.