
:max_bytes(150000):strip_icc():format(webp)/Unlockedphone_mikkelwilliam_Getty_Eplus-bd0f806b392b4069ab6618d3b520f5b7.jpg)
Master Quick YouTube Video Uploads and Rendering Secrets for 2024
Master Quick YouTube Video Uploads and Rendering Secrets
How to Render and Upload YouTube Videos Faster?

Richard Bennett
Oct 26, 2023• Proven solutions
You’ve shot a video you’re proud of and you can’t wait to post it! But, slow down, you have to edit all your clips together first. And then you have to export your video from the editing program, which can take a while. Then you have to wait for it to upload to YouTube, and once it’s up you have to write your description, add cards, and do a handful of other things.
The period between finishing a video and actually posting it for your subscribers to see can be long and tiresome. A lot of videos have probably died in these stages because their creators ran out of energy and patience.
Don’t let this happen to your videos! Here are 4 ways you can save time and avoid headaches during post-production:
3. Use default descriptions and tags
4. TubeBuddy’s bulk features and tagging tools
1. Create mini-projects
When you have alarge editing project with lots of different titles, animations, clip sequences, and PIP tracks it can get hard to keep track of everything. That’s especially true if you need to go back and make changes. A change to one part of your video could affect other parts of it.
Also, the more complex your video is the longer it will take to render/export.
There is a way you can keep your project more organized, save time making minor adjustments, and speed up rendering: create sub-projects of different segments of your video and import them into your main project as their own clips.
This helps you in 3 ways:
1. If there are a lot of effects it’ll be faster to render a shorter video.
2. If you import your sequence as its own clip you won’t have to worry about adjusting little parts of it whenever you change earlier sections of your video.
3. If you do want to make adjustments to your sequence you can open up your mini-project and change it without affecting anything in your main project.
2. Optimize your upload speed
At home, your videos will upload fastest if all of your internet resources are devoted to the upload. That means you should not have any other windows open on your computer while you are uploading. You should also make sure there aren’t other devices competing for wifi like smart tvs, cell phones, or really fancy coffee makers.
If you have neighbors on the same wifi signal as you and they are online at the same time, this will slow you down too.
Because there is so much that can interfere with wifi, you might want to consider a wired Ethernet cable. Ethernet connections are faster in general, and you won’t have any problems with other devices competing for resources like you get with wifi.
If you’re doing everything you can to optimize your upload speed at home and still find that it takes an unreasonable amount of time to upload videos to YouTube, go somewhere with a better connection. Save your video to a USB drive and take it to a library or college to upload. Connections in these kinds of places tend to be very strong.
3. Use default descriptions and tags
In your Creator Studio, go to Channel > Upload defaults. Here you can write in titles, descriptions, and tags which will automatically be applied to every video you upload.

Note: in the latest YouTube Studio, the upload interface is changed but the main process is similar.

You probably have tags you use for almost every video you post. For example, if your channel is about vegan cooking then every one of your videos is probably tagged ‘vegan’, ‘food’, and ‘cooking’. If you type those tags in here then you don’t have to keep adding them to every new video, and you can still add or remove tags from individual uploads so you aren’t stuck using the exact same set of tags every time.
Similarly, you probably have some default text that goes in the description of every one of your videos (i.e. a link to your personal website or a brief introduction of yourself). If you type in a default description then that text will appear automatically in every new video description and you can just add to it when you need to for individual videos.
Using defaults might only save you a couple of minutes per video, but those minutes add up.
4. TubeBuddy’s bulk features and tagging tools
TubeBuddy is a channel management tool for YouTube. Most of its features are more geared towards very large channels or companies with a YouTube presence, but there are also features that can help small or mid-sized YouTubers save time and stay organized.
Some of these tools include templates for things like cards and end screens and bulk processing tools for when you want to change a lot of things at once. For example, if you wanted to update the links in every card in every one of your videos at once then TubeBuddy could help with that.
Some of TubeBuddy’s best features for growing channels are the tagging features. TubeBuddy will help you discover tags, suggest new tags, and even copy whole lists of tags from rival videos.
There are different levels of pricing for TubeBuddy (including a free version, although it’s very limited) and you get a discount on the Pro version if you have less than 50,000 lifetime views on your channel. It ends up being $4.50USD a month (or $3.60 USD a month if you pay for a year in advance). It’s a good investment for someone who’s starting to see some growth on YouTube, but probably not if you’re still trying to reach milestones like 500 subs or 10,000 views.
You have to work hard to get anywhere on YouTube, but that doesn’t mean you should be toiling away at tedious stuff like typing in the same tags over and over. If you have any time-saving tips then make sure to share them with everyone in the comments!
Remember that your time is valuable =)

If you are using Filmora to edit YouTube videos, you can upload the video to YouTube directly from Filmora without download it again first, which can save you time. Besides, if you don’t want the video to be public, you can change Privacy to unlisted or private in Filmora.


Richard Bennett
Richard Bennett is a writer and a lover of all things video.
Follow @Richard Bennett
Richard Bennett
Oct 26, 2023• Proven solutions
You’ve shot a video you’re proud of and you can’t wait to post it! But, slow down, you have to edit all your clips together first. And then you have to export your video from the editing program, which can take a while. Then you have to wait for it to upload to YouTube, and once it’s up you have to write your description, add cards, and do a handful of other things.
The period between finishing a video and actually posting it for your subscribers to see can be long and tiresome. A lot of videos have probably died in these stages because their creators ran out of energy and patience.
Don’t let this happen to your videos! Here are 4 ways you can save time and avoid headaches during post-production:
3. Use default descriptions and tags
4. TubeBuddy’s bulk features and tagging tools
1. Create mini-projects
When you have alarge editing project with lots of different titles, animations, clip sequences, and PIP tracks it can get hard to keep track of everything. That’s especially true if you need to go back and make changes. A change to one part of your video could affect other parts of it.
Also, the more complex your video is the longer it will take to render/export.
There is a way you can keep your project more organized, save time making minor adjustments, and speed up rendering: create sub-projects of different segments of your video and import them into your main project as their own clips.
This helps you in 3 ways:
1. If there are a lot of effects it’ll be faster to render a shorter video.
2. If you import your sequence as its own clip you won’t have to worry about adjusting little parts of it whenever you change earlier sections of your video.
3. If you do want to make adjustments to your sequence you can open up your mini-project and change it without affecting anything in your main project.
2. Optimize your upload speed
At home, your videos will upload fastest if all of your internet resources are devoted to the upload. That means you should not have any other windows open on your computer while you are uploading. You should also make sure there aren’t other devices competing for wifi like smart tvs, cell phones, or really fancy coffee makers.
If you have neighbors on the same wifi signal as you and they are online at the same time, this will slow you down too.
Because there is so much that can interfere with wifi, you might want to consider a wired Ethernet cable. Ethernet connections are faster in general, and you won’t have any problems with other devices competing for resources like you get with wifi.
If you’re doing everything you can to optimize your upload speed at home and still find that it takes an unreasonable amount of time to upload videos to YouTube, go somewhere with a better connection. Save your video to a USB drive and take it to a library or college to upload. Connections in these kinds of places tend to be very strong.
3. Use default descriptions and tags
In your Creator Studio, go to Channel > Upload defaults. Here you can write in titles, descriptions, and tags which will automatically be applied to every video you upload.
Note: in the latest YouTube Studio, the upload interface is changed but the main process is similar.
You probably have tags you use for almost every video you post. For example, if your channel is about vegan cooking then every one of your videos is probably tagged ‘vegan’, ‘food’, and ‘cooking’. If you type those tags in here then you don’t have to keep adding them to every new video, and you can still add or remove tags from individual uploads so you aren’t stuck using the exact same set of tags every time.
Similarly, you probably have some default text that goes in the description of every one of your videos (i.e. a link to your personal website or a brief introduction of yourself). If you type in a default description then that text will appear automatically in every new video description and you can just add to it when you need to for individual videos.
Using defaults might only save you a couple of minutes per video, but those minutes add up.
4. TubeBuddy’s bulk features and tagging tools
TubeBuddy is a channel management tool for YouTube. Most of its features are more geared towards very large channels or companies with a YouTube presence, but there are also features that can help small or mid-sized YouTubers save time and stay organized.
Some of these tools include templates for things like cards and end screens and bulk processing tools for when you want to change a lot of things at once. For example, if you wanted to update the links in every card in every one of your videos at once then TubeBuddy could help with that.
Some of TubeBuddy’s best features for growing channels are the tagging features. TubeBuddy will help you discover tags, suggest new tags, and even copy whole lists of tags from rival videos.
There are different levels of pricing for TubeBuddy (including a free version, although it’s very limited) and you get a discount on the Pro version if you have less than 50,000 lifetime views on your channel. It ends up being $4.50USD a month (or $3.60 USD a month if you pay for a year in advance). It’s a good investment for someone who’s starting to see some growth on YouTube, but probably not if you’re still trying to reach milestones like 500 subs or 10,000 views.
You have to work hard to get anywhere on YouTube, but that doesn’t mean you should be toiling away at tedious stuff like typing in the same tags over and over. If you have any time-saving tips then make sure to share them with everyone in the comments!
Remember that your time is valuable =)
If you are using Filmora to edit YouTube videos, you can upload the video to YouTube directly from Filmora without download it again first, which can save you time. Besides, if you don’t want the video to be public, you can change Privacy to unlisted or private in Filmora.
Richard Bennett
Richard Bennett is a writer and a lover of all things video.
Follow @Richard Bennett
Aspiring YouTubers’ Guide to Affiliate Allies
How to Get YouTube Sponsorship for Small Channels (Easy)
Richard Bennett
Mar 27, 2024• Proven solutions
Are you looking for YouTube sponsorship? Getting YouTube sponsorship for small channels might seem to be a very difficult goal. Whenever the word sponsors strikes your mind, you think of the big and expensive commercials.
However, if you lower your expectation from the big commercial companies, there are several other companies in the market that can help you with the YouTube sponsorship.
In this article, you will learn how to get YouTube sponsorship and make money out of it.
- Part1: Before You Start Applying For Sponsorship
- Part2: How To Get A Sponsor For Youtube Channel
- Part3: Types of Sponsorship
Part 1: Before You Start Applying For Sponsorship
1. Read YouTube Rules
As you are a small channel, you must be very cautious about the YouTube rules. Never put up any abusive content on your channel that degrades the value of YouTube. Ensure that your channel’s content fits the directions and guidelines of YouTube.
The supporters of YouTube sponsorship for small channels would never wish to get associated with channels that might be erased due to the strategy infringement of YouTube. So, be careful before uploading your content.

2. Quality Content Is Important
The content you offer through your channel must offer valuable content. Not just that, you must have a library of valuable content so that the potential sponsors can browse through several materials in your channel. Uploading once in a blue moon or just a few contents in the beginning and expecting YouTube sponsorships to pour in is not the way out to acquire supporters.

3. Leave Your Business Email
Always add a business email ID to your channel, which shows that you would love to receive business inquiries. This is the ID where you will receive notifications for friend requests, video comments, and even the battering messages once you have a large fan following.

4. Try to Make Your Video Eye-catching
A high-quality video will also attract sponsors. Don’t just put your footage together and upload it to YouTube, add some transitions, elements, and effects to make it more entertaining and attractive. Yet not everyone is able to edit videos perfectly, that’s why we would like to recommend Filmora for you.
Filmora is a video editing software for people of different levels. For beginners, the Instant Mode, Template Mode saves you from the trouble of finding the proper transitions or elements. For experienced, the Green Screen, Split Screen, Speed Ramping, and more allow you to add more effects to your video.
Check the below videos to find out the features of Filmora and download it to get started with video editing.
Part 2: How To Get A Sponsor For Youtube Channel
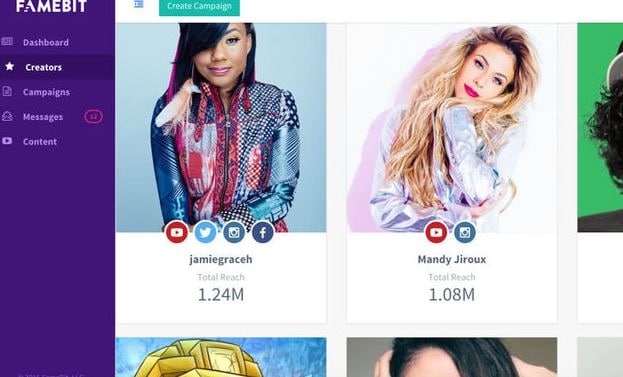
1. Use YouTube Sponsorship Platform – Famebit
If you are searching for YouTube sponsorship for small channels, Famebit is a trusted platform that can be considered. It is an interface for the advertisers and the video creators who require sponsorship for their content.
Utilizing Famebit can be beneficial in acquiring more than the average amount of cash as it is added by Google. If you have 5000 endorsers for your channel, you can very well utilize Famebit to obtain YouTube sponsorship for small channels.
You can explore various items like contraptions, innovations, designs, and more when you get to their commercial center by making a free record. Famebit charges 10% of the sponsored amount and the installment is made by check or PayPal.
2. Reach Out Directly
Reaching out to the people directly is one of the tried and tested ways to acquire YouTube sponsorship for small channels. Research and try to find 50 to 100 companies that would be interested in your channel.
It will not be much difficult to search for that one person within this list whom you can connect with directly. Once you have the company’s list and detailed contact information of those companies, send a mail inviting them to check your channel and show your interest to partner with them.
It is essential to make yourself stand out in the colossal crowd. Ensure your channel is unique and somewhat different from the rest because the contacted companies keep receiving partnering submissions from several other content creators too.
One important thing is not to send out the same old letter to all 50 companies and keep hoping to receive a positive response from at least one. Try to focus on your channel’s USP and highlight the same in your letter to the companies while trying to contact the companies for YouTube Sponsorship.

3. Remember To Attend Exhibition
The trade shows and exhibitions are a great way to search for YouTube sponsorship for small channels. The exhibitions that focus on new media give a huge platform for you to find a sponsor when you participate in it.
Such events offer tricks and tips, helps you to talk to other content creators, and also lets you connect with the brand managers who can offer your channel with YouTube sponsorship.

Part 3: Types of Sponsorship
1. Product Sponsorships
When you are searching for sponsorship for a particular product, ensure that it is relevant to your channel. Never approach the sponsors without ensuring the same as you might put off your viewers and your sponsors will not achieve their expected results. You might lose both your sponsors and audiences in such a case.
When you try to get YouTube sponsorship for small channels, it is quite difficult as the promotion of the product becomes limited to whatever small following they have. Product reviews and tutorials are the best ways to obtain product sponsorships.
2. Paid Sponsorship
Among all sponsorships, paid sponsorship is the most challenging one. Usually, when you review the products of the affiliate links in your videos, you earn revenues, but, in the paid sponsorship you earn by advertising product and company links on your channel.
When you add the company’s products to your videos, you earn money. It appears at the beginning and at the end of your videos after it is played on your YouTube channel.
3. Affiliate Sponsorship
It is the easiest of all sponsorships but also the least revenue-generating one too. Affiliate sponsorship works by sharing affiliate codes and links. It is used by your audiences to obtain discounts or offer you a reward.
There are two types in which affiliate sponsorship works. One is the discounting option where the code is shared and the viewers use these codes to get discounts anywhere between 5-15% in shopping products from that same site. Another option is to use the affiliate code to integrate it into an URL that offers profits to a content creator in form of traffic.
Conclusion
Not just the popular channels, the newbies can also earn YouTube sponsorship when they know the way outs. Follow the above tricks to get the youtube sponsorship for small channels without much effort. If your content is unique and your process to reach the sponsors is right, you can definitely make money through this medium. If you want to edit a YouTube video, Filmora can help you with its powerful features.
Richard Bennett
Richard Bennett is a writer and a lover of all things video.
Follow @Richard Bennett
Richard Bennett
Mar 27, 2024• Proven solutions
Are you looking for YouTube sponsorship? Getting YouTube sponsorship for small channels might seem to be a very difficult goal. Whenever the word sponsors strikes your mind, you think of the big and expensive commercials.
However, if you lower your expectation from the big commercial companies, there are several other companies in the market that can help you with the YouTube sponsorship.
In this article, you will learn how to get YouTube sponsorship and make money out of it.
- Part1: Before You Start Applying For Sponsorship
- Part2: How To Get A Sponsor For Youtube Channel
- Part3: Types of Sponsorship
Part 1: Before You Start Applying For Sponsorship
1. Read YouTube Rules
As you are a small channel, you must be very cautious about the YouTube rules. Never put up any abusive content on your channel that degrades the value of YouTube. Ensure that your channel’s content fits the directions and guidelines of YouTube.
The supporters of YouTube sponsorship for small channels would never wish to get associated with channels that might be erased due to the strategy infringement of YouTube. So, be careful before uploading your content.
2. Quality Content Is Important
The content you offer through your channel must offer valuable content. Not just that, you must have a library of valuable content so that the potential sponsors can browse through several materials in your channel. Uploading once in a blue moon or just a few contents in the beginning and expecting YouTube sponsorships to pour in is not the way out to acquire supporters.
3. Leave Your Business Email
Always add a business email ID to your channel, which shows that you would love to receive business inquiries. This is the ID where you will receive notifications for friend requests, video comments, and even the battering messages once you have a large fan following.
4. Try to Make Your Video Eye-catching
A high-quality video will also attract sponsors. Don’t just put your footage together and upload it to YouTube, add some transitions, elements, and effects to make it more entertaining and attractive. Yet not everyone is able to edit videos perfectly, that’s why we would like to recommend Filmora for you.
Filmora is a video editing software for people of different levels. For beginners, the Instant Mode, Template Mode saves you from the trouble of finding the proper transitions or elements. For experienced, the Green Screen, Split Screen, Speed Ramping, and more allow you to add more effects to your video.
Check the below videos to find out the features of Filmora and download it to get started with video editing.
Part 2: How To Get A Sponsor For Youtube Channel
1. Use YouTube Sponsorship Platform – Famebit
If you are searching for YouTube sponsorship for small channels, Famebit is a trusted platform that can be considered. It is an interface for the advertisers and the video creators who require sponsorship for their content.
Utilizing Famebit can be beneficial in acquiring more than the average amount of cash as it is added by Google. If you have 5000 endorsers for your channel, you can very well utilize Famebit to obtain YouTube sponsorship for small channels.
You can explore various items like contraptions, innovations, designs, and more when you get to their commercial center by making a free record. Famebit charges 10% of the sponsored amount and the installment is made by check or PayPal.
2. Reach Out Directly
Reaching out to the people directly is one of the tried and tested ways to acquire YouTube sponsorship for small channels. Research and try to find 50 to 100 companies that would be interested in your channel.
It will not be much difficult to search for that one person within this list whom you can connect with directly. Once you have the company’s list and detailed contact information of those companies, send a mail inviting them to check your channel and show your interest to partner with them.
It is essential to make yourself stand out in the colossal crowd. Ensure your channel is unique and somewhat different from the rest because the contacted companies keep receiving partnering submissions from several other content creators too.
One important thing is not to send out the same old letter to all 50 companies and keep hoping to receive a positive response from at least one. Try to focus on your channel’s USP and highlight the same in your letter to the companies while trying to contact the companies for YouTube Sponsorship.
3. Remember To Attend Exhibition
The trade shows and exhibitions are a great way to search for YouTube sponsorship for small channels. The exhibitions that focus on new media give a huge platform for you to find a sponsor when you participate in it.
Such events offer tricks and tips, helps you to talk to other content creators, and also lets you connect with the brand managers who can offer your channel with YouTube sponsorship.
Part 3: Types of Sponsorship
1. Product Sponsorships
When you are searching for sponsorship for a particular product, ensure that it is relevant to your channel. Never approach the sponsors without ensuring the same as you might put off your viewers and your sponsors will not achieve their expected results. You might lose both your sponsors and audiences in such a case.
When you try to get YouTube sponsorship for small channels, it is quite difficult as the promotion of the product becomes limited to whatever small following they have. Product reviews and tutorials are the best ways to obtain product sponsorships.
2. Paid Sponsorship
Among all sponsorships, paid sponsorship is the most challenging one. Usually, when you review the products of the affiliate links in your videos, you earn revenues, but, in the paid sponsorship you earn by advertising product and company links on your channel.
When you add the company’s products to your videos, you earn money. It appears at the beginning and at the end of your videos after it is played on your YouTube channel.
3. Affiliate Sponsorship
It is the easiest of all sponsorships but also the least revenue-generating one too. Affiliate sponsorship works by sharing affiliate codes and links. It is used by your audiences to obtain discounts or offer you a reward.
There are two types in which affiliate sponsorship works. One is the discounting option where the code is shared and the viewers use these codes to get discounts anywhere between 5-15% in shopping products from that same site. Another option is to use the affiliate code to integrate it into an URL that offers profits to a content creator in form of traffic.
Conclusion
Not just the popular channels, the newbies can also earn YouTube sponsorship when they know the way outs. Follow the above tricks to get the youtube sponsorship for small channels without much effort. If your content is unique and your process to reach the sponsors is right, you can definitely make money through this medium. If you want to edit a YouTube video, Filmora can help you with its powerful features.
Richard Bennett
Richard Bennett is a writer and a lover of all things video.
Follow @Richard Bennett
- Title: Master Quick YouTube Video Uploads and Rendering Secrets for 2024
- Author: Thomas
- Created at : 2024-05-31 12:41:02
- Updated at : 2024-06-01 12:41:02
- Link: https://youtube-help.techidaily.com/master-quick-youtube-video-uploads-and-rendering-secrets-for-2024/
- License: This work is licensed under CC BY-NC-SA 4.0.
