
:max_bytes(150000):strip_icc()/L1019-e6002f6ab3f34c489dede59d3dd7824e.jpg)
"Master Your First Impressions Best Free Intro Makers for 2024"
Master Your First Impressions: Best Free Intro Makers
Best Free YouTube Intro Makers

Richard Bennett
Nov 01, 2022• Proven solutions
An intro video goes a long way towards building your brand and showing viewers that you’re serious about YouTube. Here’s where you can make or download intros, plus some tips on making intros that support the growth of your channel.
Free Intro Makers
Here’s a list of 4 places you can create or download FREE YouTube intros with no watermark.
Blender
Blender is a free, open-source, ‘3D creation suite’. It’s great for modeling and animation, and you can even use it to make your YouTube intros.
This is an extremely powerful program. You can create cartoons and video game prototypes in Blender. This does mean that it’s probably not realistic for someone with no experience in animation to jump in and make a quick intro for their YouTube channel. However, if you want to learn Blender, all of the information you need is easily accessible through the tutorials on their site.
What’s a bit more realistic than learning an entire animation suite to make an intro is to download a premade template and just customize it in Blender. You can find YouTube intro templates that are editable in Blender on YouTube and Velosofy.
Movietools
This is a great site where you can download all kinds of free resources including video loops and animated backgrounds you can use to build YouTube intros.
You cannot download a complete Intro with your own text and/or logo from Movietools the way you can with Panzoid, but they can provide most of the resources you would need to build a sequence in Filmora or another editor.
Downloads from Movietools come as WMV (Windows Media) or MP4 files.
Panzoid
For a lot of creators, Panzoid is the default site they go to for YouTube intros, and that’s with good reason. Panzoid has an endless supply of intro templates (new ones are created weekly by members of their community) which you can edit right on the site.
A lot of the intro templates on Panzoid include music, and almost all of them include 3D text.
Click on a template you like and then click ‘open in clipmaker’.
In the clipmaker, you’ll be able to edit the template however you like. The main change you’ll want to make will probably be to the text – you’ll want it to say your channel name. In the menu on the left side of the screen, you’ll see an icon that looks like a cube. Click on it to bring up a list of the objects in the sequence.
The text will probably be under a heading such as ‘Group: All’, although there may be some variation on this depending on who built the template. Look for something that says ‘Group: Text’ in one of the dropdown menus and then look at where it says ‘Text: (the text from the template)’. There will probably be at least two fields like this for one word/line (they’re layers of the same thing). Make sure to edit them all to say the same thing or your intro will look odd.
Click the icon that looks like an arrow pointing down to choose your quality (next to mode) and format before you export. The highest quality will make your clip slow to download, but that could be worth it since you’ll probably get a lot of use out of this clip and you only need to download it once.
Velosofy
Velosofy has a ton of great intro templates you can download for free. The only complication is that the downloads are project files for programs like Sony Vegas or After Effects, making it difficult to use them unless you have those programs.
Luckily, one of the programs Velosofy has intro downloads for is Blender, the free animation software discussed above. You can download YouTube intro templates from Velosofy to edit in Blender and end up with a great custom intro for free.
5 Tips for Making a Great Intro
Here are some tips for making an intro that supports the growth of your YouTube channel.
1. Keep it Under 10 Seconds
Someone who doesn’t know you, who is shopping around for the best video to watch on a particular topic, will not have the patience to sit through a long intro. In order to stop them from clicking away, you’ll need to keep your intro short. Ten seconds is the longest you can get away with, and that’s only if your intro is exciting and includes a lot of movement and music.
Five seconds will be better than 10 seconds in most cases.
2. Match Your Channel’s Branding
Your intro should help to strengthen your personal brand by using the same kinds of colors and fonts found in your channel art and thumbnails.
Beyond matching your visuals, your intro should support the general tone of your channel. If you tend to be upbeat in your videos, upbeat music and brighter colors are probably best. If you’re a tech channel, something sleek with a black background could be better.
3. Use Music
Viewers are likely to get distracted and click away during silent pauses. In order to keep their attention through your intro, you’ll need to include music, and maybe even a sound effect.
4. Include Your Channel Name
This might seem basic, but there are intros out there where the creator has overlooked this. One of the main purposes of your intro is to brand your video, so there’s nothing more important than including your channel name.
5. Introduce Your Topic Before Your Intro
Instead of putting your intro at the very beginning of your video, put a short clip ahead of it where you explain your topic. A viewer that is looking for you to get to the point quickly might click away if the first thing they see is the intro instead of information relevant to their search.
What’s your YouTube intro like? Can you think of a way you’d like to change or improve it?
Richard Bennett
Richard Bennett is a writer and a lover of all things video.
Follow @Richard Bennett
Richard Bennett
Nov 01, 2022• Proven solutions
An intro video goes a long way towards building your brand and showing viewers that you’re serious about YouTube. Here’s where you can make or download intros, plus some tips on making intros that support the growth of your channel.
Free Intro Makers
Here’s a list of 4 places you can create or download FREE YouTube intros with no watermark.
Blender
Blender is a free, open-source, ‘3D creation suite’. It’s great for modeling and animation, and you can even use it to make your YouTube intros.
This is an extremely powerful program. You can create cartoons and video game prototypes in Blender. This does mean that it’s probably not realistic for someone with no experience in animation to jump in and make a quick intro for their YouTube channel. However, if you want to learn Blender, all of the information you need is easily accessible through the tutorials on their site.
What’s a bit more realistic than learning an entire animation suite to make an intro is to download a premade template and just customize it in Blender. You can find YouTube intro templates that are editable in Blender on YouTube and Velosofy.
Movietools
This is a great site where you can download all kinds of free resources including video loops and animated backgrounds you can use to build YouTube intros.
You cannot download a complete Intro with your own text and/or logo from Movietools the way you can with Panzoid, but they can provide most of the resources you would need to build a sequence in Filmora or another editor.
Downloads from Movietools come as WMV (Windows Media) or MP4 files.
Panzoid
For a lot of creators, Panzoid is the default site they go to for YouTube intros, and that’s with good reason. Panzoid has an endless supply of intro templates (new ones are created weekly by members of their community) which you can edit right on the site.
A lot of the intro templates on Panzoid include music, and almost all of them include 3D text.
Click on a template you like and then click ‘open in clipmaker’.
In the clipmaker, you’ll be able to edit the template however you like. The main change you’ll want to make will probably be to the text – you’ll want it to say your channel name. In the menu on the left side of the screen, you’ll see an icon that looks like a cube. Click on it to bring up a list of the objects in the sequence.
The text will probably be under a heading such as ‘Group: All’, although there may be some variation on this depending on who built the template. Look for something that says ‘Group: Text’ in one of the dropdown menus and then look at where it says ‘Text: (the text from the template)’. There will probably be at least two fields like this for one word/line (they’re layers of the same thing). Make sure to edit them all to say the same thing or your intro will look odd.
Click the icon that looks like an arrow pointing down to choose your quality (next to mode) and format before you export. The highest quality will make your clip slow to download, but that could be worth it since you’ll probably get a lot of use out of this clip and you only need to download it once.
Velosofy
Velosofy has a ton of great intro templates you can download for free. The only complication is that the downloads are project files for programs like Sony Vegas or After Effects, making it difficult to use them unless you have those programs.
Luckily, one of the programs Velosofy has intro downloads for is Blender, the free animation software discussed above. You can download YouTube intro templates from Velosofy to edit in Blender and end up with a great custom intro for free.
5 Tips for Making a Great Intro
Here are some tips for making an intro that supports the growth of your YouTube channel.
1. Keep it Under 10 Seconds
Someone who doesn’t know you, who is shopping around for the best video to watch on a particular topic, will not have the patience to sit through a long intro. In order to stop them from clicking away, you’ll need to keep your intro short. Ten seconds is the longest you can get away with, and that’s only if your intro is exciting and includes a lot of movement and music.
Five seconds will be better than 10 seconds in most cases.
2. Match Your Channel’s Branding
Your intro should help to strengthen your personal brand by using the same kinds of colors and fonts found in your channel art and thumbnails.
Beyond matching your visuals, your intro should support the general tone of your channel. If you tend to be upbeat in your videos, upbeat music and brighter colors are probably best. If you’re a tech channel, something sleek with a black background could be better.
3. Use Music
Viewers are likely to get distracted and click away during silent pauses. In order to keep their attention through your intro, you’ll need to include music, and maybe even a sound effect.
4. Include Your Channel Name
This might seem basic, but there are intros out there where the creator has overlooked this. One of the main purposes of your intro is to brand your video, so there’s nothing more important than including your channel name.
5. Introduce Your Topic Before Your Intro
Instead of putting your intro at the very beginning of your video, put a short clip ahead of it where you explain your topic. A viewer that is looking for you to get to the point quickly might click away if the first thing they see is the intro instead of information relevant to their search.
What’s your YouTube intro like? Can you think of a way you’d like to change or improve it?
Richard Bennett
Richard Bennett is a writer and a lover of all things video.
Follow @Richard Bennett
A Novice’s Roadmap to YouTube Traffic Success
The 12-step YouTube SEO Guide for Beginners Who Want More Views

Shanoon Cox
Oct 26, 2023• Proven solutions
The joy of creating on YouTube is often dampened by the disappointment of underperforming videos. You have published your content and it’s not getting the views you had hoped.
Well, let’s change that!
In this guide, I’m going to walk you through YouTube SEO from the very start to the very end.
Nothing complicated. No paid programs or expensive apps needed. We are going back to basics and get your videos discovered.
Ready?
Let’s Go!
Part 1: Research Your Topic and Competitors
Come up with a video idea . Can’t come up with one? Let me help. I heard you can make a mean scrambled egg, why don’t you show the world how you do it?
Excellent! Let’s go with that idea.
Wait, don’t go making the video yet. First, we have to do some research. We need to know what videos already exist out there.
Step 1: Find Related Videos
Do a quick search on YouTube to see what videos already exist on your topic.

Uh oh… your video will be competing against celebrities like Gordon Ramsay and Jamie Oliver.
Okay, don’t panic! There is a fantastic quote, credited to bestselling author, Jon Acuff , that goes:
While researching your competition, you will feel overwhelmed, but remember, you are at the beginning, and Gordon Ramsay and Jamie Oliver are not even at their middle, they are way passed the finish line. You still have a long journey to go, so don’t get discouraged, get inspired!
Watch those videos and understand what they are all about.
Understand that people watch YouTube for 3 key reasons:
- To be entertained
- To learn something new
- To be inspired
A video that can hit all 3 marks is going to be positioned for success. Don’t fret too much about the competition, as long as your content is good, you will see improvement.
So if you think this scrambled egg idea can hit those 3 marks, then I encourage you to go to the next step. If you don’t, let’s regroup and brainstorm some more YouTube video ideas .
Step 2: Find Keywords
Now that we’ve decided that we are sticking with the video idea, we are ready to do some keyword research. Keywords are the words and phrases people type in the YouTube search bar to discover videos.
Come up with as many relevant keywords as you can. Start by entering a keyword into the YouTube search bar. This will tell you what are the most popular searches associated with that keyword:
Once you have an idea of what people are searching for related to your topic, you’ll want to find more relevant keywords. I like to use the free app, Ubersuggest to do that.

This app gives you a whole list of long-tail keywords, which are 3-4-word phrases which is specific to what your video is about.
Some you will use to dig deeper in and other you will deem irrelevant to your videos. A good way of determining the value of a keyword is by the stats the application shows.
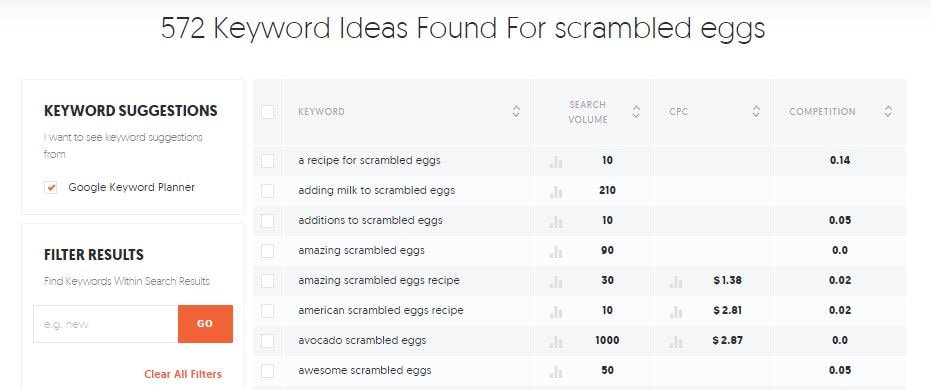
How to Read Keyword Suggestions
Once you have a list of keywords, you will see some numbers on the right-hand side. Here is what each one is about:
- Search volume is the number used to identify the popularity of the keyword. The higher the number the more people are searching for it.
- CPC is the value accredited by YouTube, determining how much advertisers are paying to target audiences who search for that keyword and click on the link.
- Competition is the number used to qualify how many other content are using that keyword.
The two categories that matter most to us right now is Search Volume and Competition. We want keywords with high search volume and low competition rate.
In the example above, you can see that the keyword “avocado scrambled eggs” has a Search Volume of 1,000 and a competition rate of 0.0. This is a good keyword to target, if you can incorporate an avocado to your dish… which of course you can!
Step 3: Write Title
I know you might want to deal with the Title, Description, and Tags after you’ve filmed and edited your video. But if you want to apply a YouTube SEO-focused strategy, then these should be addressed before you even pick up a camera as it can greatly dictate the content you end up creating.
A good YouTube title sparks curiosity, evokes emotional reaction, and promises value to your viewers.
Of course you can title your video simply: Making Scrambled Eggs
But does it spark curiosity? Not really… most people can make scrambled eggs.
Does it evoke any emotion? Maybe hunger… but even then, not really…
Finally, does it promise value? Well, assuming that most people can at least crack an egg into a pan, then hardly.
Your scrambled egg is special! Your video is special! We need to evoke that in the title — and as long as you are not writing any clickbait and deliver on what the title suggest, you can do this.
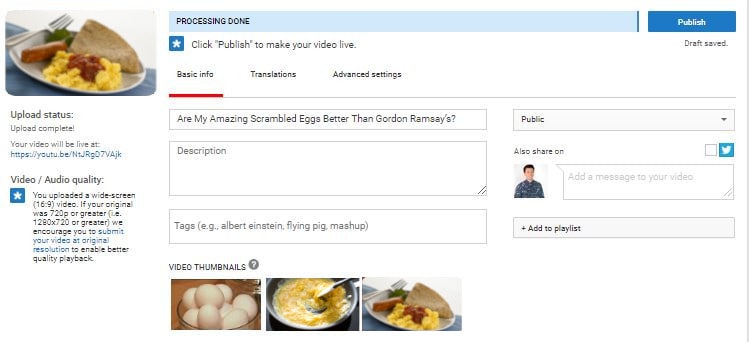
So, how about this: Are My Amazing Scrambled Eggs Better Than Gordon Ramsay’s?
Hmmm… Well, is it? We know that the Gordon Ramsay’s video has almost 30M views. Many people have already tried cooking it, I’m sure. There is only one way to find out, by encouraging others to try it over Gordon’s.
You don’t need to go for a somewhat contentious title like this, but that’s the idea, you want something that gets people curious, make them feel a certain way, and in the end, make them better for having watched your video.
See how a good title can guide the rest of your video?
Step 4: Write Description
You aren’t going to be writing the description for the viewers necessarily, you are going to be writing it for YouTube’s algorithms. The better YouTube understands what your video is about, the better they can show it to people searching for it.
This means you need to include the keywords you were researching at the beginning of your description, as YouTube will be using them to identify the content of your video. 1 or 2 keywords that best represent your video is enough. Don’t stuff the title with too many keywords or you’ll risk sounding like a robot.
But also use the description for practical uses too, if you have additional information such as supportive links, outline of the video’s content, a list of materials, step-by-step guide, or a recipe that you think your human viewers will find useful, you should input that in the description as well.
Step 5: Write Tags
Thank goodness we did the keyword research in Step 2, because coming up with tags is not as easy as it looks.
Pull 15 keywords from the list and keep it somewhere safe.
Note: The keywords you used in the title should be found in your tags, and since they are the most important ones, you should place them first.
Organize your keywords in the tag as such:
Have the specific keywords at the top, followed by more general keywords, and then branded ones:
Specific: How to make scrambled eggs
General: Scrambled eggs
Branded: Gordon Ramsay scrambled eggs
Part 2: Make The Best Darn Video Possible
It doesn’t matter how relevant your keywords are or how epic your title is, if you video sucks (i.e. your viewers click in and leave right away), YouTube will not show it in search.
Even if you haven’t created any videos yet, you can follow these next steps to ensure you are following the best practices to structure your video.
Step 6: Plan and Film the Hook
The first few seconds is where the largest percentage of your earned viewership will drop off. Odds are 20% of your viewers won’t even get past the first 10 seconds .
What you need is a hook, an intro that ensures this video is what they want to watch and let’s them know what they can expect.
Step 7: Film B-Roll
One static camera shot of you talking or cooking or giving a tutorial can cause your viewers to lose attention.
In order to keep your viewers interest, you will need b-roll, or supplemental footage you can cut to give you video more life.
While jump cuts (cuts made on a sequential clip of the same subject or in the same camera position) are fine, having additional footage to cut to will make your video feel more fluid.
So when you are filming your scrambled egg video, make sure you get some footage of you cracking the egg, scrambling it, and serving it on the plate.
Step 8: Encourage Viewers to Engage in Video
Liking, disliking, subscribing, and commenting on your video will all help your performance indirectly.
While YouTube wouldn’t rank your video higher simply because you have more likes subscribers, or comments, engagement from viewers help your video get discovered. If you get a like or comment from a YouTuber with a lot of subscribers, your video may be visible to those who are following that YouTuber for a while.
The best way to get engagement from your audience is to encourage them to like and subscribe or ask them a question or start a dialogue.
For example, in this scrambled egg video you are making, at the end you can ask, “So what do you think, is this better than Gordon Ramsay?”

Who knows, who will respond.
Step 9: Design a Thumbnail
You could have made a brilliant video, but if you have a poor quality thumbnail that is unattractive, then the overall performance of your video will suffer — and good SEO can only do so much after that.
Your viewers will absolutely judge your video by its cover so it’s important to put some thought into it and not solely rely on the three random thumbnail choices that YouTube picks for you.

Take a look at your competition. If they all look the same, do something different. Add text or a human face (preferably yours) to evoke emotion, as viewers are more likely to click into a video if they see an expressive image.
Don’t want to pay money for a photo editing software such as Photoshop?
You can use an online service called Canva or download GIMP , an open-source photo editor much like Photoshop, but far less powerful. These will help you get the job done as you are starting out.
Want to know more thumbnail maker? Check our picks of the best free YouTube thumbnail makers .
Part 3: Publishing With Attention to Optimization
Well done finishing the video! You are almost there… but not there yet.

Come on, keep going!
Step 10: Fill Out Your Videos Assets
The video is done, the thumbnail is designed, and you have all your title, description, and tags ready to go. This step is easy, upload the video, and fill out the assets, and give yourself a pat on the back.
Step 11: Add Transcripts
In addition to making your content accessible for people who don’t want to or can’t listen to the audio in your video, adding subtitles and closed captions will help YouTube understand the spoken content in your video.
While YouTube does have an automatic subtitle generator, it’s not reliable enough to be used for identifying the keywords you use in your video.
You can choose to write out the whole transcript of your video yourself, but if you are press on time, which of course you are, you can simply go and edit the automatic transcript already available in your video. By the way, you can also use some automatic transcription software.
Step 12: Add Video to Playlist
Finally the last thing you need to do for your video is to add it to a playlist. Even though it might be the first video in the playlist, it helps YouTube identify your video if you organize it in a playlist. As you accumulate more content, having videos in playlists makes content easier to find and keeps relevant videos together.
When viewers searches, having your videos in playlists increases the chance of it being discovered.
So if your first video is about scrambled eggs, maybe you next video can be about the awesome butter toasts.
I guess, you are on your way to making a pretty badass breakfast playlist. I personally can’t wait to see it!
If you treat SEO as an afterthought, only after your video is created, you are not using it to its full potential. If you follow these 12 steps during the course of your production, you will find that SEO doesn’t simply help your video perform at the end, but contributes in all the other phases of creating your video as well.
Besides considering YouTube SEO, you should make a good YouTube video as well. Filmora is a powerful video editing software that features lots of templates and effects. Get the free trial version below and have a try today.


Do you have any questions about SEO? Please leave us a comment below.
Shanoon Cox
Shanoon Cox is a writer and a lover of all things video.
Follow @Shanoon Cox
Shanoon Cox
Oct 26, 2023• Proven solutions
The joy of creating on YouTube is often dampened by the disappointment of underperforming videos. You have published your content and it’s not getting the views you had hoped.
Well, let’s change that!
In this guide, I’m going to walk you through YouTube SEO from the very start to the very end.
Nothing complicated. No paid programs or expensive apps needed. We are going back to basics and get your videos discovered.
Ready?
Let’s Go!
Part 1: Research Your Topic and Competitors
Come up with a video idea . Can’t come up with one? Let me help. I heard you can make a mean scrambled egg, why don’t you show the world how you do it?
Excellent! Let’s go with that idea.
Wait, don’t go making the video yet. First, we have to do some research. We need to know what videos already exist out there.
Step 1: Find Related Videos
Do a quick search on YouTube to see what videos already exist on your topic.
Uh oh… your video will be competing against celebrities like Gordon Ramsay and Jamie Oliver.
Okay, don’t panic! There is a fantastic quote, credited to bestselling author, Jon Acuff , that goes:
While researching your competition, you will feel overwhelmed, but remember, you are at the beginning, and Gordon Ramsay and Jamie Oliver are not even at their middle, they are way passed the finish line. You still have a long journey to go, so don’t get discouraged, get inspired!
Watch those videos and understand what they are all about.
Understand that people watch YouTube for 3 key reasons:
- To be entertained
- To learn something new
- To be inspired
A video that can hit all 3 marks is going to be positioned for success. Don’t fret too much about the competition, as long as your content is good, you will see improvement.
So if you think this scrambled egg idea can hit those 3 marks, then I encourage you to go to the next step. If you don’t, let’s regroup and brainstorm some more YouTube video ideas .
Step 2: Find Keywords
Now that we’ve decided that we are sticking with the video idea, we are ready to do some keyword research. Keywords are the words and phrases people type in the YouTube search bar to discover videos.
Come up with as many relevant keywords as you can. Start by entering a keyword into the YouTube search bar. This will tell you what are the most popular searches associated with that keyword:
Once you have an idea of what people are searching for related to your topic, you’ll want to find more relevant keywords. I like to use the free app, Ubersuggest to do that.
This app gives you a whole list of long-tail keywords, which are 3-4-word phrases which is specific to what your video is about.
Some you will use to dig deeper in and other you will deem irrelevant to your videos. A good way of determining the value of a keyword is by the stats the application shows.
How to Read Keyword Suggestions
Once you have a list of keywords, you will see some numbers on the right-hand side. Here is what each one is about:
- Search volume is the number used to identify the popularity of the keyword. The higher the number the more people are searching for it.
- CPC is the value accredited by YouTube, determining how much advertisers are paying to target audiences who search for that keyword and click on the link.
- Competition is the number used to qualify how many other content are using that keyword.
The two categories that matter most to us right now is Search Volume and Competition. We want keywords with high search volume and low competition rate.
In the example above, you can see that the keyword “avocado scrambled eggs” has a Search Volume of 1,000 and a competition rate of 0.0. This is a good keyword to target, if you can incorporate an avocado to your dish… which of course you can!
Step 3: Write Title
I know you might want to deal with the Title, Description, and Tags after you’ve filmed and edited your video. But if you want to apply a YouTube SEO-focused strategy, then these should be addressed before you even pick up a camera as it can greatly dictate the content you end up creating.
A good YouTube title sparks curiosity, evokes emotional reaction, and promises value to your viewers.
Of course you can title your video simply: Making Scrambled Eggs
But does it spark curiosity? Not really… most people can make scrambled eggs.
Does it evoke any emotion? Maybe hunger… but even then, not really…
Finally, does it promise value? Well, assuming that most people can at least crack an egg into a pan, then hardly.
Your scrambled egg is special! Your video is special! We need to evoke that in the title — and as long as you are not writing any clickbait and deliver on what the title suggest, you can do this.
So, how about this: Are My Amazing Scrambled Eggs Better Than Gordon Ramsay’s?
Hmmm… Well, is it? We know that the Gordon Ramsay’s video has almost 30M views. Many people have already tried cooking it, I’m sure. There is only one way to find out, by encouraging others to try it over Gordon’s.
You don’t need to go for a somewhat contentious title like this, but that’s the idea, you want something that gets people curious, make them feel a certain way, and in the end, make them better for having watched your video.
See how a good title can guide the rest of your video?
Step 4: Write Description
You aren’t going to be writing the description for the viewers necessarily, you are going to be writing it for YouTube’s algorithms. The better YouTube understands what your video is about, the better they can show it to people searching for it.
This means you need to include the keywords you were researching at the beginning of your description, as YouTube will be using them to identify the content of your video. 1 or 2 keywords that best represent your video is enough. Don’t stuff the title with too many keywords or you’ll risk sounding like a robot.
But also use the description for practical uses too, if you have additional information such as supportive links, outline of the video’s content, a list of materials, step-by-step guide, or a recipe that you think your human viewers will find useful, you should input that in the description as well.
Step 5: Write Tags
Thank goodness we did the keyword research in Step 2, because coming up with tags is not as easy as it looks.
Pull 15 keywords from the list and keep it somewhere safe.
Note: The keywords you used in the title should be found in your tags, and since they are the most important ones, you should place them first.
Organize your keywords in the tag as such:
Have the specific keywords at the top, followed by more general keywords, and then branded ones:
Specific: How to make scrambled eggs
General: Scrambled eggs
Branded: Gordon Ramsay scrambled eggs
Part 2: Make The Best Darn Video Possible
It doesn’t matter how relevant your keywords are or how epic your title is, if you video sucks (i.e. your viewers click in and leave right away), YouTube will not show it in search.
Even if you haven’t created any videos yet, you can follow these next steps to ensure you are following the best practices to structure your video.
Step 6: Plan and Film the Hook
The first few seconds is where the largest percentage of your earned viewership will drop off. Odds are 20% of your viewers won’t even get past the first 10 seconds .
What you need is a hook, an intro that ensures this video is what they want to watch and let’s them know what they can expect.
Step 7: Film B-Roll
One static camera shot of you talking or cooking or giving a tutorial can cause your viewers to lose attention.
In order to keep your viewers interest, you will need b-roll, or supplemental footage you can cut to give you video more life.
While jump cuts (cuts made on a sequential clip of the same subject or in the same camera position) are fine, having additional footage to cut to will make your video feel more fluid.
So when you are filming your scrambled egg video, make sure you get some footage of you cracking the egg, scrambling it, and serving it on the plate.
Step 8: Encourage Viewers to Engage in Video
Liking, disliking, subscribing, and commenting on your video will all help your performance indirectly.
While YouTube wouldn’t rank your video higher simply because you have more likes subscribers, or comments, engagement from viewers help your video get discovered. If you get a like or comment from a YouTuber with a lot of subscribers, your video may be visible to those who are following that YouTuber for a while.
The best way to get engagement from your audience is to encourage them to like and subscribe or ask them a question or start a dialogue.
For example, in this scrambled egg video you are making, at the end you can ask, “So what do you think, is this better than Gordon Ramsay?”
Who knows, who will respond.
Step 9: Design a Thumbnail
You could have made a brilliant video, but if you have a poor quality thumbnail that is unattractive, then the overall performance of your video will suffer — and good SEO can only do so much after that.
Your viewers will absolutely judge your video by its cover so it’s important to put some thought into it and not solely rely on the three random thumbnail choices that YouTube picks for you.
Take a look at your competition. If they all look the same, do something different. Add text or a human face (preferably yours) to evoke emotion, as viewers are more likely to click into a video if they see an expressive image.
Don’t want to pay money for a photo editing software such as Photoshop?
You can use an online service called Canva or download GIMP , an open-source photo editor much like Photoshop, but far less powerful. These will help you get the job done as you are starting out.
Want to know more thumbnail maker? Check our picks of the best free YouTube thumbnail makers .
Part 3: Publishing With Attention to Optimization
Well done finishing the video! You are almost there… but not there yet.
Come on, keep going!
Step 10: Fill Out Your Videos Assets
The video is done, the thumbnail is designed, and you have all your title, description, and tags ready to go. This step is easy, upload the video, and fill out the assets, and give yourself a pat on the back.
Step 11: Add Transcripts
In addition to making your content accessible for people who don’t want to or can’t listen to the audio in your video, adding subtitles and closed captions will help YouTube understand the spoken content in your video.
While YouTube does have an automatic subtitle generator, it’s not reliable enough to be used for identifying the keywords you use in your video.
You can choose to write out the whole transcript of your video yourself, but if you are press on time, which of course you are, you can simply go and edit the automatic transcript already available in your video. By the way, you can also use some automatic transcription software.
Step 12: Add Video to Playlist
Finally the last thing you need to do for your video is to add it to a playlist. Even though it might be the first video in the playlist, it helps YouTube identify your video if you organize it in a playlist. As you accumulate more content, having videos in playlists makes content easier to find and keeps relevant videos together.
When viewers searches, having your videos in playlists increases the chance of it being discovered.
So if your first video is about scrambled eggs, maybe you next video can be about the awesome butter toasts.
I guess, you are on your way to making a pretty badass breakfast playlist. I personally can’t wait to see it!
If you treat SEO as an afterthought, only after your video is created, you are not using it to its full potential. If you follow these 12 steps during the course of your production, you will find that SEO doesn’t simply help your video perform at the end, but contributes in all the other phases of creating your video as well.
Besides considering YouTube SEO, you should make a good YouTube video as well. Filmora is a powerful video editing software that features lots of templates and effects. Get the free trial version below and have a try today.
Do you have any questions about SEO? Please leave us a comment below.
Shanoon Cox
Shanoon Cox is a writer and a lover of all things video.
Follow @Shanoon Cox
- Title: "Master Your First Impressions Best Free Intro Makers for 2024"
- Author: Thomas
- Created at : 2024-05-31 12:48:59
- Updated at : 2024-06-01 12:48:59
- Link: https://youtube-help.techidaily.com/master-your-first-impressions-best-free-intro-makers-for-2024/
- License: This work is licensed under CC BY-NC-SA 4.0.
