
![[New] Fashion Your YT Snapshits with Illuminated Borders](https://www.lifewire.com/thmb/7wWwLeV8KAaB-XqPIbKe8lIgaY4=/400x300/filters:no_upscale():max_bytes(150000):strip_icc():format(webp)/reddit-app-for-andoird-652f6fcd646245e9807afbac25a072ee.jpg)
[New] Fashion Your YT Snapshits with Illuminated Borders
Fashion Your YT Snapshits with Illuminated Borders
Your YouTube video, or any other clip published on any forum, gets a larger number of hits if it has an attractive thumbnail. And, the fact is, a thumbnail becomes 10x more attractive when the main character that the image has have a neon border around it.
With that said, in the following sections, you will learn a couple of methods on how to add a YouTube thumbnail border around the main characters and/or objects that are significant to the clip.
In this article
01 Add Glowing Neon Border to YouTube Thumbnail with Filmora
02 Add a Glowing Neon Border in YouTube Thumbnail with Canva
03 Outline a Person in a YouTube Thumbnail with Photoshop
Part 1: How to Add Neon Border to YouTube Thumbnail for Free with Filmora
Being one of the most versatile and intuitive post-production tools available in the market today, Wondershare Filmora X allows you to add a neon border to a YouTube thumbnail quite conveniently. You can learn how to get this done on Windows or Mac by following the steps given below.
For Win 7 or later (64-bit)
For macOS 10.12 or later
Step 1: Define Project Settings and Add Image to the Timeline
Launch Wondershare Filmora X on your PC (a MacBook Pro M1 is used here), ensure that the project aspect ratio is set to 16:9 (Widescreen) on the splash screen, and click New Project. On the main interface, click the Preview quality and display settings icon from the upper-right area of the Timeline, click Change Project Aspect Ratio, click to select 1280 x 720 (HD) from the Resolution menu of the Project Settings box, and click OK to save the custom project settings.

Then select My Media from the menu bar if not already selected, click Project Media from the navigation pane, and click Import from the Media box to select and import the image of the main character or object that you want to use in the thumbnail.

Now, drag the image from the Media box to the Timeline at the bottom.

Step 2: Clear Image Background, Add Border, and Add Custom Background
Go to Effects from the menu bar, click to select the Default tab and then AI Portrait from the navigation pane, and click and drag the Human Segmentation preset from the right box, and place it over the image track in the Timeline.

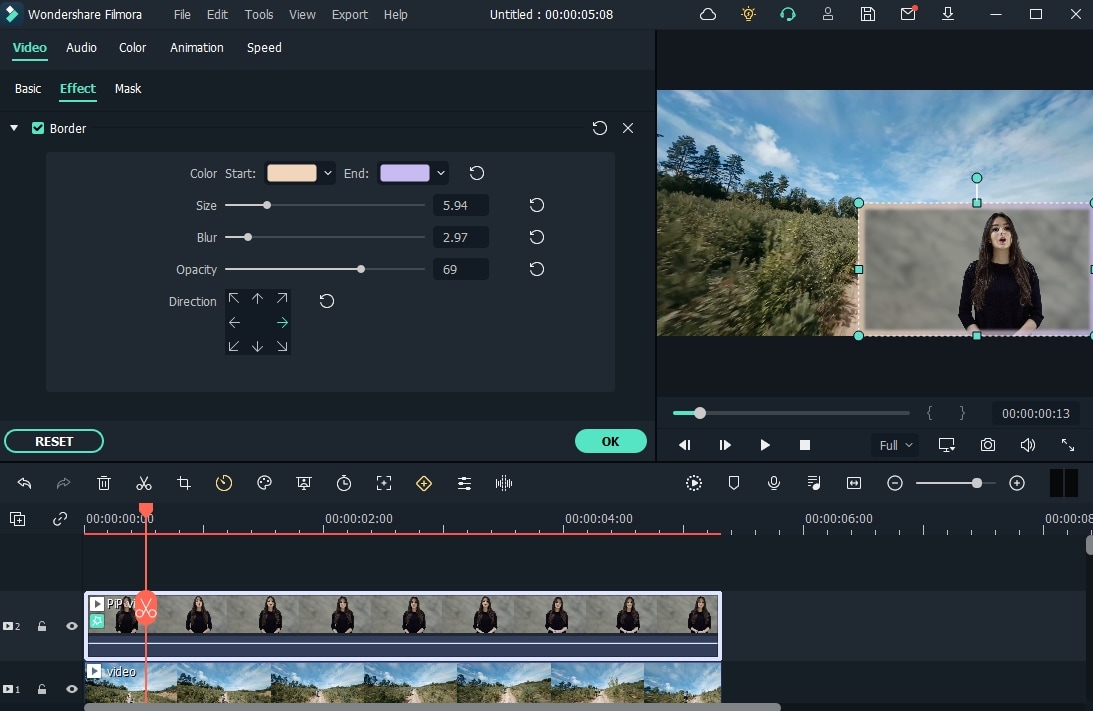
Double-click the image layer, scroll down the upper-left box to the Video Effects section, and use the Edge Thickness and Edge Feather sliders to adjust the character’s edges to make them as realistic as possible. Click OK when done.

Next, click and drag the Human Border preset over the image track in the Timeline, and follow the same procedure to customize the border. This will give the character a neon border effect.

Now, use the method explained earlier to import a custom image for the background, and drag and place it under the previous track in the Timeline.

If you are running the latest version of Filmora, you will find there are some neon light effects available under AI Portrait as well.

Step 3: Add Titles to Thumbnail
Go to Titles from the menu bar, click to select the Default tab and then Lower 3rds from the navigation pane, and click and drag your preferred lower-third preset from the right window to a separate layer in the Timeline. Double-click the lower-third layer, and use the available options in the upper-left window to change the text, its color, etc., and drag the textbox to place it to your preferred position on the image as well. Click OK to save the changes.
Next, click to select Titles from the navigation pane, and drag your preferred title from the right window to the upper-most track in the Timeline. Now use the method explained earlier to edit the text, its color, position, etc. to make it look professional.

For more tips and tricks for creating YouTube thumbnail, you can check this You Tube thumbnail creating guide.
Step 4: Get the Neon Border Thumbnail
Click the Snapshot (Camera) icon from the upper-right area of the Timeline, go to My Media from the menu bar, right-click the thumbnail of the screenshot you captured, and click Reveal in Finder (on Mac) or Reveal in Explorer (on Windows) to get to the folder the YouTube thumbnail border is saved in.

Part 2: How to Add a Glowing Neon Border in Your YouTube Thumbnail with Canva
Canva is another intuitive editing program that works on the web interface rather than having you download and install an app on your PC. You can add a neon border for YouTube thumbnails using Canva by following the instructions given below:
Step 1: Define Project Settings and Add a Background
After signing in to your Canva account, click Create a design from the top-right corner of the page, click Custom size from the bottom, define 1280 and 720 in the Width and Height fields on the box that appears respectively, and click Create new design.

Now, click to select Background from the navigation bar on the left (if the Background tool is not visible, click More and then choose Background from the expanded list), and click to select a background from the images available in the center pane.

Step 2: Upload an Image and Add Effects
Click Uploads from the navigation bar, click the More icon from the right of the Upload media button present at the top of the center pane, choose your preferred method to upload the image (with the transparent background) that you want to use, upload the image, and drag it from the center pane to the Canvas.
Note: You can use any of the tools available online to remove the background from your image for free.

To add a YouTube thumbnail border, make sure that the image that you added to the Canvas is selected, click the Duplicate icon from the upper-right area, and use the scaling handles of the copy of the image to increase its size a bit. Reposition the image back to its original location as well.
Then, click Edit image from the upper-left corner of the Canvas, click Duotone from the Edit image pane at the center, if need be, click See all, choose your preferred duotone effect to apply on the image, choose your preferred highlight and shadow colors from the box that appears next, and click Back from the top of the pane.

Next, click See all next to the Adjust section from the center pane, and drag the Blur slider to the right to increase the blur effect on the image.

Step 3: Position the Layers
While keeping the duplicate image selected, click the Position button from the upper-right area of the Canvas, and click Background to send the second image behind the first one to get the neon border effect for the photo.

Part 3: How to Outline a Person in a YouTube Thumbnail with Photoshop
Because YouTube thumbnails are nothing but static images, creating YouTube thumbnail border with Adobe Photoshop is comparatively easier. The process of doing this is given below:
Step 1: Define Document Preferences and Import an Image
Launch Adobe Photoshop on your PC, click Create new, and on the New Document customization box, define the width and height values to 1280 and 720 pixels respectively. Select Transparent from the Background Contents menu as well if not already selected. Click Create from the bottom to create a new Photoshop document with the specified document settings. Next, open the folder that contains the source image, drag the photo to Photoshop, and press Enter to place the photo.

Step 2: Remove Background from the Image
Make sure that the image layer is selected in the Layers panel on the right, go to Select from the menu bar at the top, and click Subject. From the bottom of the Layers panel, click the Add a mask icon to get rid of the background, leaving only the human on the Canvas.

Step 3: Add a Custom Background and an Outline Around the Subject
Use the method explained earlier to import a background image of your choice to Photoshop. Drag the background image layer to the bottom in the Layers panel. Double-click the masked layer, click to select Stroke from the left pane of the Layer Style box, and use the options available on the right to manage the size, color, position, etc. of the stroke that has been added around the human subject. Click OK when done, and then export the image normally to use it as a YouTube thumbnail border.

Summary
It is important to know that the default resolution of a YouTube thumbnail is 1280 x 720 pixels that is usually written and referred to as 720p. While adding a YouTube thumbnail border, it is also imperative to have a good sense of color combination and fonts. Furthermore, a decent tool like Wondershare Filmora X must be used to add an appealing neon border around the main subject in the thumbnail image easily and quickly.
02 Add a Glowing Neon Border in YouTube Thumbnail with Canva
03 Outline a Person in a YouTube Thumbnail with Photoshop
Part 1: How to Add Neon Border to YouTube Thumbnail for Free with Filmora
Being one of the most versatile and intuitive post-production tools available in the market today, Wondershare Filmora X allows you to add a neon border to a YouTube thumbnail quite conveniently. You can learn how to get this done on Windows or Mac by following the steps given below.
For Win 7 or later (64-bit)
For macOS 10.12 or later
Step 1: Define Project Settings and Add Image to the Timeline
Launch Wondershare Filmora X on your PC (a MacBook Pro M1 is used here), ensure that the project aspect ratio is set to 16:9 (Widescreen) on the splash screen, and click New Project. On the main interface, click the Preview quality and display settings icon from the upper-right area of the Timeline, click Change Project Aspect Ratio, click to select 1280 x 720 (HD) from the Resolution menu of the Project Settings box, and click OK to save the custom project settings.
Then select My Media from the menu bar if not already selected, click Project Media from the navigation pane, and click Import from the Media box to select and import the image of the main character or object that you want to use in the thumbnail.
Now, drag the image from the Media box to the Timeline at the bottom.
Step 2: Clear Image Background, Add Border, and Add Custom Background
Go to Effects from the menu bar, click to select the Default tab and then AI Portrait from the navigation pane, and click and drag the Human Segmentation preset from the right box, and place it over the image track in the Timeline.
Double-click the image layer, scroll down the upper-left box to the Video Effects section, and use the Edge Thickness and Edge Feather sliders to adjust the character’s edges to make them as realistic as possible. Click OK when done.
Next, click and drag the Human Border preset over the image track in the Timeline, and follow the same procedure to customize the border. This will give the character a neon border effect.
Now, use the method explained earlier to import a custom image for the background, and drag and place it under the previous track in the Timeline.
If you are running the latest version of Filmora, you will find there are some neon light effects available under AI Portrait as well.
Step 3: Add Titles to Thumbnail
Go to Titles from the menu bar, click to select the Default tab and then Lower 3rds from the navigation pane, and click and drag your preferred lower-third preset from the right window to a separate layer in the Timeline. Double-click the lower-third layer, and use the available options in the upper-left window to change the text, its color, etc., and drag the textbox to place it to your preferred position on the image as well. Click OK to save the changes.
Next, click to select Titles from the navigation pane, and drag your preferred title from the right window to the upper-most track in the Timeline. Now use the method explained earlier to edit the text, its color, position, etc. to make it look professional.
For more tips and tricks for creating YouTube thumbnail, you can check this You Tube thumbnail creating guide.
Step 4: Get the Neon Border Thumbnail
Click the Snapshot (Camera) icon from the upper-right area of the Timeline, go to My Media from the menu bar, right-click the thumbnail of the screenshot you captured, and click Reveal in Finder (on Mac) or Reveal in Explorer (on Windows) to get to the folder the YouTube thumbnail border is saved in.
Part 2: How to Add a Glowing Neon Border in Your YouTube Thumbnail with Canva
Canva is another intuitive editing program that works on the web interface rather than having you download and install an app on your PC. You can add a neon border for YouTube thumbnails using Canva by following the instructions given below:
Step 1: Define Project Settings and Add a Background
After signing in to your Canva account, click Create a design from the top-right corner of the page, click Custom size from the bottom, define 1280 and 720 in the Width and Height fields on the box that appears respectively, and click Create new design.
Now, click to select Background from the navigation bar on the left (if the Background tool is not visible, click More and then choose Background from the expanded list), and click to select a background from the images available in the center pane.
Step 2: Upload an Image and Add Effects
Click Uploads from the navigation bar, click the More icon from the right of the Upload media button present at the top of the center pane, choose your preferred method to upload the image (with the transparent background) that you want to use, upload the image, and drag it from the center pane to the Canvas.
Note: You can use any of the tools available online to remove the background from your image for free.
To add a YouTube thumbnail border, make sure that the image that you added to the Canvas is selected, click the Duplicate icon from the upper-right area, and use the scaling handles of the copy of the image to increase its size a bit. Reposition the image back to its original location as well.
Then, click Edit image from the upper-left corner of the Canvas, click Duotone from the Edit image pane at the center, if need be, click See all, choose your preferred duotone effect to apply on the image, choose your preferred highlight and shadow colors from the box that appears next, and click Back from the top of the pane.
Next, click See all next to the Adjust section from the center pane, and drag the Blur slider to the right to increase the blur effect on the image.
Step 3: Position the Layers
While keeping the duplicate image selected, click the Position button from the upper-right area of the Canvas, and click Background to send the second image behind the first one to get the neon border effect for the photo.
Part 3: How to Outline a Person in a YouTube Thumbnail with Photoshop
Because YouTube thumbnails are nothing but static images, creating YouTube thumbnail border with Adobe Photoshop is comparatively easier. The process of doing this is given below:
Step 1: Define Document Preferences and Import an Image
Launch Adobe Photoshop on your PC, click Create new, and on the New Document customization box, define the width and height values to 1280 and 720 pixels respectively. Select Transparent from the Background Contents menu as well if not already selected. Click Create from the bottom to create a new Photoshop document with the specified document settings. Next, open the folder that contains the source image, drag the photo to Photoshop, and press Enter to place the photo.
Step 2: Remove Background from the Image
Make sure that the image layer is selected in the Layers panel on the right, go to Select from the menu bar at the top, and click Subject. From the bottom of the Layers panel, click the Add a mask icon to get rid of the background, leaving only the human on the Canvas.
Step 3: Add a Custom Background and an Outline Around the Subject
Use the method explained earlier to import a background image of your choice to Photoshop. Drag the background image layer to the bottom in the Layers panel. Double-click the masked layer, click to select Stroke from the left pane of the Layer Style box, and use the options available on the right to manage the size, color, position, etc. of the stroke that has been added around the human subject. Click OK when done, and then export the image normally to use it as a YouTube thumbnail border.
Summary
It is important to know that the default resolution of a YouTube thumbnail is 1280 x 720 pixels that is usually written and referred to as 720p. While adding a YouTube thumbnail border, it is also imperative to have a good sense of color combination and fonts. Furthermore, a decent tool like Wondershare Filmora X must be used to add an appealing neon border around the main subject in the thumbnail image easily and quickly.
Strategic Steps for Professional-Level YouTube Promos
While there are a lot of ways you could advertise your business online, YouTube video ads are quickly becoming the most popular advertising solution. This is because more and more people choose to watch videos than any other form of video.
But to make sure that you are putting your best foot forward when it comes to video ads, you need to invest in a YouTube ad creator that is easy to use and effective. Here, we will be looking at the best YouTube video creators that you can use.
Why Use YouTube Video Ads
Before we look at some of the tools you can use to create YouTube video ads, it is important to mention some of the reasons why you may want to choose YouTube ads over other solutions. YouTube ads when compared to PPC are relatively cheaper and you also choose how much you are willing to pay when a user clicks on the ads. This makes it unlikely that you could spend more than you intended to.
YouTube ads are also more targeted than any other form of advertising. You have a lot of options when choosing who you want to target including metrics such as demographics, topics, similar audiences, customer matches, life events, and more.
Since the ad is a video, it generates far more engagement than a text ad on any other platform. Even though it is an ad, the video is still a great way for your brand to connect with potential audiences.
Types of Video Ads for YouTube
The following are the different types of YouTube ads that you can create;
**Video Discovery
Video discover ads appear on the search page results and are usually composed of a thumbnail image and a few lines of text. They also have a very recognizable “Ad” in the box to let all users know that this is sponsored content.
**In-Stream Ads
In-stream video ads can be skippable or non-skippable. Skippable in-stream video ads will often play for a minimum of 5 seconds before allowing the user to skip to the video content. Non-skippable in-stream video ads do not have the “skip” button and the user has to watch the video to the end.
**Pre-roll Ads
A pre-roll ad is just an in-stream ad that is not skippable. It doesn’t give the user the option of skipping the app and they have to watch the entire ad before they can watch the video. The pre-roll video ad is usually 15 to 60 seconds long.
**Bumper Ads
Bumper ads are tiny non-skippable 6-second ads that will play right before the video content loads. They can be an ideal way to promote an event or a new brand. Since they are only 6 seconds long, they can be very easy to make.
Best YouTube Ad Creators
The following are the best YouTube ad creators that you can use to make your YouTube video ad;
Filmora
Best For: All Types of YouTube Video ads
Price: Free Trial Available with plans starting from $54.99 a year.
Rating: 4.8/5
Wondershare Filmora is one of the best video creation software in the market and therefore can be very useful when creating YouTube video ads of any kind. It has powerful features that can benefit both beginner and professional users, allowing users to create stunning videos of any length.
For Win 7 or later (64-bit)
For macOS 10.12 or later
It comes with a library of more than 300 templates, filters, overlays, and numerous other effects that you can use to create your video. You can even add audio and music to the video to make your ad stand out more.
Animoto
Best For: All Types of YouTube Video Ads
Price: A free plan is available with paid plans starting from $15 a month
User Rating: 4.3/5

Animoto is another great solution that you can use to create YouTube ads of all kinds and publish them directly on the video-sharing platform. It has a very simple drag-and-drop operation that can allow you to create your YouTube video ad in just a few minutes.
It offers you a lot of resources that you can use to create the video including a huge library of up to one million photos and video clips as well as licensed audio tracks that you can use freely. This is on top of the numerous effects that you can use to make your video ad stand out more.
Promo.com
Best For: All Types of YouTube Video Ads
Price: Free plan is available with paid plans starting at $39 a month
User Rating: 4.4/5

Promo.com is another great solution that you can use to create YouTube video ads to give your brand the upper hand. It simplifies the video creation process by providing you with pre-made templates that you can add elements to create the video. You also get a library of music, photos, and video clips that you can choose to add to the video.
It also allows you to publish the video directly on social media apps. Since it doesn’t limit the size of the video that you can create, it is also an ideal solution for creating other types of videos.
Biteable
Best For: All Types of YouTube Ads
Price: Free Plan is available with paid plans starting at $19 a month
User Rating: 4.3/5

Biteable is also a great choice when you want to create YouTube ad videos. It is a professional solution that gives you a lot of options when it comes to video creation with a rich resource of over 1.8 million photos, clips, and pre-made animations to choose from.
The videos that you create with Biteable are of very high resolution and you have unlimited exports so you can use the same video over and over again. It also doesn’t limit the size or length of the video that you can create making it an ideal solution to create all types of videos.
InVideo
Best For: All Types of YouTube Ads
Price: Free plan is available with paid plans from $10 a month
User Rating: 4.7/5

This is an online solution that is very easy to use and that creates stunning videos. The interface allows you to upload your images, video clips, and audio and then use one of the many templates to create the video. The templates are also customizable, giving you additional options to customize your video in many ways.
InVideo allows you to upload the video that you create directly to social media platforms. It also has a very large library of resources that you can use to create the video including more than 3000 professionally made templates and more than a million premium photos and videos to choose from.
Adobe Spark
Best For: All Types of YouTube Ad Videos
Price: Free Plan available with paid plans starting at $9.99 a month
User Rating: 4.5/5

If you are looking for a solution that will allow you to make unique and very high-quality video ads, then Adobe Spark is a great choice. It has a ton of resources that you can use to make your video ad stand out including multiple themes, layouts, storyboards, and unique fonts.
You also have access to thousands of free images to spice up your creation and exclusive templates that you will not find anywhere else. But like most Adobe software, it can be hard to get started with Adobe Spark, especially for beginner users.
Animaker
Best For: All Types of YouTube Ad videos
Price: It doesn’t offer a free plan. Paid plans start at $10 per month.
User Rating: 4.6/5

Animaker is a professional video editing tool that can create very high-quality and unique videos. It is also one of the only tools that you can use to add subtitles to a video. You get to choose from a lot of professionally made templates and choose from a large library of images and videos to add to your project.
It also allows you to add audio to the video in the form of voiceover or music. You can also use the live editing feature to make changes to a video that is already uploaded to YouTube.
Powtoon
Best For: Animated YouTube Ads
Price: It doesn’t offer a free plan. Paid plans start at $20 a month
User Rating: 4/5

Powtoon is a great solution when the YouTube ad video that you want to create is an animated video. It has numerous features designed to help you create the most interactive animated videos. You have a lot of resources to choose from including various animation styles, whiteboards, and infographics.
It also has a very large library of templates, videos, images, and audio to choose from. But Powtoon doesn’t offer a free plan and hence there is no way for you to test its function before purchasing it.
Magisto
Best For: All Types of YouTube Ads
Price: It doesn’t offer a free plan. Paid plans start at $34.99 a month
User Rating: 4.4/5

Magisto is an online video editing tool that you can use to create video ads very quickly. It is completely deployed on the cloud which means that you don’t have to download any software on your computer. The user interface is very easy to use, allowing users to create professional-quality videos in a matter of minutes.
If you are using it to create longer videos, you can edit the scenes of the video individually and add as many effects as are relevant to your project. It can also be used to create and edit videos on Android and iOS devices.
Creatopy
Best For: All Types of YouTube Ads
Price: A free plan is available. Paid plans start at $17 a month
User Rating: 4.3/5

Creatopy is a simple to use and highly effective video editor that can come in handy when creating YouTube video ads. It offers you the chance to create videos of any size, making it an ideal choice not just for video ads but all types of video ads.
You can upload your images and audio files to add to the video project, or you can choose from the built-in library. Then you can use one or more of the many effects to add the finishing touch.
Tips for Creating YouTube Ads
The following are just some tips to help you create effective and profitable YouTube Video ads;
- Choose the type of ad you would like to create wisely. Learn the different types of YouTube ads and select one based on your brand, advertising budget, and projected reach.
- Use the YouTube targeting options to give your ads the best chance at success. Ensure that you are choosing the right targets to avoid spending money on targets that will not engage with your ad.
- You may also want to use your videos in a remarketing campaign. Remarketing targets the same audience that you targeted before, increasing your chances of getting more engagement.
- When creating the ad, ensure that the content in the ad is compelling and feels natural. Even though the audience will be watching sponsored content it should feel just like any other video.
- You can also drive more engagement by adding interactive elements to the video. These can be calls-to-action, auto-end screens, and cards to showcase your products.
Related FAQs About YouTube Ads
**How do you create a YouTube Ad?
You can easily create a YouTube ad using one of the video editing tools that we have outlined above. Choose the type of YouTube video ad you want to create as it will inform the length of the video you will create.
**Is it Free to Make YouTube Ads?
It can be free. If you choose to use a free video editor, you can create a YouTube ad for free. But you should know that you will still have to pay for YouTube to serve the ad.
**What is a YouTube Ad Specialist?
A YouTube Ads Specialist is a professional who is responsible for creating a YouTube ads strategy and implementing the strategy by creating the YouTube video ads.
**Can I Put My Ads on YouTube?
Yes. YouTube allows you to run your ads and even choose the placement of the ads and target the audiences you want YouTube to serve the ads to.
YouTube video ads can be a great way to reach as many people as you can with your products and services. Now you have several options that you can use to create the ads.
For macOS 10.12 or later
It comes with a library of more than 300 templates, filters, overlays, and numerous other effects that you can use to create your video. You can even add audio and music to the video to make your ad stand out more.
Animoto
Best For: All Types of YouTube Video Ads
Price: A free plan is available with paid plans starting from $15 a month
User Rating: 4.3/5
Animoto is another great solution that you can use to create YouTube ads of all kinds and publish them directly on the video-sharing platform. It has a very simple drag-and-drop operation that can allow you to create your YouTube video ad in just a few minutes.
It offers you a lot of resources that you can use to create the video including a huge library of up to one million photos and video clips as well as licensed audio tracks that you can use freely. This is on top of the numerous effects that you can use to make your video ad stand out more.
Promo.com
Best For: All Types of YouTube Video Ads
Price: Free plan is available with paid plans starting at $39 a month
User Rating: 4.4/5
Promo.com is another great solution that you can use to create YouTube video ads to give your brand the upper hand. It simplifies the video creation process by providing you with pre-made templates that you can add elements to create the video. You also get a library of music, photos, and video clips that you can choose to add to the video.
It also allows you to publish the video directly on social media apps. Since it doesn’t limit the size of the video that you can create, it is also an ideal solution for creating other types of videos.
Biteable
Best For: All Types of YouTube Ads
Price: Free Plan is available with paid plans starting at $19 a month
User Rating: 4.3/5
Biteable is also a great choice when you want to create YouTube ad videos. It is a professional solution that gives you a lot of options when it comes to video creation with a rich resource of over 1.8 million photos, clips, and pre-made animations to choose from.
The videos that you create with Biteable are of very high resolution and you have unlimited exports so you can use the same video over and over again. It also doesn’t limit the size or length of the video that you can create making it an ideal solution to create all types of videos.
InVideo
Best For: All Types of YouTube Ads
Price: Free plan is available with paid plans from $10 a month
User Rating: 4.7/5
This is an online solution that is very easy to use and that creates stunning videos. The interface allows you to upload your images, video clips, and audio and then use one of the many templates to create the video. The templates are also customizable, giving you additional options to customize your video in many ways.
InVideo allows you to upload the video that you create directly to social media platforms. It also has a very large library of resources that you can use to create the video including more than 3000 professionally made templates and more than a million premium photos and videos to choose from.
Adobe Spark
Best For: All Types of YouTube Ad Videos
Price: Free Plan available with paid plans starting at $9.99 a month
User Rating: 4.5/5
If you are looking for a solution that will allow you to make unique and very high-quality video ads, then Adobe Spark is a great choice. It has a ton of resources that you can use to make your video ad stand out including multiple themes, layouts, storyboards, and unique fonts.
You also have access to thousands of free images to spice up your creation and exclusive templates that you will not find anywhere else. But like most Adobe software, it can be hard to get started with Adobe Spark, especially for beginner users.
Animaker
Best For: All Types of YouTube Ad videos
Price: It doesn’t offer a free plan. Paid plans start at $10 per month.
User Rating: 4.6/5
Animaker is a professional video editing tool that can create very high-quality and unique videos. It is also one of the only tools that you can use to add subtitles to a video. You get to choose from a lot of professionally made templates and choose from a large library of images and videos to add to your project.
It also allows you to add audio to the video in the form of voiceover or music. You can also use the live editing feature to make changes to a video that is already uploaded to YouTube.
Powtoon
Best For: Animated YouTube Ads
Price: It doesn’t offer a free plan. Paid plans start at $20 a month
User Rating: 4/5
Powtoon is a great solution when the YouTube ad video that you want to create is an animated video. It has numerous features designed to help you create the most interactive animated videos. You have a lot of resources to choose from including various animation styles, whiteboards, and infographics.
It also has a very large library of templates, videos, images, and audio to choose from. But Powtoon doesn’t offer a free plan and hence there is no way for you to test its function before purchasing it.
Magisto
Best For: All Types of YouTube Ads
Price: It doesn’t offer a free plan. Paid plans start at $34.99 a month
User Rating: 4.4/5
Magisto is an online video editing tool that you can use to create video ads very quickly. It is completely deployed on the cloud which means that you don’t have to download any software on your computer. The user interface is very easy to use, allowing users to create professional-quality videos in a matter of minutes.
If you are using it to create longer videos, you can edit the scenes of the video individually and add as many effects as are relevant to your project. It can also be used to create and edit videos on Android and iOS devices.
Creatopy
Best For: All Types of YouTube Ads
Price: A free plan is available. Paid plans start at $17 a month
User Rating: 4.3/5
Creatopy is a simple to use and highly effective video editor that can come in handy when creating YouTube video ads. It offers you the chance to create videos of any size, making it an ideal choice not just for video ads but all types of video ads.
You can upload your images and audio files to add to the video project, or you can choose from the built-in library. Then you can use one or more of the many effects to add the finishing touch.
Tips for Creating YouTube Ads
The following are just some tips to help you create effective and profitable YouTube Video ads;
- Choose the type of ad you would like to create wisely. Learn the different types of YouTube ads and select one based on your brand, advertising budget, and projected reach.
- Use the YouTube targeting options to give your ads the best chance at success. Ensure that you are choosing the right targets to avoid spending money on targets that will not engage with your ad.
- You may also want to use your videos in a remarketing campaign. Remarketing targets the same audience that you targeted before, increasing your chances of getting more engagement.
- When creating the ad, ensure that the content in the ad is compelling and feels natural. Even though the audience will be watching sponsored content it should feel just like any other video.
- You can also drive more engagement by adding interactive elements to the video. These can be calls-to-action, auto-end screens, and cards to showcase your products.
Related FAQs About YouTube Ads
**How do you create a YouTube Ad?
You can easily create a YouTube ad using one of the video editing tools that we have outlined above. Choose the type of YouTube video ad you want to create as it will inform the length of the video you will create.
**Is it Free to Make YouTube Ads?
It can be free. If you choose to use a free video editor, you can create a YouTube ad for free. But you should know that you will still have to pay for YouTube to serve the ad.
**What is a YouTube Ad Specialist?
A YouTube Ads Specialist is a professional who is responsible for creating a YouTube ads strategy and implementing the strategy by creating the YouTube video ads.
**Can I Put My Ads on YouTube?
Yes. YouTube allows you to run your ads and even choose the placement of the ads and target the audiences you want YouTube to serve the ads to.
YouTube video ads can be a great way to reach as many people as you can with your products and services. Now you have several options that you can use to create the ads.
- Title: [New] Fashion Your YT Snapshits with Illuminated Borders
- Author: Thomas
- Created at : 2024-05-31 12:47:14
- Updated at : 2024-06-01 12:47:14
- Link: https://youtube-help.techidaily.com/new-fashion-your-yt-snapshits-with-illuminated-borders/
- License: This work is licensed under CC BY-NC-SA 4.0.
