![[New] Flawless Soundscape Secrets to High-Resolution Audio Recording](https://thmb.techidaily.com/e6d973791325054ad0d7f0fcd99fd3ff0a56a44316e750df20403e0686bc2309.jpg)
"[New] Flawless Soundscape Secrets to High-Resolution Audio Recording"
Flawless Soundscape: Secrets to High-Resolution Audio Recording
10 Recording Tips for Recording Audio with High Quality

Richard Bennett
Oct 26, 2023• Proven solutions
Getting the best sound for your recording is not as simplistic as buying an expensive microphone. There are many different things you can do to record your audio more clearly. Here are 10 recording tips to record high-quality audio.
1. Silence everything you don’t want your microphone to record
2. Put your mobile phone in airplane mode
3. Minimize echo
4. Block wind from reaching your microphone
5. Upgrade your microphone
6. Adjust your levels
7. Start with a sound cue if you’re planning to do some syncing in post
8. Get close to the sound
9. ADR
10. Record Ambient Sound
Bonus Tip-Record Your Audio with Wondershare Filmora
Wondershare Filmora has great recording features that enable you to record screen , voiceover, and webcam. Just connect the recording device to your computer, and start the recording in Wondershare Filmora and you will get high-quality audio. And you can also easily pick a song from the royalty-free music library on Wondershare Filmora. These audio features on Filmora are rare and very simple to use, you only need to click a few times and your video will have a new sound and background song.


1. Silence everything you don’t want your microphone to record
When you’re recording audio, you have to be more aware of the subtle sounds that drone on in your background. These sounds may include humming from machines with fans, buzzing from lights, and jingling from your pet’s collar. Observe your recording space and find ways to silence everything that you don’t want in your audio recording.
2. Put your mobile phone in airplane mode
Although it may be quite obvious to turn your phone’s ring tone off when you’re recording, it may not be as obvious to put your phone in airplane mode. When phones receive calls or perform searches as part of their background processes, they emit signals that can get picked up by your recording system. Avoid ruining good takes with unwanted sounds of phone signals by putting your phones in airplane mode.
3. Minimize echo
If you are recording yourself talk or sing, make sure to set up your recording space in a way where the sound projected from your voice bounces minimally off the walls and back to your microphone. Bare walls and hardwood floors will cause a lot of bouncing. Make use of materials that will absorb your sound rather than bounce it, like a thick rug or a comforter. If you want your voice to echo, that’s something you should do in post-production.
4. Block wind from reaching your microphone
Although it might not sound so loud and distracting to the naked ear, wind sounds terribly loud through a microphone recording and can cause your audio to clip (distortion of waveform due to output of sound exceeding maximum capacity or 0 dB point). This includes the “wind” that comes out of your mouth when you pronounce words starting with the letter “p.” Use pop filters, windscreens, and deadcats to block wind from reaching your microphone.
5. Upgrade your microphone
As much as you try to control all the noise in your surroundings, your greatest recording limitation will come from the hardware that you use. Improve your recordings by plugging in an external microphone into your camera’s microphone jack or record audio completely separately with a professional microphone.
Need help with deciding on a microphone to buy? Check out our recommended list of microphones.
6. Adjust your levels
Before pressing the record button, see how loudly your microphone picks up the sound you wish to record. Adjust your levels (sensitivity of your microphone) until the sound sits in between -6 dBs and -12dBs. This range gives the source of your sound some room to get louder without the recorded audio getting clipped. When you first listen to audio recorded within this range, it may sound very quiet. No need to worry though because you can increase the volume later in editing.
7. Start with a sound cue if you’re planning to do some syncing in post
If you’re recording separate audio that you plan to sync to your video later in editing, start your recording with a short and loud sound cue like a clap or a high pitched “beep” tone. Later, when you’re editing, it’ll be much easier for you to find the section where your video and additional audio match.
8. Get close to the sound
Unless you’re aiming to record ambient sound, bring your microphone close to the source of sound you are wanting to record. The closer your microphone is to the source of sound, the lower your sensitivity setting can be on your microphone. As a result of lowering your levels, sounds you are not meaning to record will also sound fainter.
9. ADR
When you need to record a scene in a loud setting where you have very little control over the noise, record additional vocals later and replace the original vocals through a process called automated dialogue replacement.
10. Record Ambient Sound
Remember to record ambient sound or “room tone.” You can use these recordings to fill in the blanks if you run out of audio and also smooth out parts of your audio where you hear pops, clicks, and other unwanted noise.
Richard Bennett
Richard Bennett is a writer and a lover of all things video.
Follow @Richard Bennett
Richard Bennett
Oct 26, 2023• Proven solutions
Getting the best sound for your recording is not as simplistic as buying an expensive microphone. There are many different things you can do to record your audio more clearly. Here are 10 recording tips to record high-quality audio.
1. Silence everything you don’t want your microphone to record
2. Put your mobile phone in airplane mode
3. Minimize echo
4. Block wind from reaching your microphone
5. Upgrade your microphone
6. Adjust your levels
7. Start with a sound cue if you’re planning to do some syncing in post
8. Get close to the sound
9. ADR
10. Record Ambient Sound
Bonus Tip-Record Your Audio with Wondershare Filmora
Wondershare Filmora has great recording features that enable you to record screen , voiceover, and webcam. Just connect the recording device to your computer, and start the recording in Wondershare Filmora and you will get high-quality audio. And you can also easily pick a song from the royalty-free music library on Wondershare Filmora. These audio features on Filmora are rare and very simple to use, you only need to click a few times and your video will have a new sound and background song.
1. Silence everything you don’t want your microphone to record
When you’re recording audio, you have to be more aware of the subtle sounds that drone on in your background. These sounds may include humming from machines with fans, buzzing from lights, and jingling from your pet’s collar. Observe your recording space and find ways to silence everything that you don’t want in your audio recording.
2. Put your mobile phone in airplane mode
Although it may be quite obvious to turn your phone’s ring tone off when you’re recording, it may not be as obvious to put your phone in airplane mode. When phones receive calls or perform searches as part of their background processes, they emit signals that can get picked up by your recording system. Avoid ruining good takes with unwanted sounds of phone signals by putting your phones in airplane mode.
3. Minimize echo
If you are recording yourself talk or sing, make sure to set up your recording space in a way where the sound projected from your voice bounces minimally off the walls and back to your microphone. Bare walls and hardwood floors will cause a lot of bouncing. Make use of materials that will absorb your sound rather than bounce it, like a thick rug or a comforter. If you want your voice to echo, that’s something you should do in post-production.
4. Block wind from reaching your microphone
Although it might not sound so loud and distracting to the naked ear, wind sounds terribly loud through a microphone recording and can cause your audio to clip (distortion of waveform due to output of sound exceeding maximum capacity or 0 dB point). This includes the “wind” that comes out of your mouth when you pronounce words starting with the letter “p.” Use pop filters, windscreens, and deadcats to block wind from reaching your microphone.
5. Upgrade your microphone
As much as you try to control all the noise in your surroundings, your greatest recording limitation will come from the hardware that you use. Improve your recordings by plugging in an external microphone into your camera’s microphone jack or record audio completely separately with a professional microphone.
Need help with deciding on a microphone to buy? Check out our recommended list of microphones.
6. Adjust your levels
Before pressing the record button, see how loudly your microphone picks up the sound you wish to record. Adjust your levels (sensitivity of your microphone) until the sound sits in between -6 dBs and -12dBs. This range gives the source of your sound some room to get louder without the recorded audio getting clipped. When you first listen to audio recorded within this range, it may sound very quiet. No need to worry though because you can increase the volume later in editing.
7. Start with a sound cue if you’re planning to do some syncing in post
If you’re recording separate audio that you plan to sync to your video later in editing, start your recording with a short and loud sound cue like a clap or a high pitched “beep” tone. Later, when you’re editing, it’ll be much easier for you to find the section where your video and additional audio match.
8. Get close to the sound
Unless you’re aiming to record ambient sound, bring your microphone close to the source of sound you are wanting to record. The closer your microphone is to the source of sound, the lower your sensitivity setting can be on your microphone. As a result of lowering your levels, sounds you are not meaning to record will also sound fainter.
9. ADR
When you need to record a scene in a loud setting where you have very little control over the noise, record additional vocals later and replace the original vocals through a process called automated dialogue replacement.
10. Record Ambient Sound
Remember to record ambient sound or “room tone.” You can use these recordings to fill in the blanks if you run out of audio and also smooth out parts of your audio where you hear pops, clicks, and other unwanted noise.
Richard Bennett
Richard Bennett is a writer and a lover of all things video.
Follow @Richard Bennett
Charting YouTube’s Course for Video Short Growth with Funding
YouTube offers content creators a platform for creating a lucrative career. Of the major developments made in the recent past is the introduction of Shorts. These short vertical videos have grown in popularity as more people view videos on their phones. With this development, the YouTube Shorts fund was launched to reward creators for their efforts. The fund allows creators to monetize their Shorts quickly, supporting and incentivizing them to create high-quality Shorts content. In this article, we will explore the YouTube Shorts Fund 2023, including YouTube shorts fund eligibility.
YouTube Shorts Monetization A cross-platform for taking your overexposed footage to cinema-quality Shorts video!
Free Download Free Download Learn More

Part 1. YouTube Shorts Fund: Introduction and Benefits
YouTube launched YouTube Shorts Funds in 2021 to financially support creators who produce engaging and popular Shorts content. The monetization scheme would distribute $100 million to high-performing creators on the platform. The creators would receive high engagement and views from their Shorts for funding.

The main objective of the YouTube Shorts fund is to encourage creativity, diversity, and innovation in Shorts content creation. The fund operated between 2021 and 2022. It lets creators earn $100 - $10,000 a month for their content.
Participating in YouTube Shorts Funds offer several benefits to the creators:
- Additional Exposure: YouTube Shorts are predominately featured on the homepage, allowing creators to reach more people.
- Recognition: YouTube recognizes top Shorts creators through the Shorts Funding program, encouraging them to create more quality content.
- Potential Earnings: Creators can monetize their Shorts content in several ways including adding and other unique features.
YouTube incorporated monetization of Shorts in its YouTube Partner Program (YPP). Therefore, YouTube merged the Shorts Fund with the YPP in February 2023. This led to YouTube Shorts Fund 2023 which now offers creators more opportunities to make money quickly on YouTube.
Part 2. Making Money with YouTube Shorts: Eligibility and Earnings
The new YouTube Shorts monetization policy means that content creators on YouTube with access to the YPP can also earn from Shorts. The revenue-sharing model has now taken the place of the YouTube Shorts Fund, which only rewarded creators using YouTube’s money. However, creators don’t have to be members of the YPP to start receiving YouTube Shorts funding. They only need to meet certain requirements, make unique content, and adhere to Community Guidelines.
- YouTube Shorts Fund Eligibility
- Additional Steps of Actions to Activate YouTube Shorts Funding
- What the YPP Shorts Fund Entails
- How Much Can You Make with Short
YouTube Shorts Fund Eligibility
As of 2023, YouTube offers Shorts Funding as a monetization option. Creators can also choose to monetize with YPP combined with Shorts Fundings.
The eligibility requirements for Shorts funding include:
- At least 1,000 subscribers
- At least 10 million public Shorts views in the last 90 days
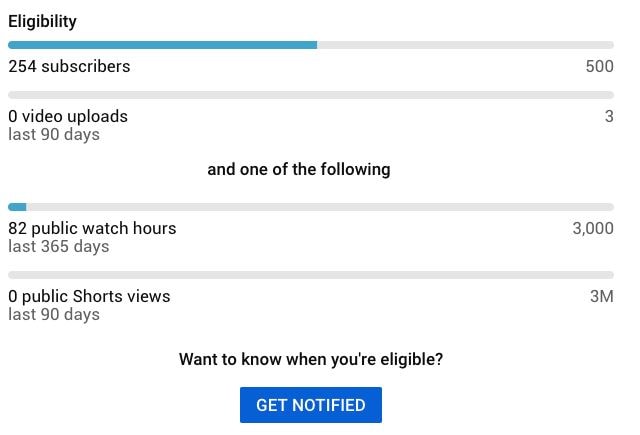
To become a member of the YPP and start accessing Shorts funding this way, the minimum requirements are as follows:
- At least 500 subscribers (You previously needed 1,000)
- At least 3,000 public watch hours over the last 13 months (You previously needed 4,000)
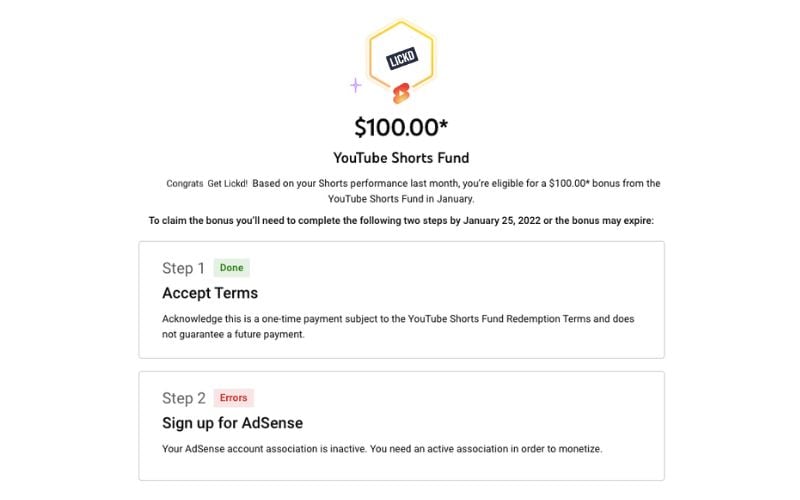
Additional Steps of Actions to Activate YouTube Shorts Funding
In addition to the basic eligibility requirements, creators are also required to take additional measures to comply with YouTube’s requirements. Additional steps include:
- Ensuring AdSense Account is active and in good standing: Since ad revenue will be paid through AdSense, you need to make sure your account is in good standing.
- Review and Accept the Terms of Shorts Monetization Module: In the YouTube Studio, head over to the Shorts Fund section and click on the Terms and Conditions link.
- Enable Monetization for Individual Shorts: Edit the monetization settings for each Short to start generating ad revenue.
- Comply with YouTube Policies and Guidelines: Visit the YouTube Creator Academy to learn more about the platform’s policies and guidelines.
What the YPP Shorts Fund Entails
The YPP Shorts Fund program includes the following features:
- Watch Page Monetization – Creators earn ad revenue from long-form content, YouTube Premium content, and live streams
- Shorts Monetization Module – Creators earn money from ads that play between YouTube Shorts.
- Commerce Product Addendum – Additional monetization features, including Super Chats. Channel Memberships, Super Thanks, and Super Stickers.
How Much Can You Make with Short s
The amount of money you can make on Shorts often varies. It can be hard to make decent money on Shorts sometimes, and other times it brings in a nice chunk of revenue. Unfortunately, the earnings are not as spectacular as the long YouTube videos. Most creators agree that the revenue per thousand views (RPM) for shorts is around $0.05 - $0.07. This would translate to about $50 - $70 for a million Shorts views. Although the ad revenue is relatively lower, you can generate more revenue with the shopping features. This will depend on how wee you keep your audience active and engaged.
Part 3. How to Use YouTube Shorts Funding: Application and Activation
The process of applying for and activating YouTube Short Funding is simple. You need to accept the Shorts Monetization Module in your terms and conditions. After activating, monetization starts immediately.
Head over to the YouTube Studio. Sign in to your account to accept the terms. Be sure to use a web browser because the YouTube app will not allow you to make these changes. Accept the terms and follow these steps to turn on the ads:
- Setp 1: Click the Content button at the bottom of the menu in the YouTube Studio
- Setp 2: Pick the video you want to monetize, and click Edit
- Setp 3: Select the Earn tab pick on, and choose the ads you want to turn on.
- Setp 4: Save your settings and the ads will be active.
Part 4. Editing YouTube Shorts for More Revenue with Wondershare Filmora
The best way to earn from the YouTube Shorts Fund is to create quality content. With good video editing software, you can achieve this and build a community of subscribers. Wondershare Filmora is a video editing software that is effective in creating quality Shorts videos. It supports various video resolutions, including vertical videos. It also has some fascinating features that make every creation unique and exciting. Take your overexposed footage to cinema-quality Shorts video that will keep your audience engaged.
Free Download For Win 7 or later(64-bit)
Free Download For macOS 10.14 or later
Filmora can help create visually appealing and engaging videos, ultimately increasing the chances of monetization on YouTube. The following features make editing videos on Filmora quick and easy.
1. Auto Reframe
You may have recorded horizontal videos and want to upload them as Shorts. The Auto Reframe feature allows you to automatically resize the video in seconds. You only need to choose the clip you want to resize and reframe it. No editing skills are required to do this.
2. Add Text to Video
Texts tell the audience what is happening in the video. It is also a great way to highlight major events in YouTube Shorts. The Add Text to Video feature on Filmora makes it easy to add text or captions to your videos.
3. Auto Synchronization
When editing Shorts, you will likely add many footage in a short video. It is common for the audio to end up being where it is not supposed to. The Auto Synchronization feature is the ultimate audio sync. It effortlessly matches your audio with the video, making sure viewers see what they hear
4. Mask & Blend
Creativity is a major component of YouTube Shorts content. The Filmora Masking and Blending mode helps you make creative video clips. It comes with a pen tool for creating free-form shapes on the go. Make your videos more impressive to your audience.
5. Auto Beat Sync
With YouTube Shorts, you need to entertain your audience in under a minute. A combination of visual and audio elements makes the video more entertaining. The Auto Beat Sync feature matches the footage with the music automatically. Be sure every beat corresponds to the scene.
Conclusion
The YouTube Shorts Fund offers an exceptional for creators to make additional income on the platform. Although the original Funds program has been updated with the latest monetization policy, creators can still generate nice revenue amount. As a creator, you need to publish quality and highly engaging content. With Wondershare Filmora, you can create content that will generate more revenue on the Shorts platform. The video editing software offers fantastic features that make video editing quick and fun.
Free Download Free Download Learn More
Part 1. YouTube Shorts Fund: Introduction and Benefits
YouTube launched YouTube Shorts Funds in 2021 to financially support creators who produce engaging and popular Shorts content. The monetization scheme would distribute $100 million to high-performing creators on the platform. The creators would receive high engagement and views from their Shorts for funding.
The main objective of the YouTube Shorts fund is to encourage creativity, diversity, and innovation in Shorts content creation. The fund operated between 2021 and 2022. It lets creators earn $100 - $10,000 a month for their content.
Participating in YouTube Shorts Funds offer several benefits to the creators:
- Additional Exposure: YouTube Shorts are predominately featured on the homepage, allowing creators to reach more people.
- Recognition: YouTube recognizes top Shorts creators through the Shorts Funding program, encouraging them to create more quality content.
- Potential Earnings: Creators can monetize their Shorts content in several ways including adding and other unique features.
YouTube incorporated monetization of Shorts in its YouTube Partner Program (YPP). Therefore, YouTube merged the Shorts Fund with the YPP in February 2023. This led to YouTube Shorts Fund 2023 which now offers creators more opportunities to make money quickly on YouTube.
Part 2. Making Money with YouTube Shorts: Eligibility and Earnings
The new YouTube Shorts monetization policy means that content creators on YouTube with access to the YPP can also earn from Shorts. The revenue-sharing model has now taken the place of the YouTube Shorts Fund, which only rewarded creators using YouTube’s money. However, creators don’t have to be members of the YPP to start receiving YouTube Shorts funding. They only need to meet certain requirements, make unique content, and adhere to Community Guidelines.
- YouTube Shorts Fund Eligibility
- Additional Steps of Actions to Activate YouTube Shorts Funding
- What the YPP Shorts Fund Entails
- How Much Can You Make with Short
YouTube Shorts Fund Eligibility
As of 2023, YouTube offers Shorts Funding as a monetization option. Creators can also choose to monetize with YPP combined with Shorts Fundings.
The eligibility requirements for Shorts funding include:
- At least 1,000 subscribers
- At least 10 million public Shorts views in the last 90 days
To become a member of the YPP and start accessing Shorts funding this way, the minimum requirements are as follows:
- At least 500 subscribers (You previously needed 1,000)
- At least 3,000 public watch hours over the last 13 months (You previously needed 4,000)
Additional Steps of Actions to Activate YouTube Shorts Funding
In addition to the basic eligibility requirements, creators are also required to take additional measures to comply with YouTube’s requirements. Additional steps include:
- Ensuring AdSense Account is active and in good standing: Since ad revenue will be paid through AdSense, you need to make sure your account is in good standing.
- Review and Accept the Terms of Shorts Monetization Module: In the YouTube Studio, head over to the Shorts Fund section and click on the Terms and Conditions link.
- Enable Monetization for Individual Shorts: Edit the monetization settings for each Short to start generating ad revenue.
- Comply with YouTube Policies and Guidelines: Visit the YouTube Creator Academy to learn more about the platform’s policies and guidelines.
What the YPP Shorts Fund Entails
The YPP Shorts Fund program includes the following features:
- Watch Page Monetization – Creators earn ad revenue from long-form content, YouTube Premium content, and live streams
- Shorts Monetization Module – Creators earn money from ads that play between YouTube Shorts.
- Commerce Product Addendum – Additional monetization features, including Super Chats. Channel Memberships, Super Thanks, and Super Stickers.
How Much Can You Make with Short s
The amount of money you can make on Shorts often varies. It can be hard to make decent money on Shorts sometimes, and other times it brings in a nice chunk of revenue. Unfortunately, the earnings are not as spectacular as the long YouTube videos. Most creators agree that the revenue per thousand views (RPM) for shorts is around $0.05 - $0.07. This would translate to about $50 - $70 for a million Shorts views. Although the ad revenue is relatively lower, you can generate more revenue with the shopping features. This will depend on how wee you keep your audience active and engaged.
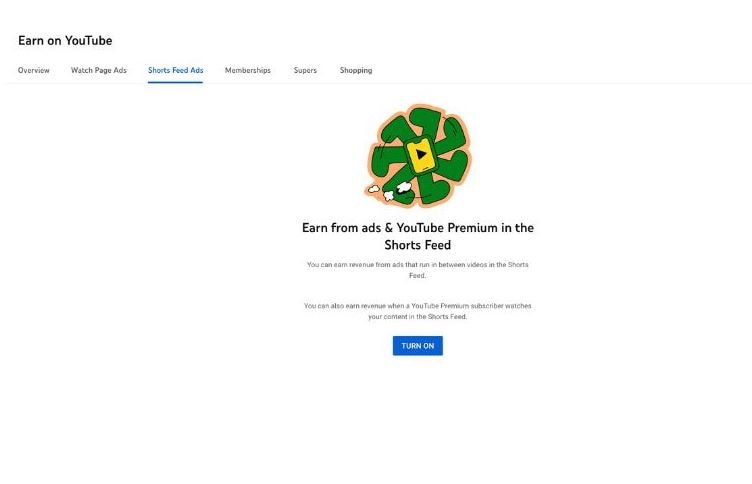
Part 3. How to Use YouTube Shorts Funding: Application and Activation
The process of applying for and activating YouTube Short Funding is simple. You need to accept the Shorts Monetization Module in your terms and conditions. After activating, monetization starts immediately.
Head over to the YouTube Studio. Sign in to your account to accept the terms. Be sure to use a web browser because the YouTube app will not allow you to make these changes. Accept the terms and follow these steps to turn on the ads:
- Setp 1: Click the Content button at the bottom of the menu in the YouTube Studio
- Setp 2: Pick the video you want to monetize, and click Edit
- Setp 3: Select the Earn tab pick on, and choose the ads you want to turn on.
- Setp 4: Save your settings and the ads will be active.
Part 4. Editing YouTube Shorts for More Revenue with Wondershare Filmora
The best way to earn from the YouTube Shorts Fund is to create quality content. With good video editing software, you can achieve this and build a community of subscribers. Wondershare Filmora is a video editing software that is effective in creating quality Shorts videos. It supports various video resolutions, including vertical videos. It also has some fascinating features that make every creation unique and exciting. Take your overexposed footage to cinema-quality Shorts video that will keep your audience engaged.
Free Download For Win 7 or later(64-bit)
Free Download For macOS 10.14 or later
Filmora can help create visually appealing and engaging videos, ultimately increasing the chances of monetization on YouTube. The following features make editing videos on Filmora quick and easy.
1. Auto Reframe
You may have recorded horizontal videos and want to upload them as Shorts. The Auto Reframe feature allows you to automatically resize the video in seconds. You only need to choose the clip you want to resize and reframe it. No editing skills are required to do this.
2. Add Text to Video
Texts tell the audience what is happening in the video. It is also a great way to highlight major events in YouTube Shorts. The Add Text to Video feature on Filmora makes it easy to add text or captions to your videos.
3. Auto Synchronization
When editing Shorts, you will likely add many footage in a short video. It is common for the audio to end up being where it is not supposed to. The Auto Synchronization feature is the ultimate audio sync. It effortlessly matches your audio with the video, making sure viewers see what they hear
4. Mask & Blend
Creativity is a major component of YouTube Shorts content. The Filmora Masking and Blending mode helps you make creative video clips. It comes with a pen tool for creating free-form shapes on the go. Make your videos more impressive to your audience.
5. Auto Beat Sync
With YouTube Shorts, you need to entertain your audience in under a minute. A combination of visual and audio elements makes the video more entertaining. The Auto Beat Sync feature matches the footage with the music automatically. Be sure every beat corresponds to the scene.
Conclusion
The YouTube Shorts Fund offers an exceptional for creators to make additional income on the platform. Although the original Funds program has been updated with the latest monetization policy, creators can still generate nice revenue amount. As a creator, you need to publish quality and highly engaging content. With Wondershare Filmora, you can create content that will generate more revenue on the Shorts platform. The video editing software offers fantastic features that make video editing quick and fun.
Also read:
- [New] How to See Your Subscribers on YouTube?
- [New] Image Illumination The Essential List of Frame-Enhancing Apps
- [Updated] Nikon's Journey to Excellence The 4K Camera Review
- [Updated] Unearthed 30 Window 11 Insider Strategies to Boost Performance for 2024
- 2024 Approved Increasing Video Visibility with Engaging Youtube Images
- 2024 Approved Transform Your YouTube Experience with Bespoeid Shorts Thumbnails
- 7 Compelling Reasons to Use ChatGPT as Your Virtual Health Advisor
- From Concept to Screen Channel YT for Pioneering Filmmaking Techniques for 2024
- Google's Goldmine A Simplified Three-Step Blueprint for Calculating Subscriber Earning Potential for 2024
- In 2024, How to Fake Snapchat Location on Honor Magic V2 | Dr.fone
- In 2024, The Ultimate Guide to Trending YouTubers
- New From Dialogue to Sound Design FCP Audio Editing Fundamentals
- Sci-Fi's New Realms Exploring the Best Metaverse Adventures on Screen for 2024
- Title: [New] Flawless Soundscape Secrets to High-Resolution Audio Recording
- Author: Thomas
- Created at : 2024-12-04 19:25:03
- Updated at : 2024-12-09 22:51:49
- Link: https://youtube-help.techidaily.com/new-flawless-soundscape-secrets-to-high-resolution-audio-recording/
- License: This work is licensed under CC BY-NC-SA 4.0.