
![[New] From Digital Avatars to Internet Stardom – Becoming a Vtuber?](https://www.lifewire.com/thmb/svXLJxawYMhz7TKJ6OUoS2rOSKY=/400x300/filters:no_upscale():max_bytes(150000):strip_icc()/how-to-use-a-mobile-boarding-pass-eb61458058f44011ad7ed012566127e4.jpg)
[New] From Digital Avatars to Internet Stardom – Becoming a Vtuber?
From Digital Avatars to Internet Stardom – Becoming a Vtuber?
Create High-Quality Video - Wondershare Filmora
An easy and powerful YouTube video editor
Numerous video and audio effects to choose from
Detailed tutorials provided by the official channel
Faceless creators, or people who do not show their faces in their films, have become more prevalent on YouTube. Although being a faceless artist allows you to have a little more privacy on the internet, some viewers like to see a person on-screen.
So, what’s the best way to win over both sides? However, becoming a virtual YouTuber allows you to have your cake and eat it, as well. Vtubing is similar to live streaming, only that instead of showing your face, your facial emotions and movements are recorded by a digital avatar. Vtubing has grown considerably more accessible, with a large number of people watching Vtubing videos on YouTube.
Moreover, Every VTuber is essentially a character. Whether they’re just being themselves on camera or acting out a backstory they made up, watching a VTuber is like watching an anime in and of itself. The avatars or characters provide VTubers with a lot of creative freedom, allowing them to create unique material.
Being a VTuber isn’t all that different from being a regular one in terms of technicalities. However, it would be beneficial if you still had a good notion of what you want to do with your channel. Even though the two activities are conceptually equivalent, VTubing has a little greater entry barrier due to equipment needs.
In this article
01 What is a virtual YouTuber?
02 What Does It Take to Become a Virtual YouTuber?
03 How to become a virtual youtuber?
What is a virtual YouTuber?
A virtual YouTuber, or VTuber for short, is an online video maker or entertainment who represents themselves through a virtual avatar. This avatar is created using computer graphics (CG), and it frequently has an anime-inspired look. Most VTubers, as the name implies, utilize YouTube as their primary platform, while others do upload videos or host streams on other platforms (e.g., Twitch, Facebook Gaming, and so on) and are still referred to as such.
Vtuber’s Brief History
Kizuna AI, a Japanese VTuber, created and popularized the phrase “virtual YouTuber” in 2016. While she wasn’t the first to employ a CG avatar for video blogging, she is almost entirely to blame for the VTubers craze exploding in Japan and then the rest of the world in late 2016. Because Kizuna AI grew in popularity so quickly, new VTubers began to appear regularly. Some creators, who had already established their platform and/or displayed their faces on camera, created VTuber versions of themselves simply to jump on the bandwagon.
According to User Local, a Japanese data technology firm, over 10,000 active VTubers will exist on YouTube alone by 2020. Kizuna AI, who has the highest following of all VTubers on the internet at the time of writing, has over 10 million subscribers across all of her social media sites (YouTube, Twitter, TikTok, and Bilibili).
Is VTubers the Next Big Thing in Video Content?
If you follow video marketing trends, you may have seen an uptick in animated videos featuring anime-style avatars. VTubers are the creators of this content, and it’s taking the world by storm. Top VTubers earn hundreds of thousands of dollars every month and have millions of followers. The industry, according to analysts, is on the increase.
In 2019, the overall number of VTuber subscribers climbed by 28%, while total views of Vtuber content increased by 99 percent, according to HyperSense. This may not appear to be a severe trend at first sight. Virtual YouTubers, on the other hand, are being used by marketers and corporations like Mattel and KFC to promote genuine engagement.
Top 5 Virtual YouTubers
The following are the top 5 virtual YouTubers. Each of their videos can be watched for a few minutes with English subtitles.
1. Kizuna AI
Kizuna AI is one of Japan’s most well-known and popular female vloggers, with over two million subscribers to her channel. She appears to be a pop star, but she is artificial intelligence, as she boasts. Since she began posting videos on her main channel, A.I.Channel, in 2016, she has gained a considerable following. On the channel, she discusses various topics and plays popular games. A.I.Games, a Kizuna AI YouTube channel dedicated to games, A.I.Games is also available. She is enthusiastic and honest in both good and bad ways, which is one of her best qualities.
Link: https://www.youtube.com/channel/UC4YaOt1yT-ZeyB0OmxHgolA
2. Kaguya Luna
Kaguya Luna is a popular Japanese vlogger who launched her Kaguya Luna Official channel in 2017. She is one of the Big Four VTubers, with over a million subscribers. Kaguya Luna is adored because she presents herself in such a way. Her videos are mostly made up of her free-wheeling speaking without any acting scripts. Her high-pitched voice is striking, and she is always active and talkative. She also performs as a pop vocalist in a live presentation.v
Link: https://www.youtube.com/channel/UCQYADFw7xEJ9oZSM5ZbqyBw
3. Hoshimachi Suisei
Suisei is an idol singer who debuted independently in 2018 before joining the Hololive group. She aims to perform onstage at the Tokyo Budokan. Her deep alto voice is ideal for covers such as Zombieland Saga’s “Saga Jihen,” as well as her original compositions such as “Next Color Planet” and “Ghost.” She also has a reputation as a sociopath, which was established after she violently backstabbed her fellow Hololive stars in a Project Winter playthrough.
Link: https://www.youtube.com/channel/UC5CwaMl1eIgY8h02uZw7u8A
4. Usada Pekora
This adorable little kitten is the most popular VTuber from VShojo’s English-language agency, and it’s easy to understand why her “Nyanderthals” like her. Nyatasha is best known for covering rap songs and going off on obscene tangents with lines like “It’s not about wiping my ass, it’s about sending a message,” despite how innocent she appears and sounds.
Link: https://www.youtube.com/channel/UC1DCedRgGHBdm81E1llLhOQ
5. Sakura Miko
Nyahello! Sakura, a shrine maiden with a theatrical demeanour and a dubious aptitude for video games, began her career as a freelance VTuber before joining Hololive. Her bombastic attitude is part of her appeal: she gets overly passionate about unimportant games, uses any excuse to stare up a female character’s skirt, and swears profusely in Japanese and English whenever she is frustrated. It’s never boring to see her shenanigans.
Link: https://www.youtube.com/channel/UC-hM6YJuNYVAmUWxeIr9FeA
What Does It Take to Become a Virtual YouTuber?
If you’ve been watching YouTube for a while, you’ve most likely noticed the VTuber trend, which began in 2017. Instead of displaying their faces, VTubers, or Virtual YouTubers, communicate with their viewers using an avatar. As this trend grows in popularity (and VTubers gain more subscribers), a lot of people are curious about how they do it. Here are answers to all of your questions on how to become a VTuber on YouTube so you may live out your virtual fantasies.
A high-end PC with enough storage space and a powerful graphics card is required for VTubers. A webcam that tracks motion and connects to your computer is required. The most prominent VTubers employ a blue screen and green room arrangement, which simply consists of walls with one color painted on them in the background of their vlogs so that everything looks to be happening inside an empty virtual area while they walk around.
Investing a lot of money in supplies or equipment for your virtual YouTuber setup isn’t essential, just like it isn’t required for any other creative endeavor. Buying such items may yield greater results if you know how to utilize them effectively but becoming a VTuber may be done for very little money, if at all.
How to become a virtual youtuber?
1. Selecting a Model
To become a virtual YouTuber, you’ll need a model to play the role of your online persona. There are several other ways to do this, but Live2D is the most popular among elite VTubers.
2. Make your model move
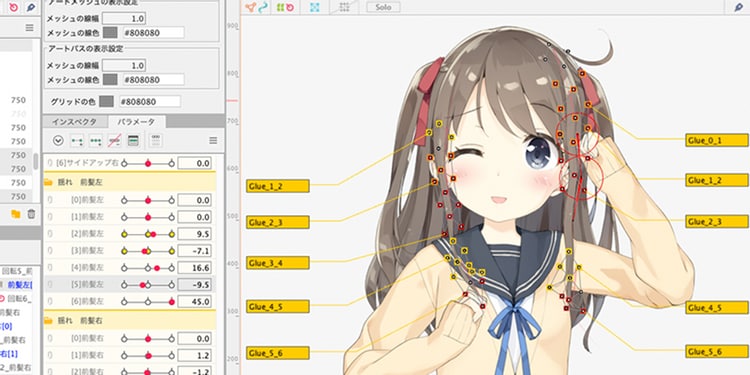
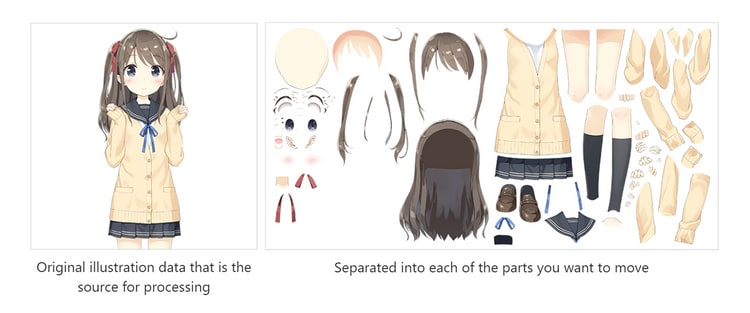
A model must be set up before it can move. In computer graphics, rigging is the process of generating and connecting a rig or bone structure to a model, which can subsequently be animated. When working in two dimensions, this usually entails dividing an image into the pieces you want to move.
You’ll want to set up a webcam to track your movements once you’ve created a rigged model. As a result, your model will adjust to fit you every time you move. Most VTubers only track their faces, but hand movements are becoming increasingly popular.
3. Streaming and/or Recording
This portion of VTubing isn’t all that dissimilar from creating regular video material. You’ll need something to record footage of your model as it moves in lockstep with you. VirtualCast, a free VR communication tool that allows you to be “anyone you choose to be” in a virtual world, may be used for pre-recorded videos. It does, however, necessitate the usage of a virtual reality headset.
Conclusion
● In 2020, the popularity of VTuber content surged. There’s no better time than now to become a virtual YouTuber if you’ve been thinking about it for a long. After all, the nicest part about VTubing is that it’s available to everyone with a smart device and a camera.
● As VTubers are always looking for authenticity, you can become a successful VTuber by sharing the things that matter. Keep an eye on VTubers with a large following and observe what they do. Seek feedback to help you improve your skills or ask for assistance if you require it. Create stuff that will pique the interest of others while also maintaining your own.
Faceless creators, or people who do not show their faces in their films, have become more prevalent on YouTube. Although being a faceless artist allows you to have a little more privacy on the internet, some viewers like to see a person on-screen.
So, what’s the best way to win over both sides? However, becoming a virtual YouTuber allows you to have your cake and eat it, as well. Vtubing is similar to live streaming, only that instead of showing your face, your facial emotions and movements are recorded by a digital avatar. Vtubing has grown considerably more accessible, with a large number of people watching Vtubing videos on YouTube.
Moreover, Every VTuber is essentially a character. Whether they’re just being themselves on camera or acting out a backstory they made up, watching a VTuber is like watching an anime in and of itself. The avatars or characters provide VTubers with a lot of creative freedom, allowing them to create unique material.
Being a VTuber isn’t all that different from being a regular one in terms of technicalities. However, it would be beneficial if you still had a good notion of what you want to do with your channel. Even though the two activities are conceptually equivalent, VTubing has a little greater entry barrier due to equipment needs.
In this article
01 What is a virtual YouTuber?
02 What Does It Take to Become a Virtual YouTuber?
03 How to become a virtual youtuber?
What is a virtual YouTuber?
A virtual YouTuber, or VTuber for short, is an online video maker or entertainment who represents themselves through a virtual avatar. This avatar is created using computer graphics (CG), and it frequently has an anime-inspired look. Most VTubers, as the name implies, utilize YouTube as their primary platform, while others do upload videos or host streams on other platforms (e.g., Twitch, Facebook Gaming, and so on) and are still referred to as such.
Vtuber’s Brief History
Kizuna AI, a Japanese VTuber, created and popularized the phrase “virtual YouTuber” in 2016. While she wasn’t the first to employ a CG avatar for video blogging, she is almost entirely to blame for the VTubers craze exploding in Japan and then the rest of the world in late 2016. Because Kizuna AI grew in popularity so quickly, new VTubers began to appear regularly. Some creators, who had already established their platform and/or displayed their faces on camera, created VTuber versions of themselves simply to jump on the bandwagon.
According to User Local, a Japanese data technology firm, over 10,000 active VTubers will exist on YouTube alone by 2020. Kizuna AI, who has the highest following of all VTubers on the internet at the time of writing, has over 10 million subscribers across all of her social media sites (YouTube, Twitter, TikTok, and Bilibili).
Is VTubers the Next Big Thing in Video Content?
If you follow video marketing trends, you may have seen an uptick in animated videos featuring anime-style avatars. VTubers are the creators of this content, and it’s taking the world by storm. Top VTubers earn hundreds of thousands of dollars every month and have millions of followers. The industry, according to analysts, is on the increase.
In 2019, the overall number of VTuber subscribers climbed by 28%, while total views of Vtuber content increased by 99 percent, according to HyperSense. This may not appear to be a severe trend at first sight. Virtual YouTubers, on the other hand, are being used by marketers and corporations like Mattel and KFC to promote genuine engagement.
Top 5 Virtual YouTubers
The following are the top 5 virtual YouTubers. Each of their videos can be watched for a few minutes with English subtitles.
1. Kizuna AI
Kizuna AI is one of Japan’s most well-known and popular female vloggers, with over two million subscribers to her channel. She appears to be a pop star, but she is artificial intelligence, as she boasts. Since she began posting videos on her main channel, A.I.Channel, in 2016, she has gained a considerable following. On the channel, she discusses various topics and plays popular games. A.I.Games, a Kizuna AI YouTube channel dedicated to games, A.I.Games is also available. She is enthusiastic and honest in both good and bad ways, which is one of her best qualities.
Link: https://www.youtube.com/channel/UC4YaOt1yT-ZeyB0OmxHgolA
2. Kaguya Luna
Kaguya Luna is a popular Japanese vlogger who launched her Kaguya Luna Official channel in 2017. She is one of the Big Four VTubers, with over a million subscribers. Kaguya Luna is adored because she presents herself in such a way. Her videos are mostly made up of her free-wheeling speaking without any acting scripts. Her high-pitched voice is striking, and she is always active and talkative. She also performs as a pop vocalist in a live presentation.v
Link: https://www.youtube.com/channel/UCQYADFw7xEJ9oZSM5ZbqyBw
3. Hoshimachi Suisei
Suisei is an idol singer who debuted independently in 2018 before joining the Hololive group. She aims to perform onstage at the Tokyo Budokan. Her deep alto voice is ideal for covers such as Zombieland Saga’s “Saga Jihen,” as well as her original compositions such as “Next Color Planet” and “Ghost.” She also has a reputation as a sociopath, which was established after she violently backstabbed her fellow Hololive stars in a Project Winter playthrough.
Link: https://www.youtube.com/channel/UC5CwaMl1eIgY8h02uZw7u8A
4. Usada Pekora
This adorable little kitten is the most popular VTuber from VShojo’s English-language agency, and it’s easy to understand why her “Nyanderthals” like her. Nyatasha is best known for covering rap songs and going off on obscene tangents with lines like “It’s not about wiping my ass, it’s about sending a message,” despite how innocent she appears and sounds.
Link: https://www.youtube.com/channel/UC1DCedRgGHBdm81E1llLhOQ
5. Sakura Miko
Nyahello! Sakura, a shrine maiden with a theatrical demeanour and a dubious aptitude for video games, began her career as a freelance VTuber before joining Hololive. Her bombastic attitude is part of her appeal: she gets overly passionate about unimportant games, uses any excuse to stare up a female character’s skirt, and swears profusely in Japanese and English whenever she is frustrated. It’s never boring to see her shenanigans.
Link: https://www.youtube.com/channel/UC-hM6YJuNYVAmUWxeIr9FeA
What Does It Take to Become a Virtual YouTuber?
If you’ve been watching YouTube for a while, you’ve most likely noticed the VTuber trend, which began in 2017. Instead of displaying their faces, VTubers, or Virtual YouTubers, communicate with their viewers using an avatar. As this trend grows in popularity (and VTubers gain more subscribers), a lot of people are curious about how they do it. Here are answers to all of your questions on how to become a VTuber on YouTube so you may live out your virtual fantasies.
A high-end PC with enough storage space and a powerful graphics card is required for VTubers. A webcam that tracks motion and connects to your computer is required. The most prominent VTubers employ a blue screen and green room arrangement, which simply consists of walls with one color painted on them in the background of their vlogs so that everything looks to be happening inside an empty virtual area while they walk around.
Investing a lot of money in supplies or equipment for your virtual YouTuber setup isn’t essential, just like it isn’t required for any other creative endeavor. Buying such items may yield greater results if you know how to utilize them effectively but becoming a VTuber may be done for very little money, if at all.
How to become a virtual youtuber?
1. Selecting a Model
To become a virtual YouTuber, you’ll need a model to play the role of your online persona. There are several other ways to do this, but Live2D is the most popular among elite VTubers.
2. Make your model move
A model must be set up before it can move. In computer graphics, rigging is the process of generating and connecting a rig or bone structure to a model, which can subsequently be animated. When working in two dimensions, this usually entails dividing an image into the pieces you want to move.
You’ll want to set up a webcam to track your movements once you’ve created a rigged model. As a result, your model will adjust to fit you every time you move. Most VTubers only track their faces, but hand movements are becoming increasingly popular.
3. Streaming and/or Recording
This portion of VTubing isn’t all that dissimilar from creating regular video material. You’ll need something to record footage of your model as it moves in lockstep with you. VirtualCast, a free VR communication tool that allows you to be “anyone you choose to be” in a virtual world, may be used for pre-recorded videos. It does, however, necessitate the usage of a virtual reality headset.
Conclusion
● In 2020, the popularity of VTuber content surged. There’s no better time than now to become a virtual YouTuber if you’ve been thinking about it for a long. After all, the nicest part about VTubing is that it’s available to everyone with a smart device and a camera.
● As VTubers are always looking for authenticity, you can become a successful VTuber by sharing the things that matter. Keep an eye on VTubers with a large following and observe what they do. Seek feedback to help you improve your skills or ask for assistance if you require it. Create stuff that will pique the interest of others while also maintaining your own.
Strengthen Your Footage: Using a Tripod in Vlogging
How To Use a Tripod for Vlogging

Richard Bennett
Mar 27, 2024• Proven solutions
As you grow into a serious vlogger, a tripod will become an essential piece of equipment. You can get by for a long time setting your camera up on a stack of books, or an upside-down laundry hamper, but not forever. While these setups are great for a beginner, an intermediate vlogger will start to find them limiting. Even if you are an amazingly creative person who can create any camera setup without a tripod there will come a point where you will decide your creative energy is better spent on your video content.
This article will explain how to use a tripod and then introduce you to four different types.
Part 1: How To Set a Tripod for Vlogging
1. Setting Up Your Tripod
Step 1 – Pull out all three legs of your tripod and make sure it is standing stably. There will be tensioners on the legs which you can release in order to adjust your height. Once your legs are extended to the height you want continue adjusting them until your tripod is level. Some tripods have a built in bubble level, but if yours does not you can use a separate bubble level or make a guestimate.
Make sure when you are setting up your tripod that you point one of its legs towards your subject. This will give you room to stand behind your camera, in-between the other two legs. If you have one leg pointed directly behind your camera then you may trip over it. Or, you may knock over and damage your camera.
Step 2 – On the top of your tripod there will be a plate with a small hole and a screw. Remove this plate using either a clip or lever, depending on your tripod. Once your plate is detached screw it into the bottom of your camera. It should be tight, but not too tight or you risk damaging your camera.
Step 3 – Attach your plate, which now has your camera mounted to it, back onto your tripod.
Your tripod comes with a ‘head’. Your tripod’s head is what your camera is mounted on top of. There are several different types of tripod heads and mounts which are all useful for different things.
Ball Heads and Pan/Tilt Heads are the two most common types of tripod heads. Ball Heads allow you to adjust your camera’s position quite a bit before you start shooting. They are not good for adding in camera movements while you are filming, however, because you need to lock them in place. Pan/Tilt heads are great for creating camera movement. Most Pan/Tilt heads have a handle which you can use to make a smooth panning motion.
Part 2: Why Do You Need a Tripod: Benefits of Using Tripod
Why can’t you just hold a camera in your hand while shooting vlog entries for your YouTube channel? Honestly, you can, but the camera may shake a lot and your footage might end up being unusable. Putting a camera on a tripod reduces the probability of camera shake to the minimum and that is just the tip of the iceberg.
A huge amount of vlogs can be described as sit down videos, in which the host of the video sits in front of a camera and talks to the audience. Holding a camera while talking or trying to present a product to the viewers is next to impossible, so in order to avoid having to deal with a camera, you can simply put it on a tripod, find the best angle, and push the record button.
On the go videos, are recorded at exterior locations, and a lot of YouTubers choose to shoot these types of videos handheld, but this approach makes it difficult to maintain the same shot composition for long. A Monopod, Gorillapod or just a simple selfie stick can make your job much easier because they stabilize the camera. In addition, shooting smooth panning shots without a tripod is as difficult as it sounds.
Part 3: A Few Things You’ll Need to Consider Before You Buy a Tripod
There are thousands of different tripod models you can use for vlogging, but which model you’re going to choose depends mostly on the type of vlog you want to make. If you are planning on shooting all of your videos in the studio-like conditions, then portability isn’t such an important feature, while quite the opposite is true if you intend on filming all of your footage on outdoor locations.
However, there are certain traits you have to consider when choosing a tripod you’re going to use while recording your vlog entries.
Sturdiness: There is absolutely no point in spending money on a tripod that breaks easily. Although if your plan is to shoot vlogs at home or in a studio, then buying a cheaper plastic tripod isn’t such a bad option, since the clamps and joints won’t have to endure a lot of wear and tear. Consider buying a more durable tripod if you are going to be traveling a lot while working on your vlogs.
The Type of Camera: A number of factors can contribute to the weight of a camera, including battery grips or lenses, so before you buy a tripod make sure that it can support the weight of the camera you want to use to record your videos.
The Maximum Height: Most vloggers don’t really have to worry about how tall their tripod is, because they are not on their feet in any of the shots featured in the video. Vloggers working on DIY videos, cooking tutorials or any other type of vlog that involves movement and action should pay attention to this trait.
Photo or Video Tripods: Do you want to take beautiful panning shots? If the answer is yes then you should get a video tripod that enables you to move the camera smoothly in any direction. Photo tripods are a great option for static shots that don’t involve a lot of camera movement.
Mobility: The heavier a tripod is, the more stability it can provide, but carrying a tripod that weighs over 10 pounds to shoot sports or adventure vlogs can be a tiring endeavor. Although portability is a factor, it shouldn’t prevent you from buying a high-quality tripod that will ensure your footage is perfectly smooth and stable.
Part 4: 4 Types of Tripods
Full-Sized Tripods: are very sturdy, and as a result can be fairly heavy. Although you can take them a lot of places they are not convenient to carry for extended periods of time. They are the most reliable way to ensure you have absolutely no camera shake.
Compact Tripods: appear to be the same size as Full-Sized tripods, but they are actually much lighter. You can get the same height with a Compact Tripod as a Full-Sized tripod and it will be much easier to travel with. However, Compact Tripods are not as stable. If you are shooting for an extended period of time you may need to weigh your Compact Tripod down with sandbags to keep it steady.
Gorillapods: have flexible legs which can be wrapped around posts, fences, or anything else you may want to mount your camera on. They are also lightweight enough that you can carry them around while you shoot. If you bend it right you can essentially use your Gorillapod as a heavy-duty selfie-stick for your camera.
Table-Top Tripods: are very small and easy to travel with. You can leave one in your camera bag or your glove box. Table-Top Tripods are meant to be set up on top of desks or other stable surfaces and may not be ideal for heavier cameras.
Part 5: The 5 Best Tripods For YouTube Vlogging
Even if you know everything there is to know about tripods, the selection process can be daunting. That’s why we’ve shortlisted the top 5 tripods on the market, in an effort to make finding the right tripod for your vlog videos as quick an easy as it can possibly be. Let’s have a look.
1. CamRah Smartphone Tripod
Price: $24.99

An increasing number of Smartphones features powerful cameras that can record videos at high resolutions. Unfortunately, most iPhones and Android devices are lightweight, which makes it difficult to hold them perfectly still while shooting a video. CamRah Smartphone Tripod offers a perfect solution to this problem because it is easy to pack and you can carry it wherever you go, without needing the extra space.
It weighs just 0.6lbs and it is 10.8 inches tall. The tripod has a maximum load of 11lbs which means that besides Smartphones, you can also mount action cameras, webcams, or even smaller DSLR cameras onto it. The flexible legs made from high-density foam offer stability even when the CamRah Tripod is placed on an uneven surface.
Pros:
- Easily portable
- Affordable
- Jaws technology provides an extra strong grip of the camera
Cons:
- The tripod’s legs can’t be extended
- Can’t be used with professional cameras
2. Manfrotto Mini Travel Tripod
Price: $34.99

Yet another great option for shooting vlogs with a Smartphone. The Manfrotto Mini Travel Tripod kit is also an excellent choice for all vloggers who shoot their videos with compact cameras. The tripod weighs just 0.51lbs and it is 5.31 inches tall, which makes it a perfect travel companion. However, it can’t support cameras heavier than 2.2lbs, so you have to carefully choose the camera you want to put on this tripod.
The tripod’s rotatable head features a lock button that enables you to fix the camera at a certain position and to shoot a video from an angle you selected. You can’t extend the legs on this tripod so shooting high angle shots is not an option.
Pros:
- Small and durable
- Allows you to mount almost any Smartphone model
- Compatible with compact cameras
Cons:
- Limits your shot selection
- Tripod’s legs can’t be extended
3. Joby Gorilla Pod
Price: $22.50

This tripod is a superstar in the vlogging community because it is flexible, easy to set up and it fits into a pocket. Joby Gorilla Pod’s legs are segmented, so you can freely choose an angle from which you want to shoot, without having to worry about the camera’s stability. You can use this tripod on flat and uneven surfaces equally effectively.
Joby Gorilla weighs just 1lbs and its maximum height 11.6 inches, which makes it perfectly suited for talking heads videos. Using this tripod while you are on the go is also an option if you have a camera that weighs less than 3lbs.
Pros:
- Highly adjustable
- Sturdy and Lightweight
- Made from stainless steel
Cons:
- Can’t be used for panning shots
- Legs can be extended for just one inch
4. Manfrotto Compact Action Tripod
Price: $64.49
If you love shooting your vlogs at night or if you simply want a tripod you can use in the studio an outdoor conditions, then Manfrotto’s Compact Action Tripod is one the best options you have at your disposal. The ergonomic head features a mounting plate that is easy to use and which provides a perfect grip of a camera.
This tripod is designed to be used with consumer-level DSLR cameras, but you can use it to shoot videos with almost all types of cameras. The Compact Action Tripod has a maximum height of 51.57 inches, and it can’t hold cameras heavier than 3.30lbs.
Pros:
- Suitable for both photography and video
- Great for outdoor use
- Allows you to take a wide variety of shots
Cons:
- Can’t support a lot of weight
- Not perfectly suited for professional-level cameras
5. Magnus VT-4000 Fluid Head Tripod
Price: $159.95
Experienced vloggers who record their videos with professional cameras, will enjoy using the Magnus VT-4000 Fluid Head Tripod. The 59-inch tall tripod can support as much as 8.8lbs of weight, and it is designed to help you create perfectly stable shots. The superb panning and tilting option enable you to move your camera freely while recording smooth shots, free of camera shakes.
The quick release mounting plate is compatible with a wide range of cameras, so you can experiment and work with several different cameras while using the same tripod. You can hardly make a mistake if you choose to buy this tripod because you’ll be able to use it to record vlogs at interior and exterior locations.
Pros:
- Easily adjustable to any surface
- Perfect for high angle shots
- Heavy-duty locks
Cons:
- Weighs 7.9lbs
- Not the best choice for action and adventure vlogs
Richard Bennett
Richard Bennett is a writer and a lover of all things video.
Follow @Richard Bennett
Richard Bennett
Mar 27, 2024• Proven solutions
As you grow into a serious vlogger, a tripod will become an essential piece of equipment. You can get by for a long time setting your camera up on a stack of books, or an upside-down laundry hamper, but not forever. While these setups are great for a beginner, an intermediate vlogger will start to find them limiting. Even if you are an amazingly creative person who can create any camera setup without a tripod there will come a point where you will decide your creative energy is better spent on your video content.
This article will explain how to use a tripod and then introduce you to four different types.
Part 1: How To Set a Tripod for Vlogging
1. Setting Up Your Tripod
Step 1 – Pull out all three legs of your tripod and make sure it is standing stably. There will be tensioners on the legs which you can release in order to adjust your height. Once your legs are extended to the height you want continue adjusting them until your tripod is level. Some tripods have a built in bubble level, but if yours does not you can use a separate bubble level or make a guestimate.
Make sure when you are setting up your tripod that you point one of its legs towards your subject. This will give you room to stand behind your camera, in-between the other two legs. If you have one leg pointed directly behind your camera then you may trip over it. Or, you may knock over and damage your camera.
Step 2 – On the top of your tripod there will be a plate with a small hole and a screw. Remove this plate using either a clip or lever, depending on your tripod. Once your plate is detached screw it into the bottom of your camera. It should be tight, but not too tight or you risk damaging your camera.
Step 3 – Attach your plate, which now has your camera mounted to it, back onto your tripod.
Your tripod comes with a ‘head’. Your tripod’s head is what your camera is mounted on top of. There are several different types of tripod heads and mounts which are all useful for different things.
Ball Heads and Pan/Tilt Heads are the two most common types of tripod heads. Ball Heads allow you to adjust your camera’s position quite a bit before you start shooting. They are not good for adding in camera movements while you are filming, however, because you need to lock them in place. Pan/Tilt heads are great for creating camera movement. Most Pan/Tilt heads have a handle which you can use to make a smooth panning motion.
Part 2: Why Do You Need a Tripod: Benefits of Using Tripod
Why can’t you just hold a camera in your hand while shooting vlog entries for your YouTube channel? Honestly, you can, but the camera may shake a lot and your footage might end up being unusable. Putting a camera on a tripod reduces the probability of camera shake to the minimum and that is just the tip of the iceberg.
A huge amount of vlogs can be described as sit down videos, in which the host of the video sits in front of a camera and talks to the audience. Holding a camera while talking or trying to present a product to the viewers is next to impossible, so in order to avoid having to deal with a camera, you can simply put it on a tripod, find the best angle, and push the record button.
On the go videos, are recorded at exterior locations, and a lot of YouTubers choose to shoot these types of videos handheld, but this approach makes it difficult to maintain the same shot composition for long. A Monopod, Gorillapod or just a simple selfie stick can make your job much easier because they stabilize the camera. In addition, shooting smooth panning shots without a tripod is as difficult as it sounds.
Part 3: A Few Things You’ll Need to Consider Before You Buy a Tripod
There are thousands of different tripod models you can use for vlogging, but which model you’re going to choose depends mostly on the type of vlog you want to make. If you are planning on shooting all of your videos in the studio-like conditions, then portability isn’t such an important feature, while quite the opposite is true if you intend on filming all of your footage on outdoor locations.
However, there are certain traits you have to consider when choosing a tripod you’re going to use while recording your vlog entries.
Sturdiness: There is absolutely no point in spending money on a tripod that breaks easily. Although if your plan is to shoot vlogs at home or in a studio, then buying a cheaper plastic tripod isn’t such a bad option, since the clamps and joints won’t have to endure a lot of wear and tear. Consider buying a more durable tripod if you are going to be traveling a lot while working on your vlogs.
The Type of Camera: A number of factors can contribute to the weight of a camera, including battery grips or lenses, so before you buy a tripod make sure that it can support the weight of the camera you want to use to record your videos.
The Maximum Height: Most vloggers don’t really have to worry about how tall their tripod is, because they are not on their feet in any of the shots featured in the video. Vloggers working on DIY videos, cooking tutorials or any other type of vlog that involves movement and action should pay attention to this trait.
Photo or Video Tripods: Do you want to take beautiful panning shots? If the answer is yes then you should get a video tripod that enables you to move the camera smoothly in any direction. Photo tripods are a great option for static shots that don’t involve a lot of camera movement.
Mobility: The heavier a tripod is, the more stability it can provide, but carrying a tripod that weighs over 10 pounds to shoot sports or adventure vlogs can be a tiring endeavor. Although portability is a factor, it shouldn’t prevent you from buying a high-quality tripod that will ensure your footage is perfectly smooth and stable.
Part 4: 4 Types of Tripods
Full-Sized Tripods: are very sturdy, and as a result can be fairly heavy. Although you can take them a lot of places they are not convenient to carry for extended periods of time. They are the most reliable way to ensure you have absolutely no camera shake.
Compact Tripods: appear to be the same size as Full-Sized tripods, but they are actually much lighter. You can get the same height with a Compact Tripod as a Full-Sized tripod and it will be much easier to travel with. However, Compact Tripods are not as stable. If you are shooting for an extended period of time you may need to weigh your Compact Tripod down with sandbags to keep it steady.
Gorillapods: have flexible legs which can be wrapped around posts, fences, or anything else you may want to mount your camera on. They are also lightweight enough that you can carry them around while you shoot. If you bend it right you can essentially use your Gorillapod as a heavy-duty selfie-stick for your camera.
Table-Top Tripods: are very small and easy to travel with. You can leave one in your camera bag or your glove box. Table-Top Tripods are meant to be set up on top of desks or other stable surfaces and may not be ideal for heavier cameras.
Part 5: The 5 Best Tripods For YouTube Vlogging
Even if you know everything there is to know about tripods, the selection process can be daunting. That’s why we’ve shortlisted the top 5 tripods on the market, in an effort to make finding the right tripod for your vlog videos as quick an easy as it can possibly be. Let’s have a look.
1. CamRah Smartphone Tripod
Price: $24.99
An increasing number of Smartphones features powerful cameras that can record videos at high resolutions. Unfortunately, most iPhones and Android devices are lightweight, which makes it difficult to hold them perfectly still while shooting a video. CamRah Smartphone Tripod offers a perfect solution to this problem because it is easy to pack and you can carry it wherever you go, without needing the extra space.
It weighs just 0.6lbs and it is 10.8 inches tall. The tripod has a maximum load of 11lbs which means that besides Smartphones, you can also mount action cameras, webcams, or even smaller DSLR cameras onto it. The flexible legs made from high-density foam offer stability even when the CamRah Tripod is placed on an uneven surface.
Pros:
- Easily portable
- Affordable
- Jaws technology provides an extra strong grip of the camera
Cons:
- The tripod’s legs can’t be extended
- Can’t be used with professional cameras
2. Manfrotto Mini Travel Tripod
Price: $34.99
Yet another great option for shooting vlogs with a Smartphone. The Manfrotto Mini Travel Tripod kit is also an excellent choice for all vloggers who shoot their videos with compact cameras. The tripod weighs just 0.51lbs and it is 5.31 inches tall, which makes it a perfect travel companion. However, it can’t support cameras heavier than 2.2lbs, so you have to carefully choose the camera you want to put on this tripod.
The tripod’s rotatable head features a lock button that enables you to fix the camera at a certain position and to shoot a video from an angle you selected. You can’t extend the legs on this tripod so shooting high angle shots is not an option.
Pros:
- Small and durable
- Allows you to mount almost any Smartphone model
- Compatible with compact cameras
Cons:
- Limits your shot selection
- Tripod’s legs can’t be extended
3. Joby Gorilla Pod
Price: $22.50
This tripod is a superstar in the vlogging community because it is flexible, easy to set up and it fits into a pocket. Joby Gorilla Pod’s legs are segmented, so you can freely choose an angle from which you want to shoot, without having to worry about the camera’s stability. You can use this tripod on flat and uneven surfaces equally effectively.
Joby Gorilla weighs just 1lbs and its maximum height 11.6 inches, which makes it perfectly suited for talking heads videos. Using this tripod while you are on the go is also an option if you have a camera that weighs less than 3lbs.
Pros:
- Highly adjustable
- Sturdy and Lightweight
- Made from stainless steel
Cons:
- Can’t be used for panning shots
- Legs can be extended for just one inch
4. Manfrotto Compact Action Tripod
Price: $64.49
If you love shooting your vlogs at night or if you simply want a tripod you can use in the studio an outdoor conditions, then Manfrotto’s Compact Action Tripod is one the best options you have at your disposal. The ergonomic head features a mounting plate that is easy to use and which provides a perfect grip of a camera.
This tripod is designed to be used with consumer-level DSLR cameras, but you can use it to shoot videos with almost all types of cameras. The Compact Action Tripod has a maximum height of 51.57 inches, and it can’t hold cameras heavier than 3.30lbs.
Pros:
- Suitable for both photography and video
- Great for outdoor use
- Allows you to take a wide variety of shots
Cons:
- Can’t support a lot of weight
- Not perfectly suited for professional-level cameras
5. Magnus VT-4000 Fluid Head Tripod
Price: $159.95
Experienced vloggers who record their videos with professional cameras, will enjoy using the Magnus VT-4000 Fluid Head Tripod. The 59-inch tall tripod can support as much as 8.8lbs of weight, and it is designed to help you create perfectly stable shots. The superb panning and tilting option enable you to move your camera freely while recording smooth shots, free of camera shakes.
The quick release mounting plate is compatible with a wide range of cameras, so you can experiment and work with several different cameras while using the same tripod. You can hardly make a mistake if you choose to buy this tripod because you’ll be able to use it to record vlogs at interior and exterior locations.
Pros:
- Easily adjustable to any surface
- Perfect for high angle shots
- Heavy-duty locks
Cons:
- Weighs 7.9lbs
- Not the best choice for action and adventure vlogs
Richard Bennett
Richard Bennett is a writer and a lover of all things video.
Follow @Richard Bennett
- Title: [New] From Digital Avatars to Internet Stardom – Becoming a Vtuber?
- Author: Thomas
- Created at : 2024-05-31 12:43:32
- Updated at : 2024-06-01 12:43:32
- Link: https://youtube-help.techidaily.com/new-from-digital-avatars-to-internet-stardom-becoming-a-vtuber/
- License: This work is licensed under CC BY-NC-SA 4.0.
