![[New] How to Make YouTube Animated Subscribe Button Easily in Filmora](https://thmb.techidaily.com/1f521609b1c133bd14e0ec883446171896f3c613d559912a6d4e6e048b474186.jpg)
[New] How to Make YouTube Animated Subscribe Button Easily in Filmora

How to Make YouTube Animated Subscribe Button Easily in Filmora
How to Make Your YouTube Animated Subscribe Button Easily With Filmora

Richard Bennett
Mar 27, 2024• Proven solutions
The main goal of every content creator is to increase its audience to expand its reach and views. To do so, it’s essential to provide something unique and different to the viewer. Without providing them the content they are looking for, it is impossible to grow your channel and reach. Once your content is ready and you are getting many views, it is essential to make these potential viewers your permanent viewers. The animated subscribe button will help you achieve this goal. While your viewers are watching your videos, you must remind them about subscribing to your channel for receiving such incredible content in the future. Subscribe animation plays a vital role in converting your viewers into subscribers.
There are so many platforms on the internet from where you can get Youtube subscribe button animation free, and you can also purchase these subscribe png gifs. But creating your own animated subscribe button can make you stand out from the crowd and make your videos unique and exclusive. Because it enables you to design it the way you want according to your brand, so, let’s create your own subscribe animation using Wondershare Filmora .
Step-By-Step guide
Step 1: To get started,open Filmora X. On your upper left corner, click on the “Sample Colors,” select the Green color and drag it to Video Track into the timeline. We are using a Green background to easily remove it using the green screen feature in Filmora to use it in our future projects after exporting it, without creating it again. Adjust the duration of this track according to your requirement. In my case, I am trying to make an animated subscribe button of 5 seconds.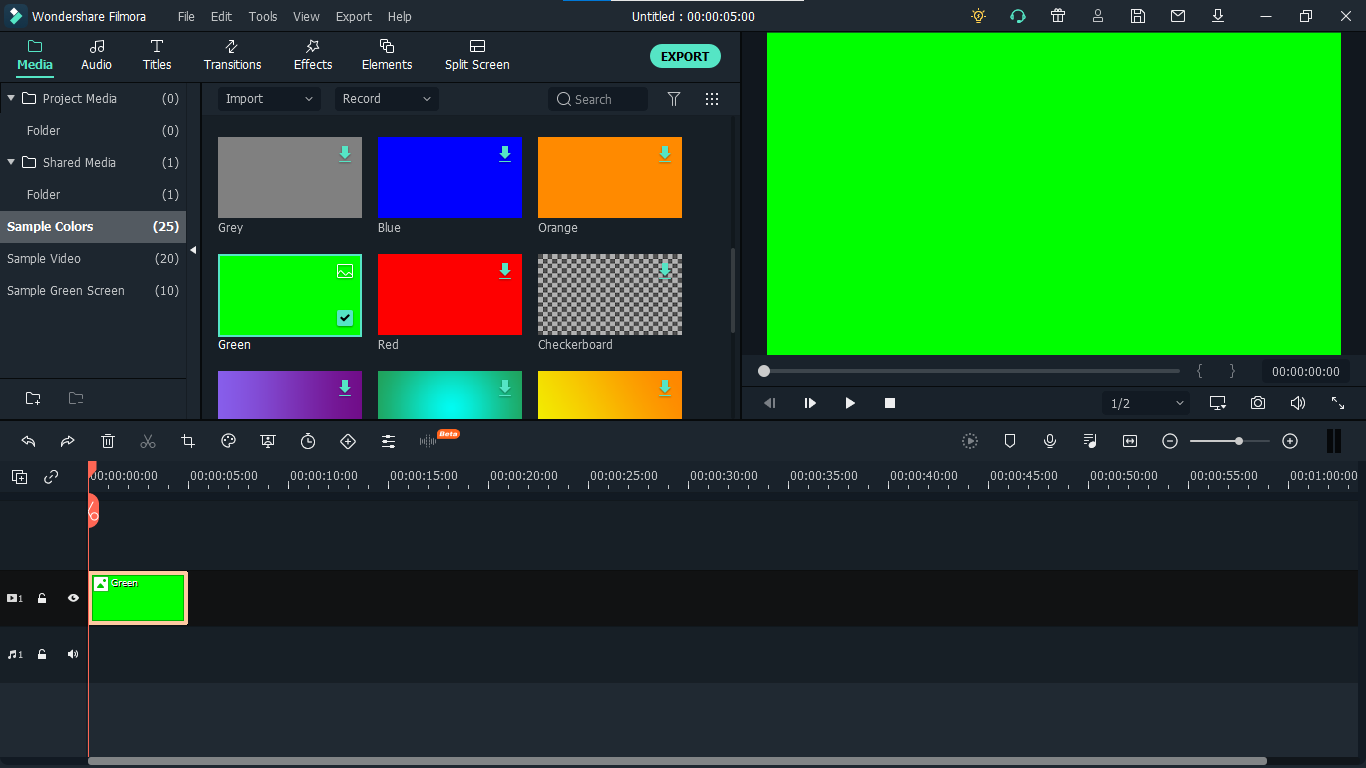
Step 2: Lock this track by clicking on the lock icon to work on subscribe animation without disturbing the background easily.
Step 3: Now it’s time to design the subscribe png gif. Go to the Sample colors again and drag the red color into the time above the green background.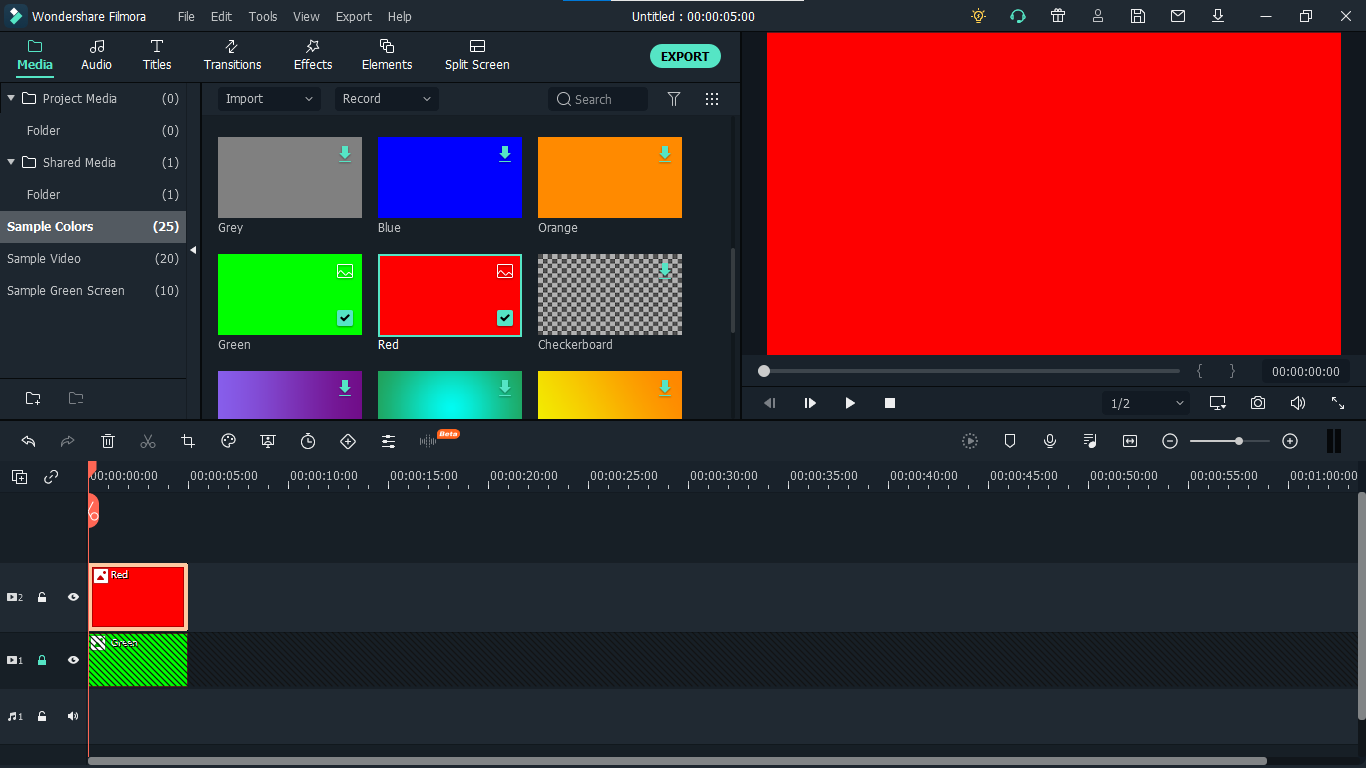
Step 4: Double click on the red color in the timeline and adjust its size. Make it look like a subscribe button that is a rectangle and place it at the bottom center of the background. You can put it anywhere you want it to appear in your future videos.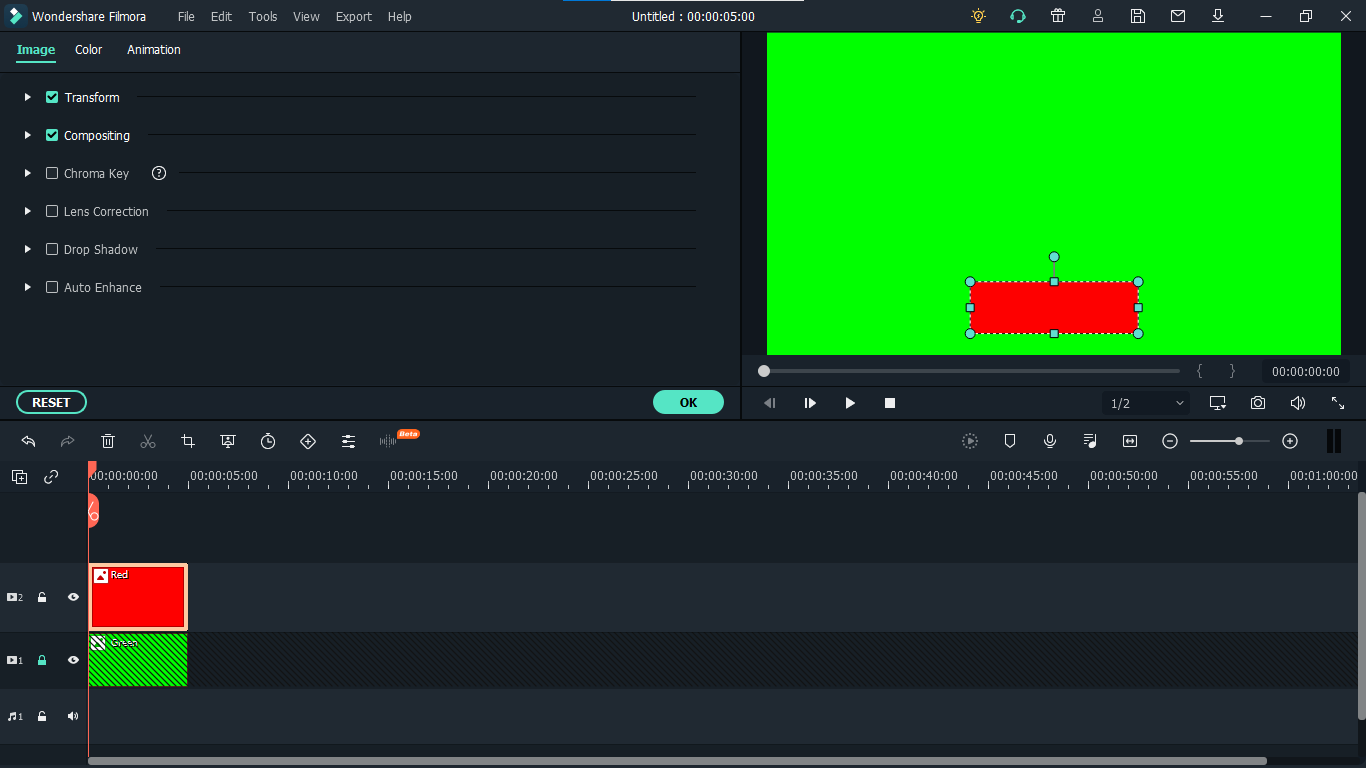
Step 5: Now, let’s add Subscribe text into the button. Go to the Title and select any style that you like. “Basic 6” will work perfectly fine for this purpose. Drag and drop it into the timeline above all tracks.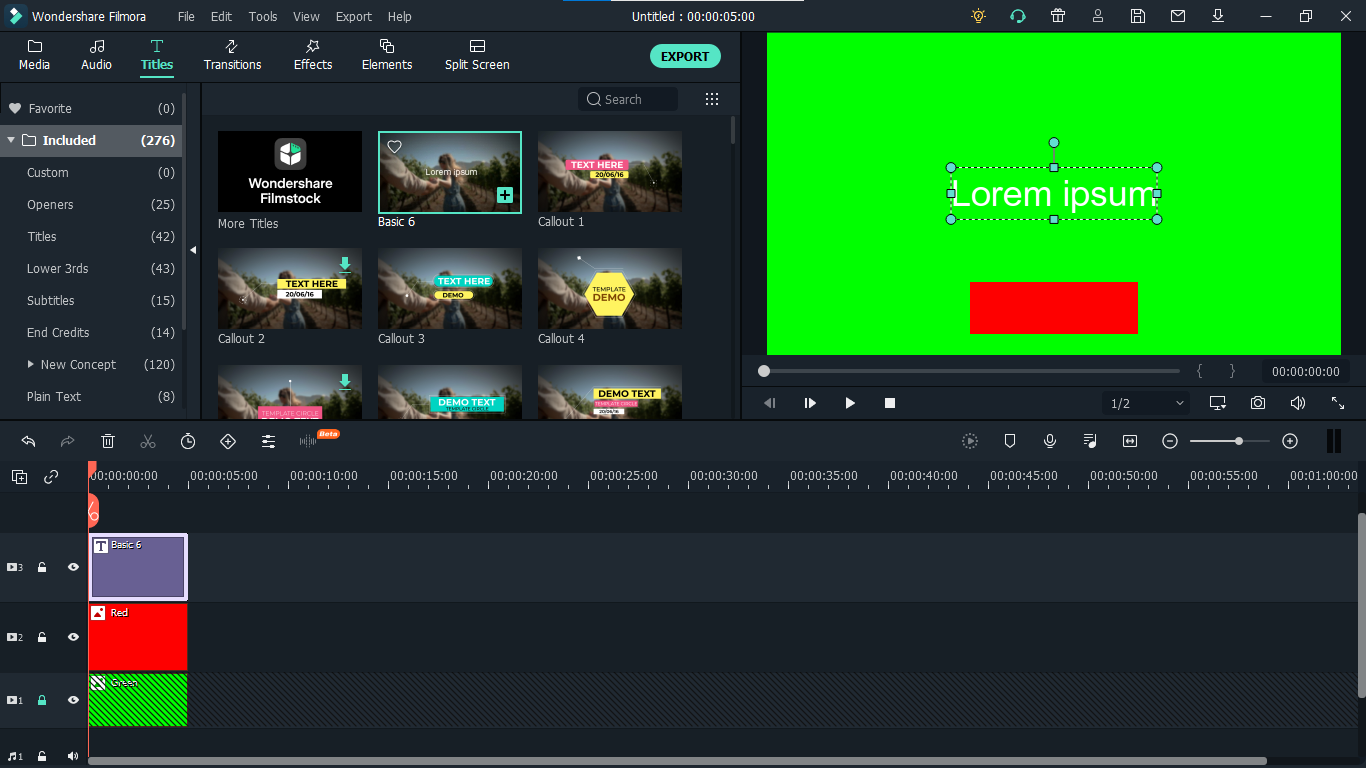
Step 6: Double click on the Title on the timeline and edit it with “Subscribe” and place it under the red rectangle and click OK.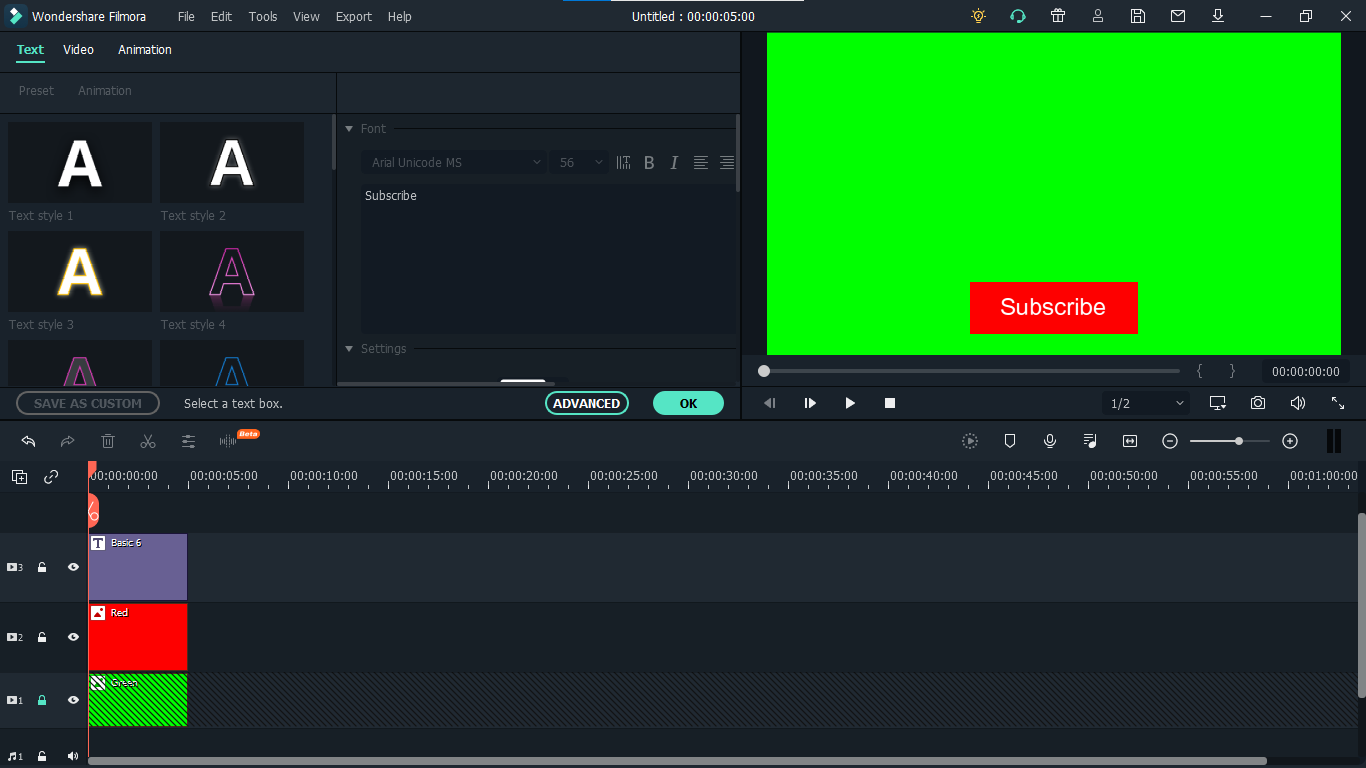
Step 7: We have put a cursor that can click on the animated subscribe button. You can use Google Search to find a transparent cursor. Make sure to save it in png format. Download it and import it into Filmora.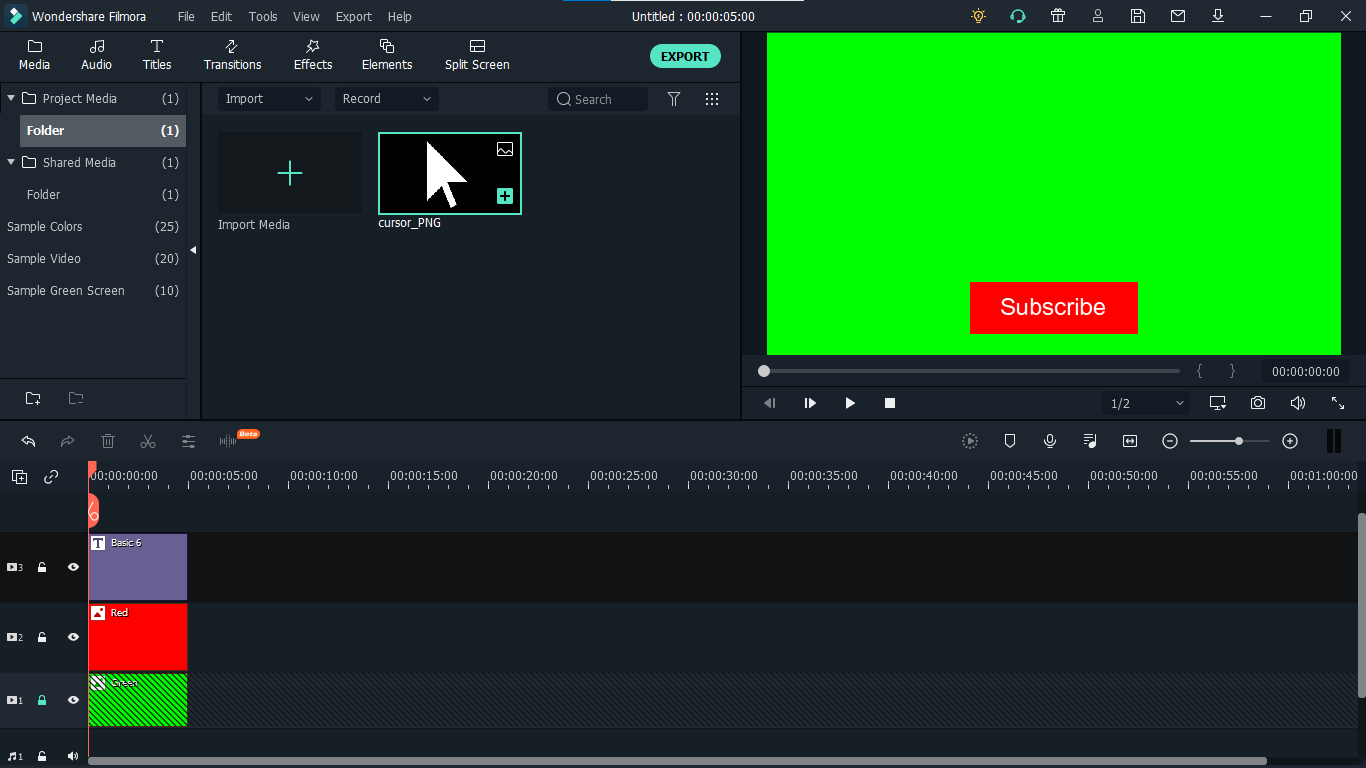
Step 8: Drag and drop the cursor into the timeline and place it above all the other three tracks to make it prominent. Adjust the size of the cursor place it on the Subscribe button where you want it to appear.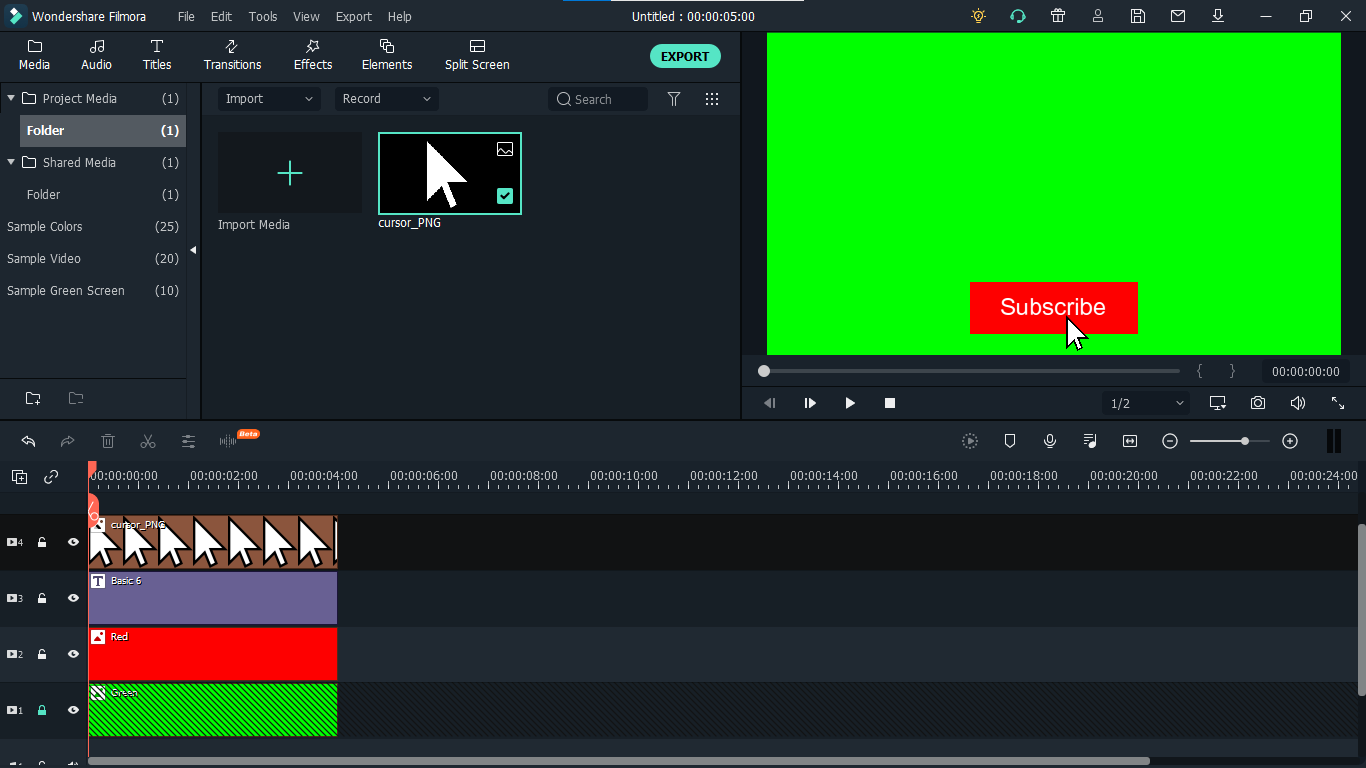
Step 9: Now, it’s time to animate the design using keyframes. First of all, let’s animate the red rectangle. Double click on the red color on the timeline. Go to the ‘Animation’ tab and then click ‘Customize.’ Move to the 1 second in the timeline and click ‘Add.’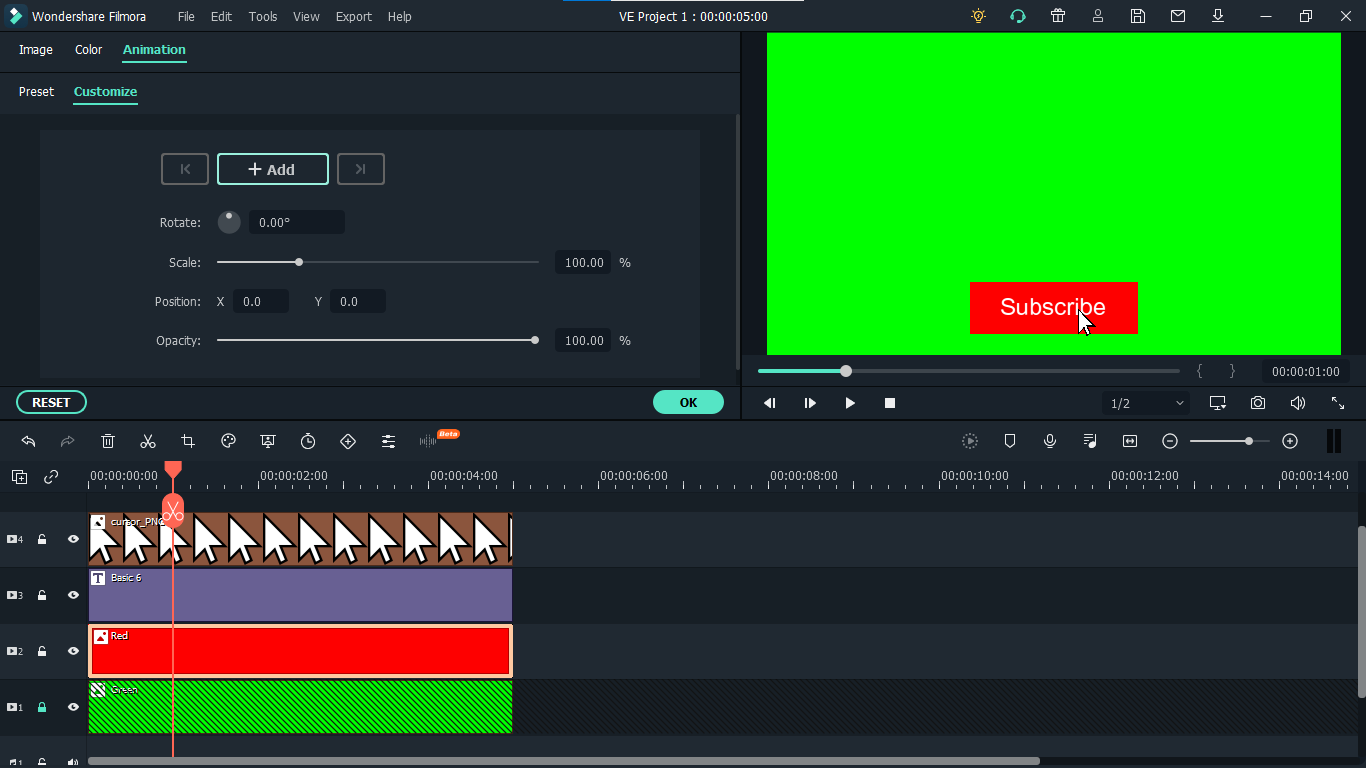
Step 10: Now go back to the beginning in the timeline and adjust the scale to 0%. It will make the rectangle pop up when you play the clip.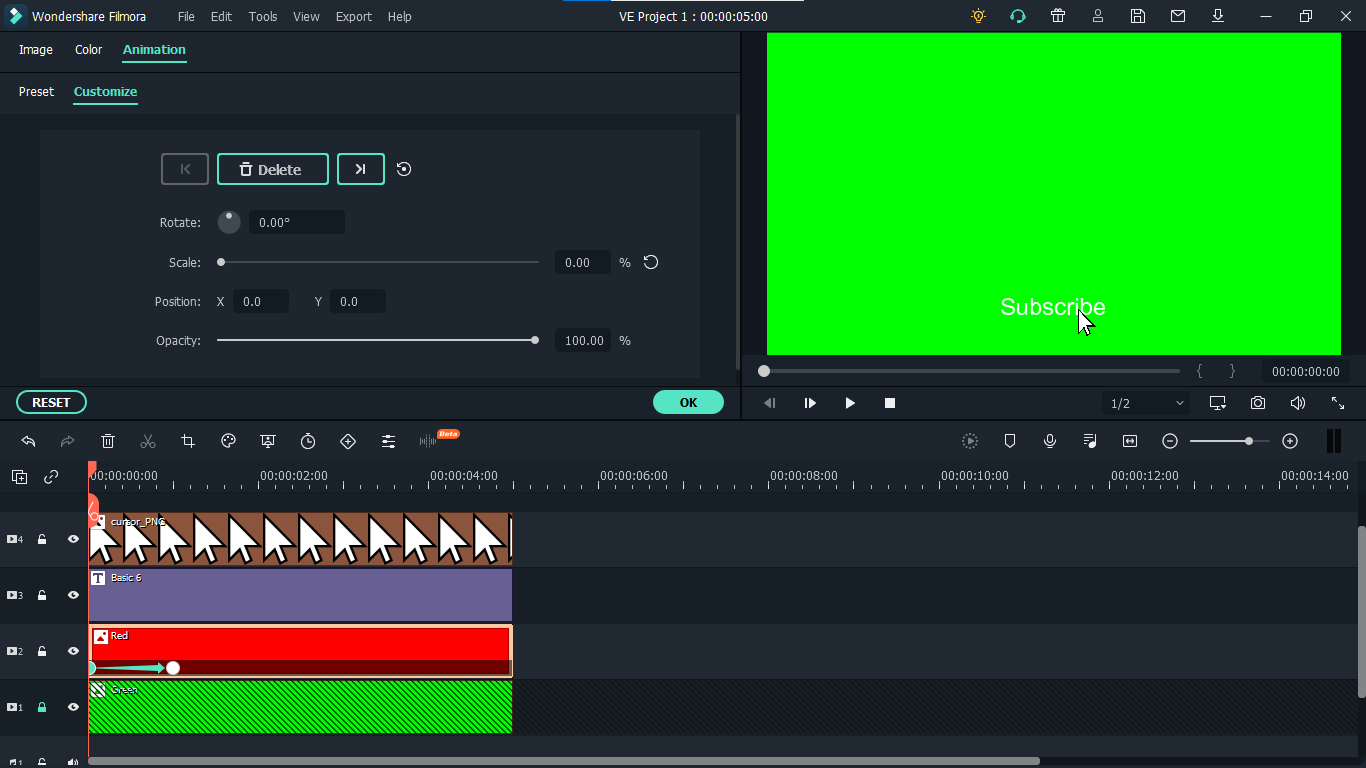
Step 11: Text needs to be animated as well to match it with the rectangle. Double click on the text in the timeline and click ‘ADVANCED.’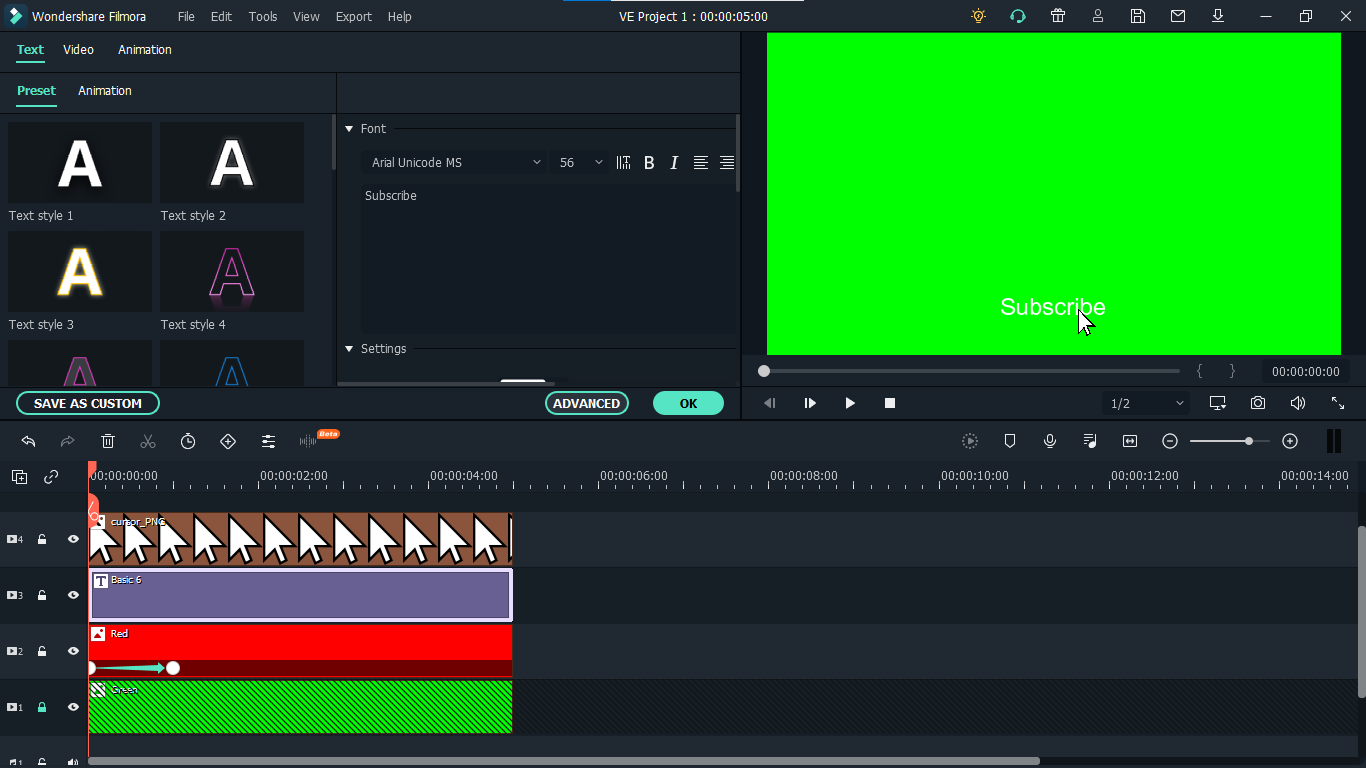
Step 12: In this Advance text editor, go to the ‘Animation’ tab and select any animation that you like. On the timeline under the preview screen, adjusts the dark areas according to the time you set on the rectangle, which was 1 second. We want the text to appear on the screen in 1 second, like the rectangle. Also, adjust the ending time when you want the text to disappear again. We have set it on 4 seconds. Which means it will start to fade after 4 seconds.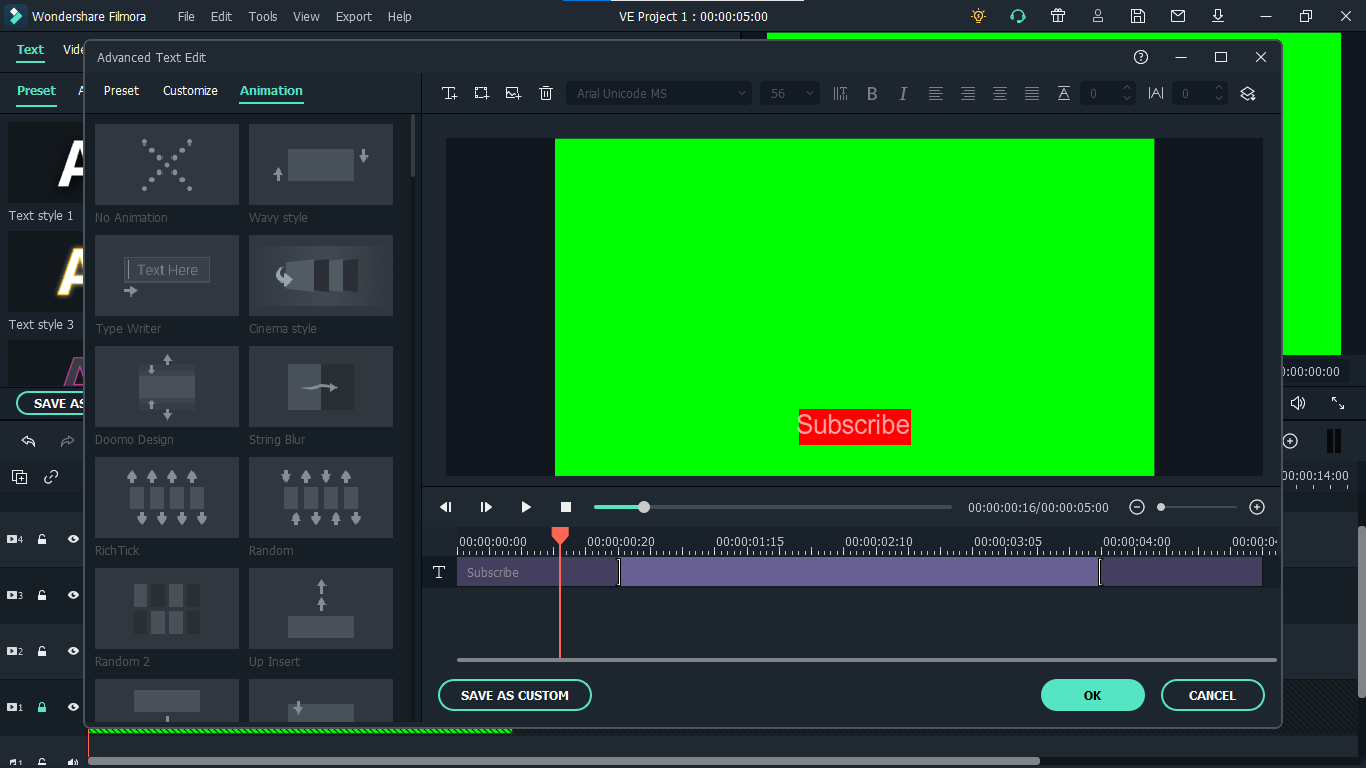
Step 13: Now, to animate the mouse cursor, we will use the same process we used for a rectangle that is key framing. Double click on the cursor track on the timeline and move the time on your timeline to a point when you want the cursor to appear. Now add a key frame by clicking ‘Add’.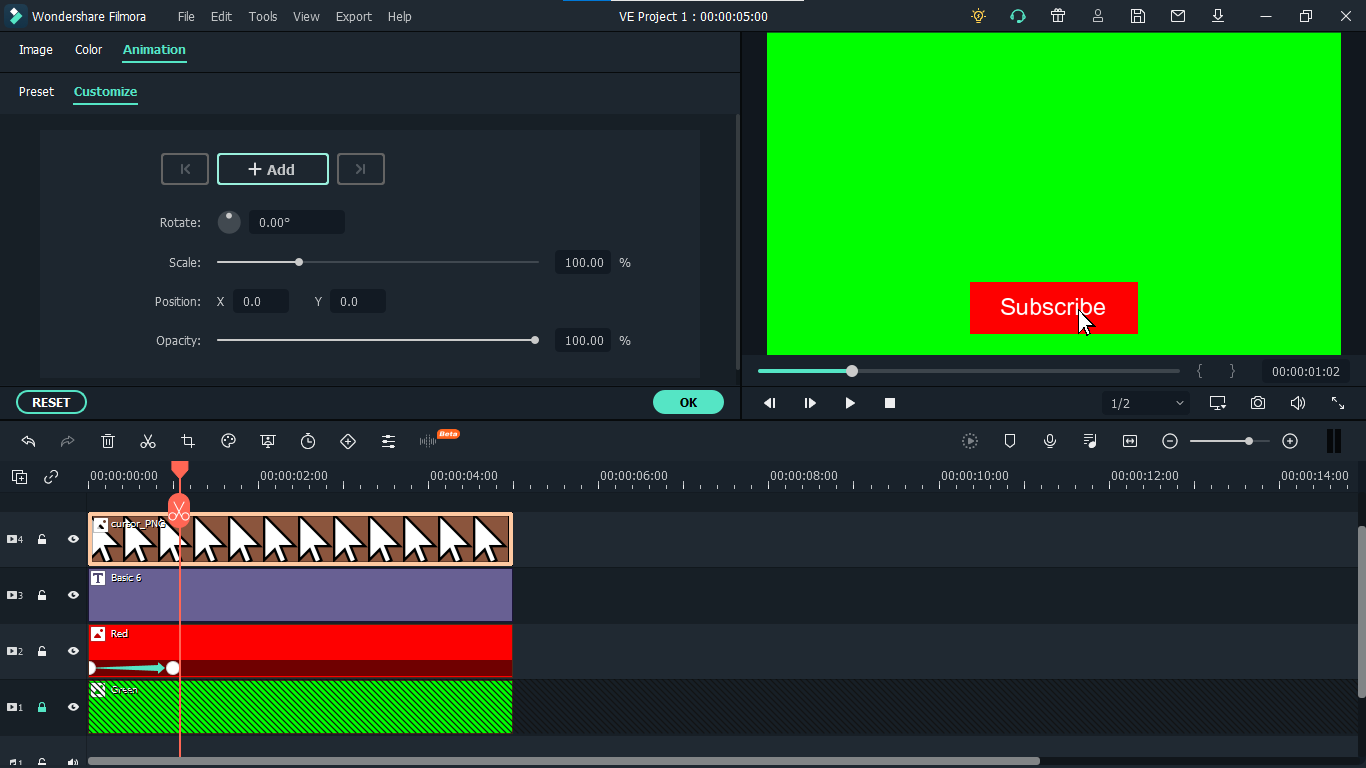
Step 14: Now jump back to a point in your timeline, when the cursor will start appearing from outside the screen. Move the cursor outside the screen from where you want it to start moving toward the subscribe animation.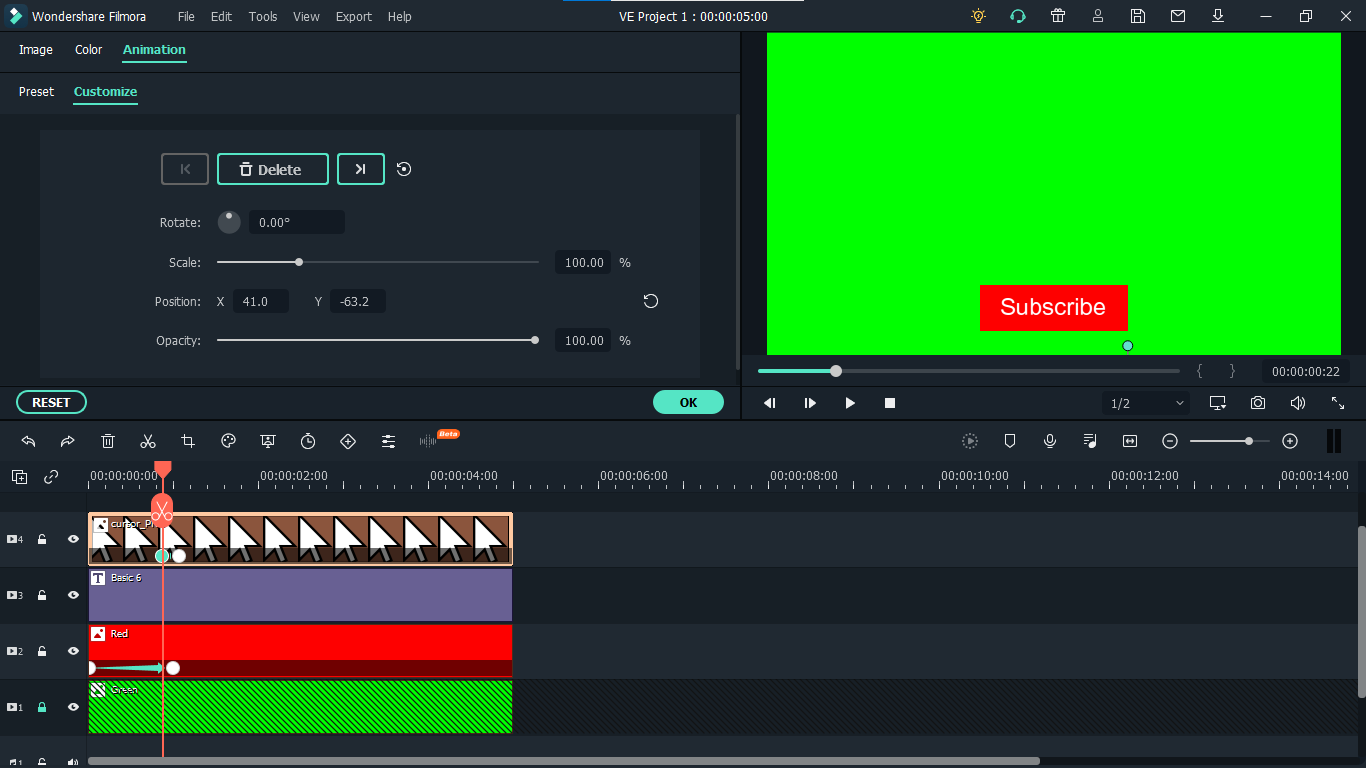
Step 15: To animate the click of the cursor, move ahead a little bit into your timeline and scale down the cursor to around 70%. Move it a little further and scale it up to 100%.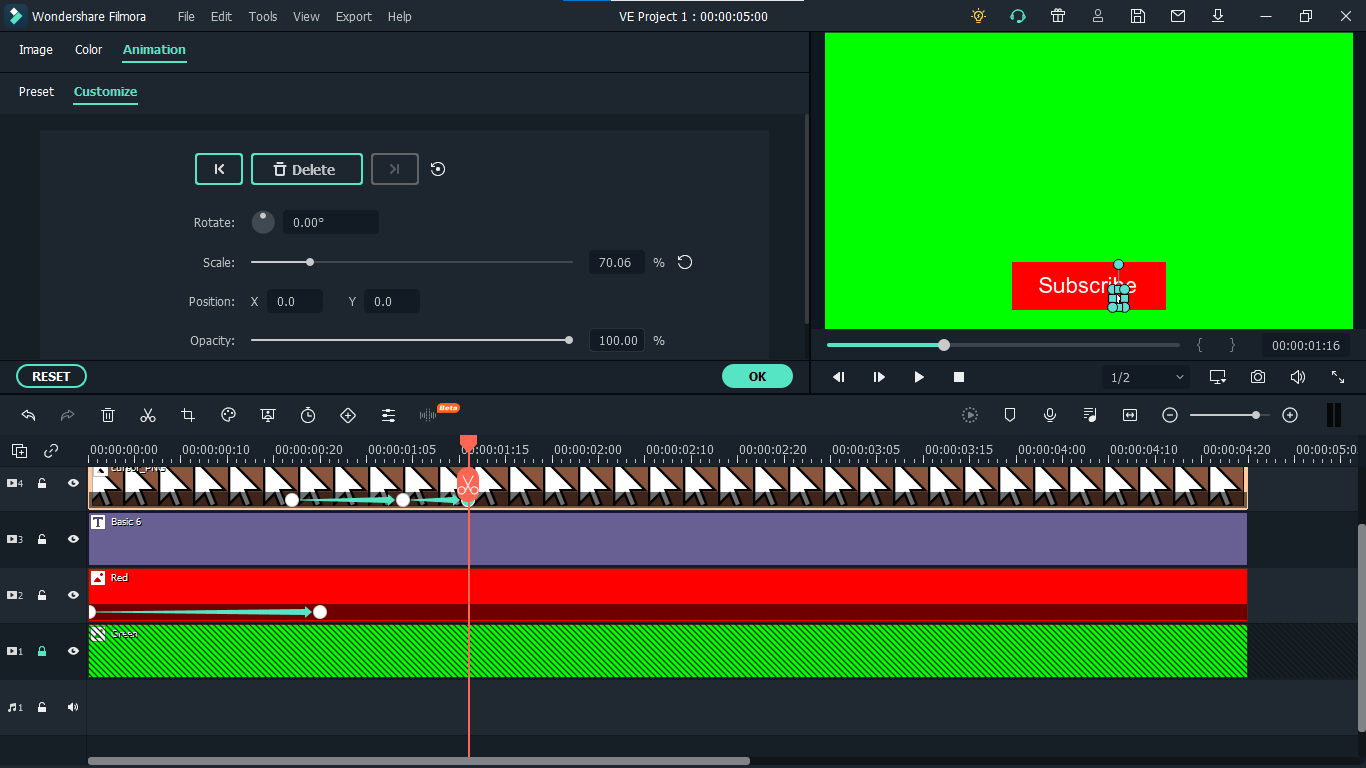
Step 16: You can add the sound of mouse click to make it more realistic. You can find this sound anywhere on the internet. Download it and import it into Filmora. Now place it into the timeline where it can match the movement of the cursor.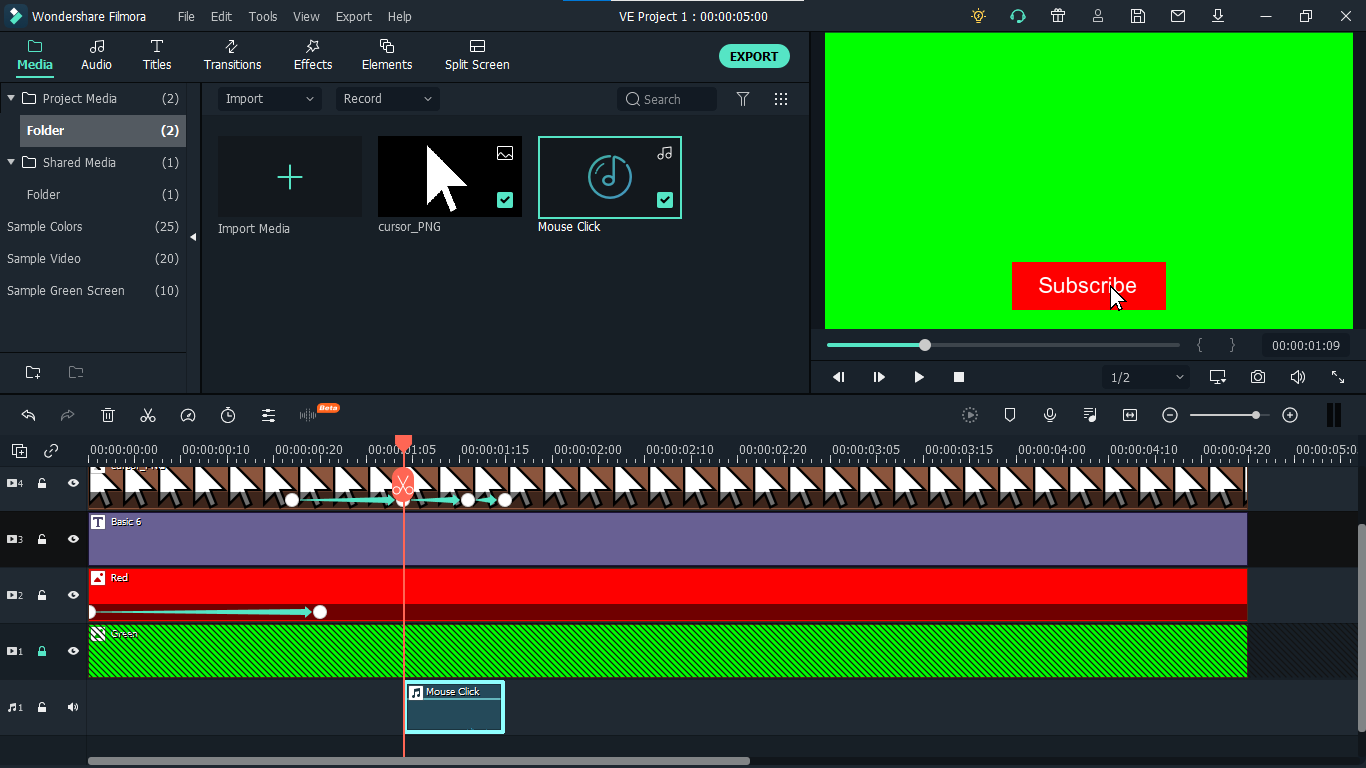
Step 17: Now it’s time to make this subscribe animation button disappear. Move forward into the time to the end, at around 4 seconds. Double click on the red button in the timeline and add a key frame at its actual scale.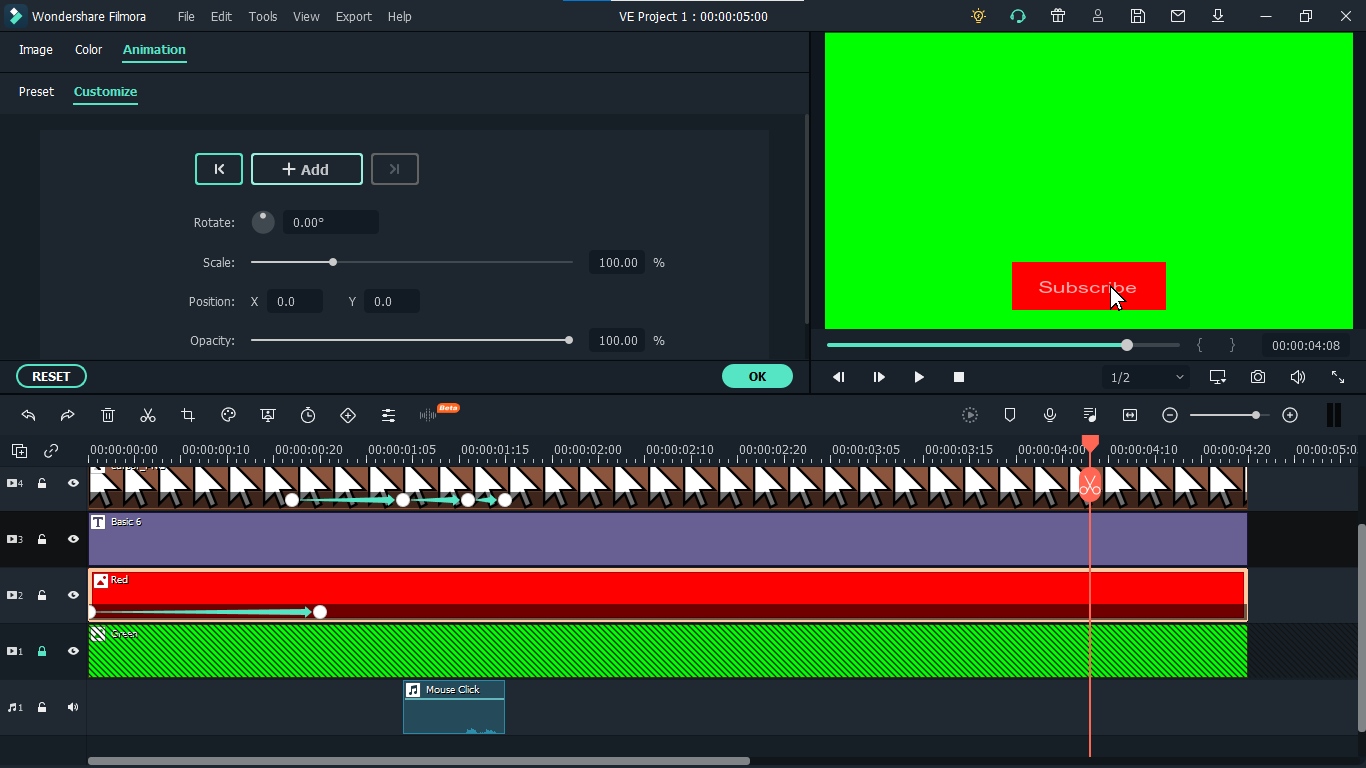
Step 18: After that, move further in the timeline to the end and make its scale 0. It will make it disappear.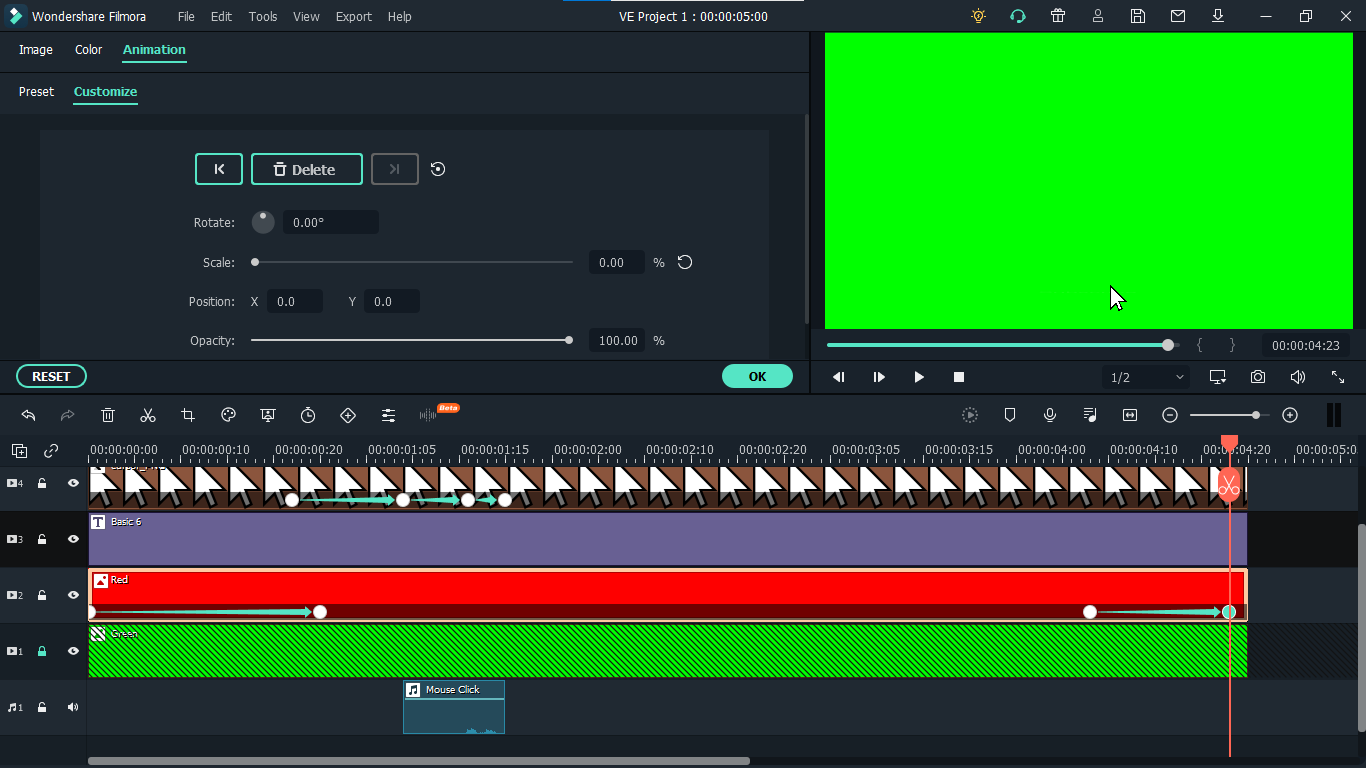
Step 19: Do the same with the cursor. Double click on the cursor in the time and add a key frame at its actual position.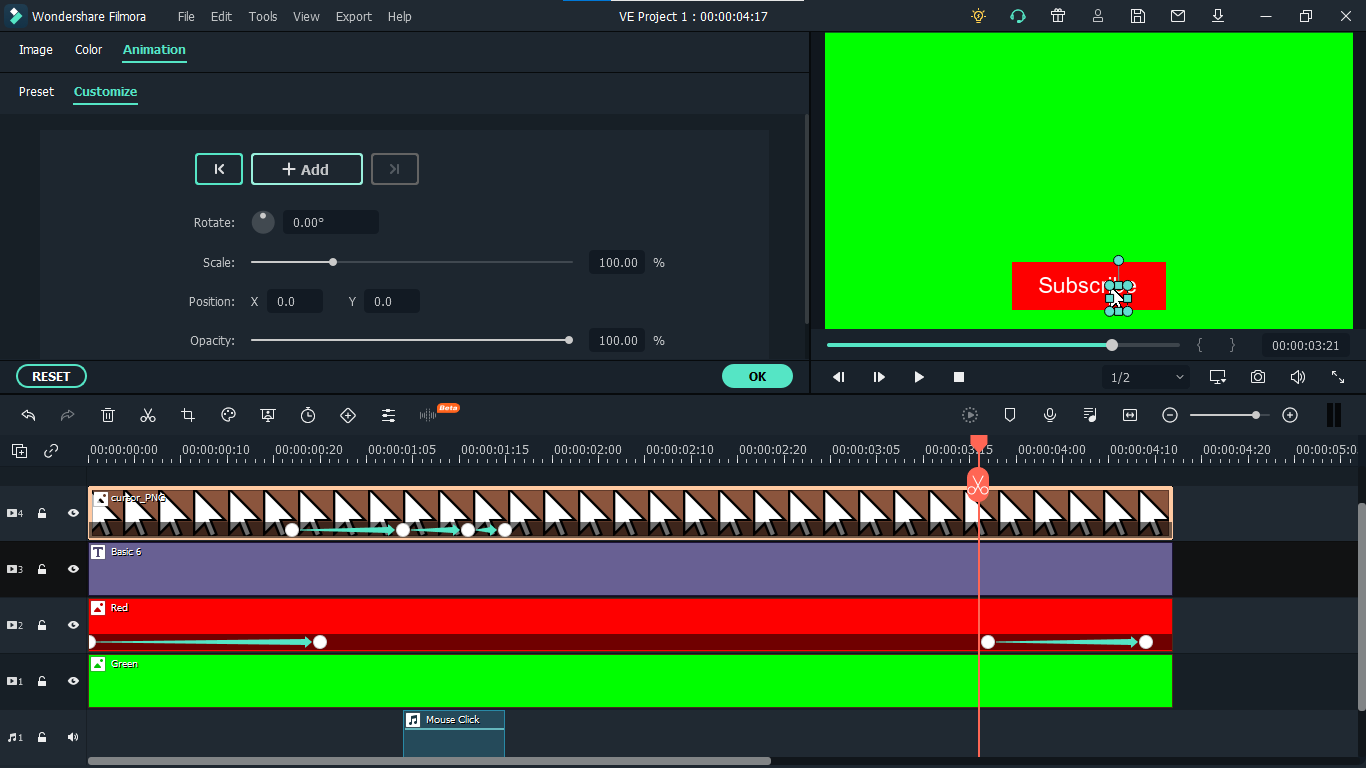
Step 20: Move ahead when you want it to disappear. Move the cursor out of the screen and click ‘OK’.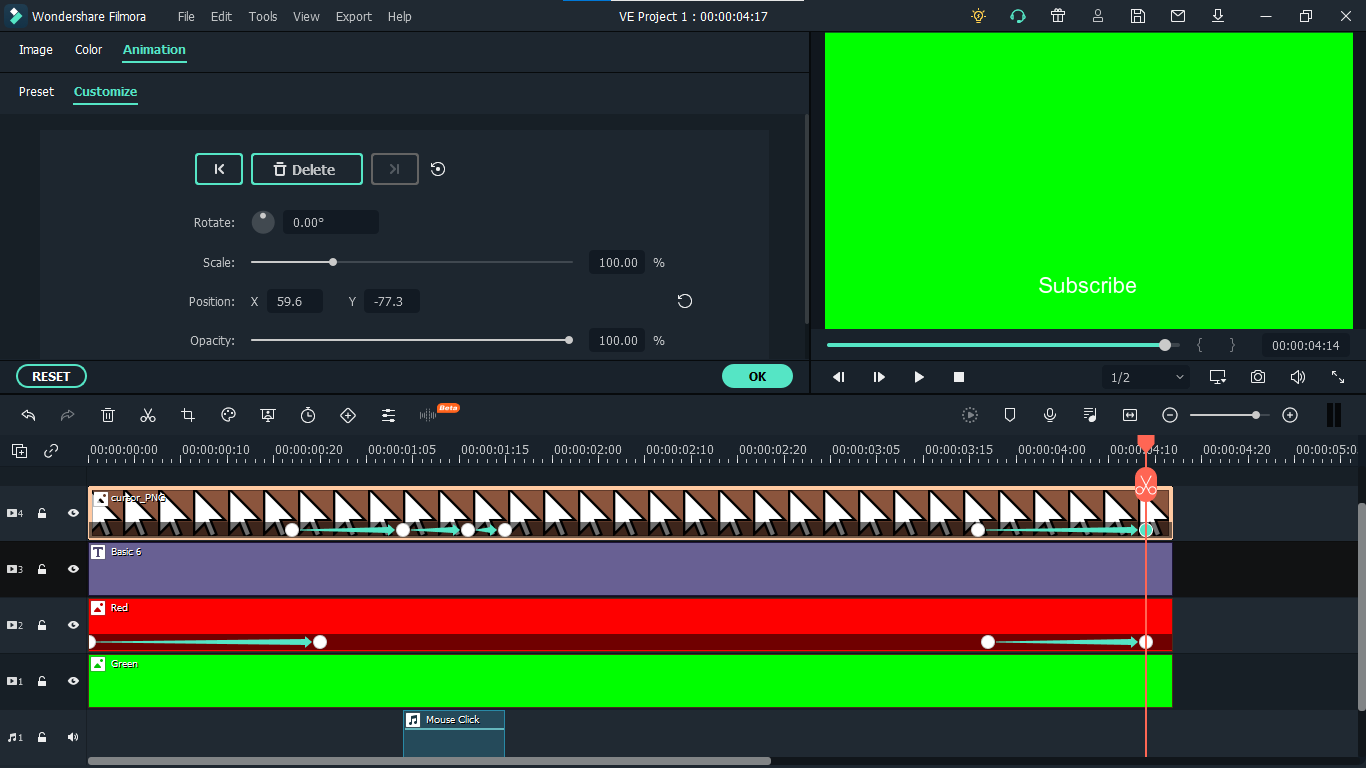
Step 21: Your Subscribe png gif is ready to be exported and used in your videos. Click on export and choose from various formats and options to choose from while exporting it.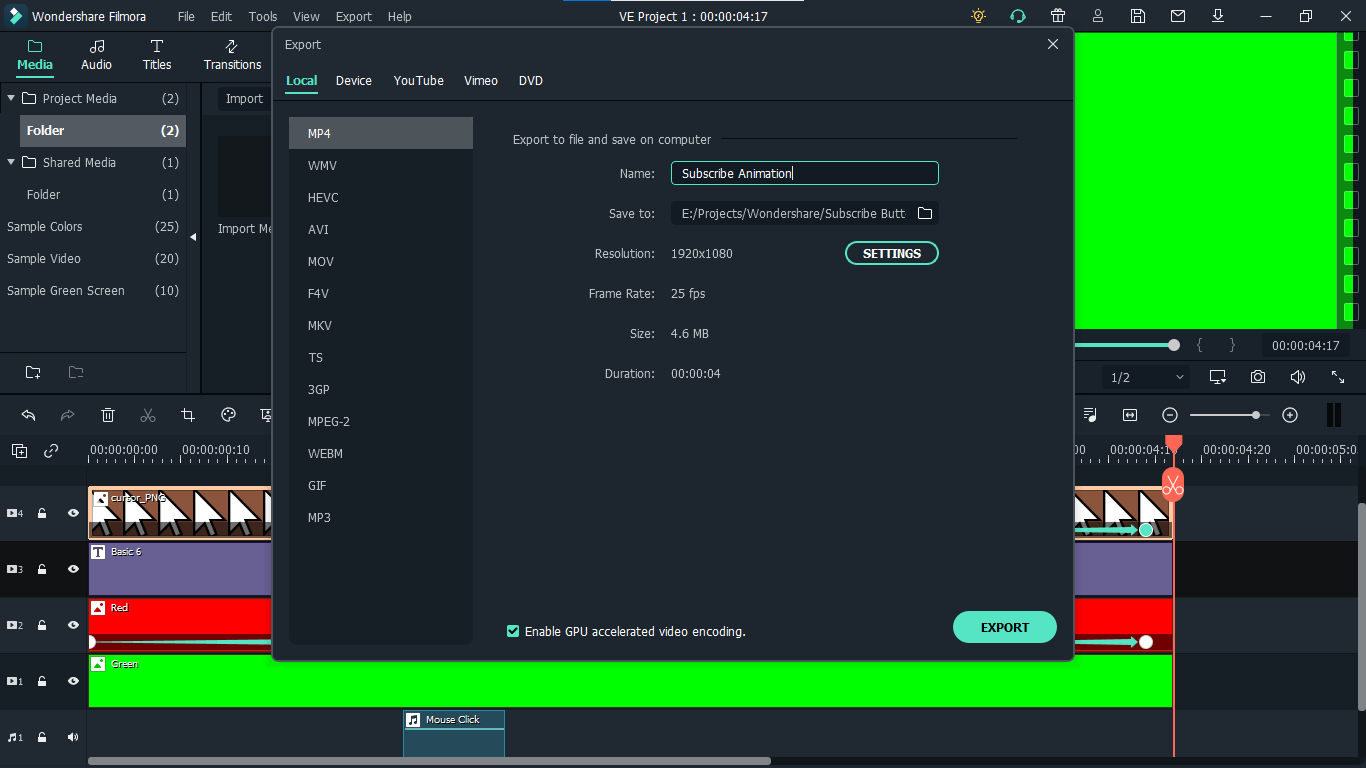
You may also like: How to Get People to Subscribe Channel
Conclusion:Your own Animated Subscribe Button is ready to be used in your future videos and projects. This is a ready-to-use subscribe button that can be easily used using the green screen effect in Filmora. Just import the clip, remove the green screen, and you are good to go. You can also customize this Subscribe Animation using your channel and more. Keep experimenting with new things using Filmora.

Richard Bennett
Richard Bennett is a writer and a lover of all things video.
Follow @Richard Bennett
Richard Bennett
Mar 27, 2024• Proven solutions
The main goal of every content creator is to increase its audience to expand its reach and views. To do so, it’s essential to provide something unique and different to the viewer. Without providing them the content they are looking for, it is impossible to grow your channel and reach. Once your content is ready and you are getting many views, it is essential to make these potential viewers your permanent viewers. The animated subscribe button will help you achieve this goal. While your viewers are watching your videos, you must remind them about subscribing to your channel for receiving such incredible content in the future. Subscribe animation plays a vital role in converting your viewers into subscribers.
There are so many platforms on the internet from where you can get Youtube subscribe button animation free, and you can also purchase these subscribe png gifs. But creating your own animated subscribe button can make you stand out from the crowd and make your videos unique and exclusive. Because it enables you to design it the way you want according to your brand, so, let’s create your own subscribe animation using Wondershare Filmora .
Step-By-Step guide
Step 1: To get started,open Filmora X. On your upper left corner, click on the “Sample Colors,” select the Green color and drag it to Video Track into the timeline. We are using a Green background to easily remove it using the green screen feature in Filmora to use it in our future projects after exporting it, without creating it again. Adjust the duration of this track according to your requirement. In my case, I am trying to make an animated subscribe button of 5 seconds.
Step 2: Lock this track by clicking on the lock icon to work on subscribe animation without disturbing the background easily.
Step 3: Now it’s time to design the subscribe png gif. Go to the Sample colors again and drag the red color into the time above the green background.
Step 4: Double click on the red color in the timeline and adjust its size. Make it look like a subscribe button that is a rectangle and place it at the bottom center of the background. You can put it anywhere you want it to appear in your future videos.
Step 5: Now, let’s add Subscribe text into the button. Go to the Title and select any style that you like. “Basic 6” will work perfectly fine for this purpose. Drag and drop it into the timeline above all tracks.
Step 6: Double click on the Title on the timeline and edit it with “Subscribe” and place it under the red rectangle and click OK.
Step 7: We have put a cursor that can click on the animated subscribe button. You can use Google Search to find a transparent cursor. Make sure to save it in png format. Download it and import it into Filmora.
Step 8: Drag and drop the cursor into the timeline and place it above all the other three tracks to make it prominent. Adjust the size of the cursor place it on the Subscribe button where you want it to appear.
Step 9: Now, it’s time to animate the design using keyframes. First of all, let’s animate the red rectangle. Double click on the red color on the timeline. Go to the ‘Animation’ tab and then click ‘Customize.’ Move to the 1 second in the timeline and click ‘Add.’
Step 10: Now go back to the beginning in the timeline and adjust the scale to 0%. It will make the rectangle pop up when you play the clip.
Step 11: Text needs to be animated as well to match it with the rectangle. Double click on the text in the timeline and click ‘ADVANCED.’
Step 12: In this Advance text editor, go to the ‘Animation’ tab and select any animation that you like. On the timeline under the preview screen, adjusts the dark areas according to the time you set on the rectangle, which was 1 second. We want the text to appear on the screen in 1 second, like the rectangle. Also, adjust the ending time when you want the text to disappear again. We have set it on 4 seconds. Which means it will start to fade after 4 seconds.
Step 13: Now, to animate the mouse cursor, we will use the same process we used for a rectangle that is key framing. Double click on the cursor track on the timeline and move the time on your timeline to a point when you want the cursor to appear. Now add a key frame by clicking ‘Add’.
Step 14: Now jump back to a point in your timeline, when the cursor will start appearing from outside the screen. Move the cursor outside the screen from where you want it to start moving toward the subscribe animation.
Step 15: To animate the click of the cursor, move ahead a little bit into your timeline and scale down the cursor to around 70%. Move it a little further and scale it up to 100%.
Step 16: You can add the sound of mouse click to make it more realistic. You can find this sound anywhere on the internet. Download it and import it into Filmora. Now place it into the timeline where it can match the movement of the cursor.
Step 17: Now it’s time to make this subscribe animation button disappear. Move forward into the time to the end, at around 4 seconds. Double click on the red button in the timeline and add a key frame at its actual scale.
Step 18: After that, move further in the timeline to the end and make its scale 0. It will make it disappear.
Step 19: Do the same with the cursor. Double click on the cursor in the time and add a key frame at its actual position.
Step 20: Move ahead when you want it to disappear. Move the cursor out of the screen and click ‘OK’.
Step 21: Your Subscribe png gif is ready to be exported and used in your videos. Click on export and choose from various formats and options to choose from while exporting it.
You may also like: How to Get People to Subscribe Channel
Conclusion:Your own Animated Subscribe Button is ready to be used in your future videos and projects. This is a ready-to-use subscribe button that can be easily used using the green screen effect in Filmora. Just import the clip, remove the green screen, and you are good to go. You can also customize this Subscribe Animation using your channel and more. Keep experimenting with new things using Filmora.

Richard Bennett
Richard Bennett is a writer and a lover of all things video.
Follow @Richard Bennett
Richard Bennett
Mar 27, 2024• Proven solutions
The main goal of every content creator is to increase its audience to expand its reach and views. To do so, it’s essential to provide something unique and different to the viewer. Without providing them the content they are looking for, it is impossible to grow your channel and reach. Once your content is ready and you are getting many views, it is essential to make these potential viewers your permanent viewers. The animated subscribe button will help you achieve this goal. While your viewers are watching your videos, you must remind them about subscribing to your channel for receiving such incredible content in the future. Subscribe animation plays a vital role in converting your viewers into subscribers.
There are so many platforms on the internet from where you can get Youtube subscribe button animation free, and you can also purchase these subscribe png gifs. But creating your own animated subscribe button can make you stand out from the crowd and make your videos unique and exclusive. Because it enables you to design it the way you want according to your brand, so, let’s create your own subscribe animation using Wondershare Filmora .
Step-By-Step guide
Step 1: To get started,open Filmora X. On your upper left corner, click on the “Sample Colors,” select the Green color and drag it to Video Track into the timeline. We are using a Green background to easily remove it using the green screen feature in Filmora to use it in our future projects after exporting it, without creating it again. Adjust the duration of this track according to your requirement. In my case, I am trying to make an animated subscribe button of 5 seconds.
Step 2: Lock this track by clicking on the lock icon to work on subscribe animation without disturbing the background easily.
Step 3: Now it’s time to design the subscribe png gif. Go to the Sample colors again and drag the red color into the time above the green background.
Step 4: Double click on the red color in the timeline and adjust its size. Make it look like a subscribe button that is a rectangle and place it at the bottom center of the background. You can put it anywhere you want it to appear in your future videos.
Step 5: Now, let’s add Subscribe text into the button. Go to the Title and select any style that you like. “Basic 6” will work perfectly fine for this purpose. Drag and drop it into the timeline above all tracks.
Step 6: Double click on the Title on the timeline and edit it with “Subscribe” and place it under the red rectangle and click OK.
Step 7: We have put a cursor that can click on the animated subscribe button. You can use Google Search to find a transparent cursor. Make sure to save it in png format. Download it and import it into Filmora.
Step 8: Drag and drop the cursor into the timeline and place it above all the other three tracks to make it prominent. Adjust the size of the cursor place it on the Subscribe button where you want it to appear.
Step 9: Now, it’s time to animate the design using keyframes. First of all, let’s animate the red rectangle. Double click on the red color on the timeline. Go to the ‘Animation’ tab and then click ‘Customize.’ Move to the 1 second in the timeline and click ‘Add.’
Step 10: Now go back to the beginning in the timeline and adjust the scale to 0%. It will make the rectangle pop up when you play the clip.
Step 11: Text needs to be animated as well to match it with the rectangle. Double click on the text in the timeline and click ‘ADVANCED.’
Step 12: In this Advance text editor, go to the ‘Animation’ tab and select any animation that you like. On the timeline under the preview screen, adjusts the dark areas according to the time you set on the rectangle, which was 1 second. We want the text to appear on the screen in 1 second, like the rectangle. Also, adjust the ending time when you want the text to disappear again. We have set it on 4 seconds. Which means it will start to fade after 4 seconds.
Step 13: Now, to animate the mouse cursor, we will use the same process we used for a rectangle that is key framing. Double click on the cursor track on the timeline and move the time on your timeline to a point when you want the cursor to appear. Now add a key frame by clicking ‘Add’.
Step 14: Now jump back to a point in your timeline, when the cursor will start appearing from outside the screen. Move the cursor outside the screen from where you want it to start moving toward the subscribe animation.
Step 15: To animate the click of the cursor, move ahead a little bit into your timeline and scale down the cursor to around 70%. Move it a little further and scale it up to 100%.
Step 16: You can add the sound of mouse click to make it more realistic. You can find this sound anywhere on the internet. Download it and import it into Filmora. Now place it into the timeline where it can match the movement of the cursor.
Step 17: Now it’s time to make this subscribe animation button disappear. Move forward into the time to the end, at around 4 seconds. Double click on the red button in the timeline and add a key frame at its actual scale.
Step 18: After that, move further in the timeline to the end and make its scale 0. It will make it disappear.
Step 19: Do the same with the cursor. Double click on the cursor in the time and add a key frame at its actual position.
Step 20: Move ahead when you want it to disappear. Move the cursor out of the screen and click ‘OK’.
Step 21: Your Subscribe png gif is ready to be exported and used in your videos. Click on export and choose from various formats and options to choose from while exporting it.
You may also like: How to Get People to Subscribe Channel
Conclusion:Your own Animated Subscribe Button is ready to be used in your future videos and projects. This is a ready-to-use subscribe button that can be easily used using the green screen effect in Filmora. Just import the clip, remove the green screen, and you are good to go. You can also customize this Subscribe Animation using your channel and more. Keep experimenting with new things using Filmora.

Richard Bennett
Richard Bennett is a writer and a lover of all things video.
Follow @Richard Bennett
Richard Bennett
Mar 27, 2024• Proven solutions
The main goal of every content creator is to increase its audience to expand its reach and views. To do so, it’s essential to provide something unique and different to the viewer. Without providing them the content they are looking for, it is impossible to grow your channel and reach. Once your content is ready and you are getting many views, it is essential to make these potential viewers your permanent viewers. The animated subscribe button will help you achieve this goal. While your viewers are watching your videos, you must remind them about subscribing to your channel for receiving such incredible content in the future. Subscribe animation plays a vital role in converting your viewers into subscribers.
There are so many platforms on the internet from where you can get Youtube subscribe button animation free, and you can also purchase these subscribe png gifs. But creating your own animated subscribe button can make you stand out from the crowd and make your videos unique and exclusive. Because it enables you to design it the way you want according to your brand, so, let’s create your own subscribe animation using Wondershare Filmora .
Step-By-Step guide
Step 1: To get started,open Filmora X. On your upper left corner, click on the “Sample Colors,” select the Green color and drag it to Video Track into the timeline. We are using a Green background to easily remove it using the green screen feature in Filmora to use it in our future projects after exporting it, without creating it again. Adjust the duration of this track according to your requirement. In my case, I am trying to make an animated subscribe button of 5 seconds.
Step 2: Lock this track by clicking on the lock icon to work on subscribe animation without disturbing the background easily.
Step 3: Now it’s time to design the subscribe png gif. Go to the Sample colors again and drag the red color into the time above the green background.
Step 4: Double click on the red color in the timeline and adjust its size. Make it look like a subscribe button that is a rectangle and place it at the bottom center of the background. You can put it anywhere you want it to appear in your future videos.
Step 5: Now, let’s add Subscribe text into the button. Go to the Title and select any style that you like. “Basic 6” will work perfectly fine for this purpose. Drag and drop it into the timeline above all tracks.
Step 6: Double click on the Title on the timeline and edit it with “Subscribe” and place it under the red rectangle and click OK.
Step 7: We have put a cursor that can click on the animated subscribe button. You can use Google Search to find a transparent cursor. Make sure to save it in png format. Download it and import it into Filmora.
Step 8: Drag and drop the cursor into the timeline and place it above all the other three tracks to make it prominent. Adjust the size of the cursor place it on the Subscribe button where you want it to appear.
Step 9: Now, it’s time to animate the design using keyframes. First of all, let’s animate the red rectangle. Double click on the red color on the timeline. Go to the ‘Animation’ tab and then click ‘Customize.’ Move to the 1 second in the timeline and click ‘Add.’
Step 10: Now go back to the beginning in the timeline and adjust the scale to 0%. It will make the rectangle pop up when you play the clip.
Step 11: Text needs to be animated as well to match it with the rectangle. Double click on the text in the timeline and click ‘ADVANCED.’
Step 12: In this Advance text editor, go to the ‘Animation’ tab and select any animation that you like. On the timeline under the preview screen, adjusts the dark areas according to the time you set on the rectangle, which was 1 second. We want the text to appear on the screen in 1 second, like the rectangle. Also, adjust the ending time when you want the text to disappear again. We have set it on 4 seconds. Which means it will start to fade after 4 seconds.
Step 13: Now, to animate the mouse cursor, we will use the same process we used for a rectangle that is key framing. Double click on the cursor track on the timeline and move the time on your timeline to a point when you want the cursor to appear. Now add a key frame by clicking ‘Add’.
Step 14: Now jump back to a point in your timeline, when the cursor will start appearing from outside the screen. Move the cursor outside the screen from where you want it to start moving toward the subscribe animation.
Step 15: To animate the click of the cursor, move ahead a little bit into your timeline and scale down the cursor to around 70%. Move it a little further and scale it up to 100%.
Step 16: You can add the sound of mouse click to make it more realistic. You can find this sound anywhere on the internet. Download it and import it into Filmora. Now place it into the timeline where it can match the movement of the cursor.
Step 17: Now it’s time to make this subscribe animation button disappear. Move forward into the time to the end, at around 4 seconds. Double click on the red button in the timeline and add a key frame at its actual scale.
Step 18: After that, move further in the timeline to the end and make its scale 0. It will make it disappear.
Step 19: Do the same with the cursor. Double click on the cursor in the time and add a key frame at its actual position.
Step 20: Move ahead when you want it to disappear. Move the cursor out of the screen and click ‘OK’.
Step 21: Your Subscribe png gif is ready to be exported and used in your videos. Click on export and choose from various formats and options to choose from while exporting it.
You may also like: How to Get People to Subscribe Channel
Conclusion:Your own Animated Subscribe Button is ready to be used in your future videos and projects. This is a ready-to-use subscribe button that can be easily used using the green screen effect in Filmora. Just import the clip, remove the green screen, and you are good to go. You can also customize this Subscribe Animation using your channel and more. Keep experimenting with new things using Filmora.

Richard Bennett
Richard Bennett is a writer and a lover of all things video.
Follow @Richard Bennett
Easy Path From Spotify to YouTube: Discover the Best Playlist Tools
Do you want to transfer your playlist to YouTube Music from Spotify? After all, there are some significant advantages to using the former over the latter. For one, YouTube Music offers a broader range of songs and videos without ads.
Though Spotify is a widely used music streaming app, its many limitations for non-Premium members have driven users to look for alternatives. For example, 30-second ads that play every 15 minutes and the inability to skip songs are among the app’s most frustrating features.
So, if you’re ready to convert Spotify playlists to YouTube Music, let’s get started!
Recommendation And Guidance For Using The Playlist Transfer Tools
With Spotify and YouTube Music, you can access millions of songs and playlists at the click of a button.
But what if you want to move your Spotify playlist to YouTube Music? Luckily, the following 5 best tools can help you to do just that.
| Name | Price | Transfer amount limit | Speed | Compatibility |
|---|---|---|---|---|
| Playlist Buddy | Free | 250 songs per playlist. | 1 minute | YouTube and Spotify |
| TuneMyMusic | Free | 1,000 tracks | 38 seconds. | Spotify, Itunes, Apple Music, Nanpster, YouTube, Deezer, Tidal, Google Play Music, and Amazon Music |
| Soundiiz | Free | 200 tracks | 26 seconds. | Spotify, Apple Music, YouTube Music, TIDAL, and more |
| Playlist Converter | Free | unlimited | Slow processing | YouTube Music, Spotify, PLS, Deezer |
| SongShift | Free | Unlimited | 40 seconds | Spotify, YouTube Music, Apple Music, Deezer, Amazon Music, Discogs, and more |
Playlist Buddy
Playlist Buddy is a free-to-use online tool that is fully dedicated to converting your Spotify playlist to YouTube within a minute. The program is quick, easy, and simple- so there’s no excuse not to try it out!
Key Features
- Transfers playlists one-by-one
- Free to use
- Compatible with YouTube and Spotify
- Can convert your lists to a CSV file
Limitations
- Cannot be used for other music streaming services
- Limited to only 250 tracks per playlist
How To Use?
To transfer your Spotify Playlist to YouTube Music using the Playlist Buddy, do the following steps:
Step1 First, open a browser on your PC and visit the “Playlist Buddy” site. Click “Login to Spotify.”
Step2 Now, click “Agree” to provide access to your account information. Click the “Sign in YouTube” button and log in to your account.
Step3 Select your Spotify playlist, click “Convert Playlist,” and Playlist Buddy will start transferring your Spotify to YouTube playlist.

Tune My Music
Tune My Music is another free tool that offers 96% accuracy while converting your Spotify playlist to YouTube Music. With this platform, you can transfer up to 1000 tracks at a time in just a few seconds.
Key Features
- Intuitive interface and workflow
- Can transfer playlists in batches
- Transfers tracks in 38 seconds
- Synchronizes two playlists from two different music services
- Backups your songs
Limitations
- Does not transfer playlists/tracks in order
- No playlist descriptions
How To Use?
The following steps will help you use the TuneMyMusic platform to convert your Spotify playlist to YouTube Music:
Step1 Visit the Tune My Music website using your browser and click the “Let’s Start” option.
Step2 On the “Select The Source” page, choose “Spotify” as your source and sign in to your account.
Step3 Now, load your Spotify playlist or paste its URL from your account. Click “Next: Select Destination” on the next page and choose “YouTube Music” from the given options.
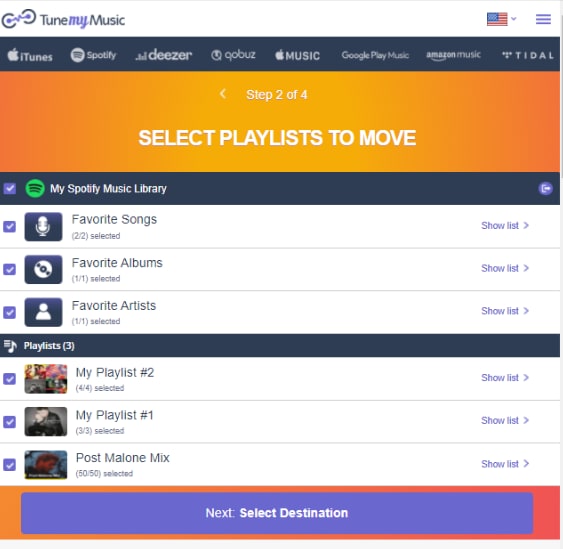
Finally, click “Start Moving My Music” to convert your Spotify playlist to YouTube Music.
Soundiiz
If you want to quickly and instantly convert your Spotify playlist to YouTube, Soundiiz is the right solution for you! This tool is free and compatible with multiple musics streaming services.
Key Features
- 98% accuracy while transferring songs
- Fast transfer of playlists between many platforms
- No app download is required
- Excellent UI
Limitations
- Transfers albums, artists, and liked songs only in the premium version
- Can only transfer 200 tracks
How To Use
Follow these steps to convert your Spotify playlist to YouTube music using Soundiiz:
Step1 In the first step, visit the Soundiiz website and click the “Start Now” option.
Step2 Select the “Sign in with Spotify” option from the list to log in to your account and click “Access” to provide permission to access your details.

Step3 Select “YouTube Music” from the left-side panel and click “Connect.” Now, sign in to your account.
Step4 Now, open the “Transfer” tab, choose “Spotify” as a source, and go to “Playlists.” Choose the Spotify playlist and click “Confirm and Continue.”

Step5 Configure your playlist and click the “Save Configuration” option. Next, click “Confirm” and choose “YouTube Music” on the next page to convert your Spotify to a YouTube playlist.
Playlist Converter
Playlist Converter allows you to take your favorite Spotify playlists and convert them to YouTube Music, Apple Music, Google Play Music, or Amazon Music.
This handy platform is easy-to-use and only takes a few minutes to convert your favorite playlists.
Key Features
- Converts to multiple music sources and file formats
- Available for free
- Unlimited transfers
- No registration is required
Limitations
- Not much accurate
- It takes time to process
How To Use?
To use the Playlist Converter tool for converting Spotify playlists to YouTube Music, follow these steps in sequence:
Step1 Visit the Playlist Converter website using your browser and go to the “Spotify” tab.
Step2 Click “Log in with Spotify” and sign in to your account. Make sure to provide access to your details.
Step3 Select your Spotify playlist and click “Export to YouTube Account.” Next, click the “Login With YouTube and Export the Playlist” option and sign in to your account.

Playlist Converter will fetch your playlist details and transfer them to your YouTube account.
SongShift
SongShift is an iOS app that allows you to transfer your songs between music streaming platforms. It’s an excellent way to keep all your song tracks in one place, no matter where you prefer to stream them.
The app is easy to use and only takes a few steps to get started!
Key Features
- It lets you fix mismatches
- Excellent user experience and interface
- Transfers tracks to multiple music streaming platforms
- Unlimited song transfer
Limitations
- Only available for iOS devices
How To Use?
Here’s how you can use the SongShift app to convert your Spotify playlist to your YouTube Music account:
Step1 Open the App Store on your iOS device, install the SongShift app and launch it.
Step2 On the app’s main page, tap “Connect Your Music” and go to the “Music Services” page. Select “Spotify” and click the “Connect” option.
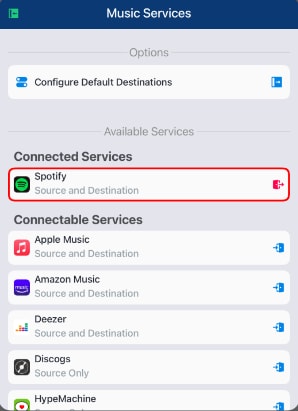
Step3 Now, sign in to your Spotify account and tap the “Plus” icon at the bottom of the screen.
Step4 Tap the “Setup Source” option under New Configuration and choose “Spotify” as the source service.
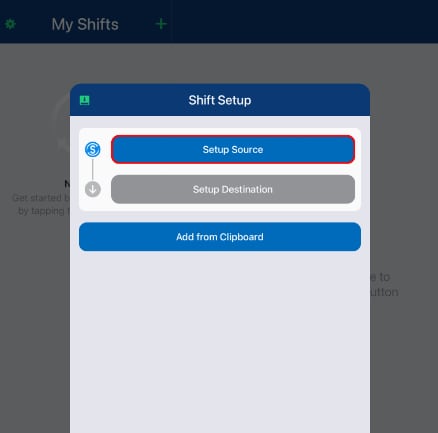
Next, tap “Playlist” under the “Select Media Type” header and find your Spotify playlist.
Step5 Afterward, tap the “Setup Destination” option and select “YouTube Music.” Now, choose your destination type and tap “I’m Finished” to start transferring your Spotify playlist to YouTube Music.
Bonus Video Tutorial: Another Way To See the Music - Audio Visualization Effects
Hopefully, this article helped resolve your query, and you can now quickly transfer all your favorite playlists from Spotify to YouTube Music.
Besides, before the end, we want to show you another exciting way to feel the music - Audio Visualization Effects. The effect will intelligently match the sound in your video while also adding dynamic effects. You can try it in a user-friendly video editor Filmora . If you want to know more about the effect and how to realize it with Filmoea, please watch the video we specially prepared for you below.
Free Download For Win 7 or later(64-bit)
Free Download For macOS 10.14 or later
Conclusion
This comprehensive guide recommends the 5 best tools to help you convert Spotify playlists to YouTube Music. In addition, we’ve provided a step-by-step process of using each tool, its key features, and its limitations to help you make the right decisions.
Playlist Buddy is a free-to-use online tool that is fully dedicated to converting your Spotify playlist to YouTube within a minute. The program is quick, easy, and simple- so there’s no excuse not to try it out!
Key Features
- Transfers playlists one-by-one
- Free to use
- Compatible with YouTube and Spotify
- Can convert your lists to a CSV file
Limitations
- Cannot be used for other music streaming services
- Limited to only 250 tracks per playlist
How To Use?
To transfer your Spotify Playlist to YouTube Music using the Playlist Buddy, do the following steps:
Step1 First, open a browser on your PC and visit the “Playlist Buddy” site. Click “Login to Spotify.”
Step2 Now, click “Agree” to provide access to your account information. Click the “Sign in YouTube” button and log in to your account.
Step3 Select your Spotify playlist, click “Convert Playlist,” and Playlist Buddy will start transferring your Spotify to YouTube playlist.

Tune My Music
Tune My Music is another free tool that offers 96% accuracy while converting your Spotify playlist to YouTube Music. With this platform, you can transfer up to 1000 tracks at a time in just a few seconds.
Key Features
- Intuitive interface and workflow
- Can transfer playlists in batches
- Transfers tracks in 38 seconds
- Synchronizes two playlists from two different music services
- Backups your songs
Limitations
- Does not transfer playlists/tracks in order
- No playlist descriptions
How To Use?
The following steps will help you use the TuneMyMusic platform to convert your Spotify playlist to YouTube Music:
Step1 Visit the Tune My Music website using your browser and click the “Let’s Start” option.
Step2 On the “Select The Source” page, choose “Spotify” as your source and sign in to your account.
Step3 Now, load your Spotify playlist or paste its URL from your account. Click “Next: Select Destination” on the next page and choose “YouTube Music” from the given options.

Finally, click “Start Moving My Music” to convert your Spotify playlist to YouTube Music.
Soundiiz
If you want to quickly and instantly convert your Spotify playlist to YouTube, Soundiiz is the right solution for you! This tool is free and compatible with multiple musics streaming services.
Key Features
- 98% accuracy while transferring songs
- Fast transfer of playlists between many platforms
- No app download is required
- Excellent UI
Limitations
- Transfers albums, artists, and liked songs only in the premium version
- Can only transfer 200 tracks
How To Use
Follow these steps to convert your Spotify playlist to YouTube music using Soundiiz:
Step1 In the first step, visit the Soundiiz website and click the “Start Now” option.
Step2 Select the “Sign in with Spotify” option from the list to log in to your account and click “Access” to provide permission to access your details.

Step3 Select “YouTube Music” from the left-side panel and click “Connect.” Now, sign in to your account.
Step4 Now, open the “Transfer” tab, choose “Spotify” as a source, and go to “Playlists.” Choose the Spotify playlist and click “Confirm and Continue.”

Step5 Configure your playlist and click the “Save Configuration” option. Next, click “Confirm” and choose “YouTube Music” on the next page to convert your Spotify to a YouTube playlist.
Playlist Converter
Playlist Converter allows you to take your favorite Spotify playlists and convert them to YouTube Music, Apple Music, Google Play Music, or Amazon Music.
This handy platform is easy-to-use and only takes a few minutes to convert your favorite playlists.
Key Features
- Converts to multiple music sources and file formats
- Available for free
- Unlimited transfers
- No registration is required
Limitations
- Not much accurate
- It takes time to process
How To Use?
To use the Playlist Converter tool for converting Spotify playlists to YouTube Music, follow these steps in sequence:
Step1 Visit the Playlist Converter website using your browser and go to the “Spotify” tab.
Step2 Click “Log in with Spotify” and sign in to your account. Make sure to provide access to your details.
Step3 Select your Spotify playlist and click “Export to YouTube Account.” Next, click the “Login With YouTube and Export the Playlist” option and sign in to your account.

Playlist Converter will fetch your playlist details and transfer them to your YouTube account.
SongShift
SongShift is an iOS app that allows you to transfer your songs between music streaming platforms. It’s an excellent way to keep all your song tracks in one place, no matter where you prefer to stream them.
The app is easy to use and only takes a few steps to get started!
Key Features
- It lets you fix mismatches
- Excellent user experience and interface
- Transfers tracks to multiple music streaming platforms
- Unlimited song transfer
Limitations
- Only available for iOS devices
How To Use?
Here’s how you can use the SongShift app to convert your Spotify playlist to your YouTube Music account:
Step1 Open the App Store on your iOS device, install the SongShift app and launch it.
Step2 On the app’s main page, tap “Connect Your Music” and go to the “Music Services” page. Select “Spotify” and click the “Connect” option.

Step3 Now, sign in to your Spotify account and tap the “Plus” icon at the bottom of the screen.
Step4 Tap the “Setup Source” option under New Configuration and choose “Spotify” as the source service.

Next, tap “Playlist” under the “Select Media Type” header and find your Spotify playlist.
Step5 Afterward, tap the “Setup Destination” option and select “YouTube Music.” Now, choose your destination type and tap “I’m Finished” to start transferring your Spotify playlist to YouTube Music.
Bonus Video Tutorial: Another Way To See the Music - Audio Visualization Effects
Hopefully, this article helped resolve your query, and you can now quickly transfer all your favorite playlists from Spotify to YouTube Music.
Besides, before the end, we want to show you another exciting way to feel the music - Audio Visualization Effects. The effect will intelligently match the sound in your video while also adding dynamic effects. You can try it in a user-friendly video editor Filmora . If you want to know more about the effect and how to realize it with Filmoea, please watch the video we specially prepared for you below.
Free Download For Win 7 or later(64-bit)
Free Download For macOS 10.14 or later
Conclusion
This comprehensive guide recommends the 5 best tools to help you convert Spotify playlists to YouTube Music. In addition, we’ve provided a step-by-step process of using each tool, its key features, and its limitations to help you make the right decisions.
Also read:
- [New] 2024 Approved Activating Built-In Recorders on Mate and P Series Phones (Mate 10/20; P20/10).
- [New] Mastering Content Discovery with Powerful Title & Tag Use
- [New] Orchestrated Journey Through YouTube's Undisclosed Content
- [New] Realigning Your Personal Soundtracks From Spotify to YouTube Music
- [New] Snug Scenes for Snowy Screens A Focused List
- Free Visual Templates to Upgrade Your Profile for 2024
- Get the Latest HP OfficeJet N4650 Windows Drivers – Free Downloads
- How to Transfer a DVD Onto a USB Drive Using Windows or macOS
- In 2024, Capture Screens, Free! - Cross-Platform for Windows/Mac Users
- In 2024, Does Immediate Subscribing Affect Content Recommendations?
- In 2024, Expand Access to Creative Works Pick From the Best Free YouTube Shorts Downloader Apps
- In 2024, Streamlining Your Personal Library From Spotify, To YouTube Music
- Innovative Solutions Advanced Mobile Recording on Android
- Key Strategies Utilizing Hashtags in YouTube Gaming Content for 2024
- Missing HDMI Interface for GPUs
- Stay Secure Online: Understanding the Rise of Twitter Frauds, Meta's Authentication Milestone, & The Mechanics Behind ChatGPT-4
- Title: [New] How to Make YouTube Animated Subscribe Button Easily in Filmora
- Author: Thomas
- Created at : 2024-11-29 16:01:35
- Updated at : 2024-12-03 16:02:03
- Link: https://youtube-help.techidaily.com/new-how-to-make-youtube-animated-subscribe-button-easily-in-filmora/
- License: This work is licensed under CC BY-NC-SA 4.0.

