![[New] Pioneering the Perfect Playlist for YouTube Music Enthusiasts](https://thmb.techidaily.com/2b5408cdd9aa5a17f9e7b91e863fefaf73cf6e1aca47c82b58449d867a0d4a44.jpg)
[New] Pioneering the Perfect Playlist for YouTube Music Enthusiasts
Pioneering the Perfect Playlist for YouTube Music Enthusiasts
YouTube is one of the biggest video-sharing websites where you can find unlimited videos of your favorite songs in various genres for free. However, due to the thousands of channels on YouTube, remember a soundtrack you once liked.
To tackle this issue, you must create a playlist containing only those you prefer to listen to.
So, if you are looking for information on creating a YouTube music playlist on your Windows or Mac PC, Android, or iPhone web browser, read this article and follow the steps carefully.
How to Create a YouTube Music Playlist?
Are you one of those who want to listen to their favorite tracks while working out or carrying on their work-related tasks? If that’s the case, a YouTube Playlist might come in handy as you don’t have to search again and again for your songs on your device.
How To Create a YouTube Music Playlist on the Web?
If you are using a Windows or Mac computer and want to create a YouTube music playlist on a web browser, follow the below steps:
Step1 In the first step, turn on your PC, launch a web browser from the desktop or Dock, and head to theYouTube website. Next, Sign into your account with your Google email ID if you are not already logged in.

![]()
Note: It is only possible to create a YouTube music playlist by signing into your account.
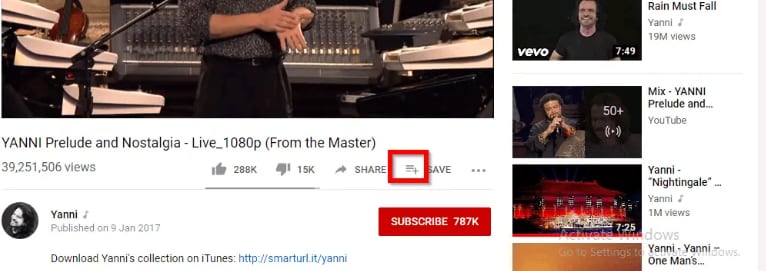
Step2 When you have signed in, look for your favorite track on the YouTube live feed page or search for it in the search bar at the top of the screen. Once you have found the song, click on it to play it, click the three horizontal dots at the bottom right-hand side of the video, and select the “Save” option from the small pop-up.
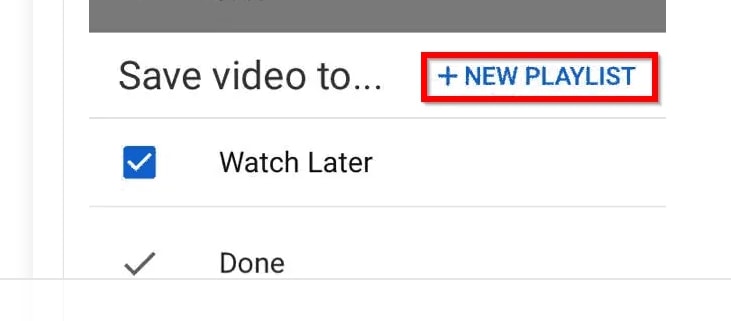
Step3
- Now, select the “Create a new playlist”
- Type in the name of your playlist.
- Choose to make it Public, Unlisted, or Private.

The differences between the three options are:
- A Public playlist is a list of videos that any random person can see, access, or use it.
- An Unlisted playlist can be shared with others by using its link to access it.
- A Private playlist cannot be seen, accessed or used by anyone except you.
Finally, click the “Create” button, and your YouTube music playlist will be saved automatically.
Step4 Repeat the second and third steps to save all the other songs you wish to add to the same playlist. Once done, head back to the main YouTube feed page, click “Library,” and scroll to the middle of the page in the right pane to access and play the music playlist at your will.

![]()
Note: You can always edit your YouTube music playlist by changing its name, privacy, and description or adding and removing any tracks. It is also possible to delete any of your playlists or create and save multiple playlists on your device’s web browser.
How to Create a YouTube Music playlist on iPhone?
To create a YouTube music playlist on your iPhone, follow these quick steps.:
Step1 Download and launch the YouTube Music app on your iPhone , sign into your account, and tap a song you want to add to your playlist. Next, tap on the music video once for the create a playlist option to pop up.

Step2 Now tap the three horizontal lines with the Plus icon, tap “+ NEW PLAYLIST” at the bottom right corner of the screen, and type in the name of the new music playlist.
Step3 In the next step, type in the name of your new playlist, select your privacy preferences, i.e., Private, Public, or unlisted, and tap “Create” to complete the process.

Finally, close the video, tap “Library” at the bottom of the screen, scroll down and see your new YouTube music playlist.
How to Create a YouTube Music playlist on Android?
YouTube Music app interface for Android is different than for iPhone, so do the following steps to create a new playlist quickly.
Step1 Download and launch the YouTube Music app on your Android , sign into your account, and tap a song to open it. Next, tap on the music video once and tap the three horizontal lines with the Plus icon.
Then, tap “Create a new playlist” at the bottom right corner of the screen, and type in the name of the new music playlist.

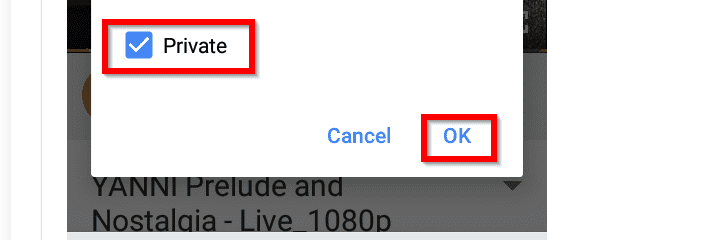
Step2 In the next step, choose your privacy preferences and tap “OK” to create the new YouTube music playlist.
Now tap to close the video, tap “Library” at the bottom of the screen, scroll down in the middle of the app and view your new YouTube music playlist.
![]()
Note: You may see an option to create a new channel during the YouTube music playlist process. If so, tap “Create Channel” to see the “+ NEW PLAYLIST” option on your iPhone and the “Create a new playlist” option on your Android YouTube app.
Bonus Video Tutorial: From a YouTube User to Creator - How To Make Music Video
You know how to create a YouTube playlist on the web or on your mobile. However, as you are a music lover and use YouTube frequently, are you interested in creating music videos by yourself? If yes, please watch the video below. It will show you how to make music videos with a user-friendly video editor, Filmora . We hope you can enjoy your YouTube music while exploring more creative possibilities:
Free Download For Win 7 or later(64-bit)
Free Download For macOS 10.14 or later
Conclusion
Listening to YouTube’s free music tracks is more fun when you do not have to go and forth to search for your favorite songs. You can enjoy the experience more when you have personalized playlists for situations like a long drive, studying, or working in an office.
So, in this article, we have discussed a step-by-step process for creating a YouTube music playlist on a web browser, Android, and iPhone, and hopefully, you can dance to your favorite beats without searching for them first on YouTube.
Step2 When you have signed in, look for your favorite track on the YouTube live feed page or search for it in the search bar at the top of the screen. Once you have found the song, click on it to play it, click the three horizontal dots at the bottom right-hand side of the video, and select the “Save” option from the small pop-up.
Step3
- Now, select the “Create a new playlist”
- Type in the name of your playlist.
- Choose to make it Public, Unlisted, or Private.
The differences between the three options are:
- A Public playlist is a list of videos that any random person can see, access, or use it.
- An Unlisted playlist can be shared with others by using its link to access it.
- A Private playlist cannot be seen, accessed or used by anyone except you.
Finally, click the “Create” button, and your YouTube music playlist will be saved automatically.
Step4 Repeat the second and third steps to save all the other songs you wish to add to the same playlist. Once done, head back to the main YouTube feed page, click “Library,” and scroll to the middle of the page in the right pane to access and play the music playlist at your will.
![]()
Note: You can always edit your YouTube music playlist by changing its name, privacy, and description or adding and removing any tracks. It is also possible to delete any of your playlists or create and save multiple playlists on your device’s web browser.
How to Create a YouTube Music playlist on iPhone?
To create a YouTube music playlist on your iPhone, follow these quick steps.:
Step1 Download and launch the YouTube Music app on your iPhone , sign into your account, and tap a song you want to add to your playlist. Next, tap on the music video once for the create a playlist option to pop up.
Step2 Now tap the three horizontal lines with the Plus icon, tap “+ NEW PLAYLIST” at the bottom right corner of the screen, and type in the name of the new music playlist.
Step3 In the next step, type in the name of your new playlist, select your privacy preferences, i.e., Private, Public, or unlisted, and tap “Create” to complete the process.
Finally, close the video, tap “Library” at the bottom of the screen, scroll down and see your new YouTube music playlist.
How to Create a YouTube Music playlist on Android?
YouTube Music app interface for Android is different than for iPhone, so do the following steps to create a new playlist quickly.
Step1 Download and launch the YouTube Music app on your Android , sign into your account, and tap a song to open it. Next, tap on the music video once and tap the three horizontal lines with the Plus icon.
Then, tap “Create a new playlist” at the bottom right corner of the screen, and type in the name of the new music playlist.
Step2 In the next step, choose your privacy preferences and tap “OK” to create the new YouTube music playlist.
Now tap to close the video, tap “Library” at the bottom of the screen, scroll down in the middle of the app and view your new YouTube music playlist.
![]()
Note: You may see an option to create a new channel during the YouTube music playlist process. If so, tap “Create Channel” to see the “+ NEW PLAYLIST” option on your iPhone and the “Create a new playlist” option on your Android YouTube app.
Bonus Video Tutorial: From a YouTube User to Creator - How To Make Music Video
You know how to create a YouTube playlist on the web or on your mobile. However, as you are a music lover and use YouTube frequently, are you interested in creating music videos by yourself? If yes, please watch the video below. It will show you how to make music videos with a user-friendly video editor, Filmora . We hope you can enjoy your YouTube music while exploring more creative possibilities:
Free Download For Win 7 or later(64-bit)
Free Download For macOS 10.14 or later
Conclusion
Listening to YouTube’s free music tracks is more fun when you do not have to go and forth to search for your favorite songs. You can enjoy the experience more when you have personalized playlists for situations like a long drive, studying, or working in an office.
So, in this article, we have discussed a step-by-step process for creating a YouTube music playlist on a web browser, Android, and iPhone, and hopefully, you can dance to your favorite beats without searching for them first on YouTube.
Smooth Streaming: Elite Stabilizers Reviewed
Best Camera Stabilizers for YouTube

Richard Bennett
Mar 27, 2024• Proven solutions
When a YouTube video is shaky it’s hard to focus on what is happening in it. Camera shake is a huge distraction and, if it is a persistent problem in your YouTube videos, it will be hard to get subscribers. Shakiness is an easy problem to correct. With a bit of equipment, or a bit of creativity, it is easy to make sure your YouTube videos are nice and smooth.
Best Camera Stabilizers for YouTube
This article will talk about different types of equipment you can use to stabilize your camera. For vloggers on a budget, there is even one tip on stabilizing your camera without camera equipment. Here are some of the best stabilizers for YouTube videos:
Part 1. Tripod
A tripod is a three-legged stand you can mount your camera to. The height of a tripod can be adjusted so you can set your camera up at the level that works best for you. Because tripods can stand alone you can set your camera up to record yourself without needing a helper.
Tripods are the best choice for vlogs that revolve around you standing (or sitting) and delivering information, like opinion or beauty vlogs.
Part 2. Monopod
A monopod is like a tripod in the sense that you can adjust its height, but unlike a tripod a monopod has only one leg and cannot stand by itself. You will need a helper to stay with your camera if you plan to film yourself using a monopod. A monopod is more portable than a tripod, though, and can be used in a wider variety of places. You can even use a monopod to record aerial shots just by picking it up.
Part 3. Pistol Grip
A pistol grip is a handle you mount your camera to the top of. You can carry your camera around on top of the pistol grip, or you can mount the grip itself to your tripod or monopod. Once the grip is mounted you can use it to more easily control your camera movements. This is a great way to get even, steady, camera pans.
Part 4. Selfie Stick
A selfie stick is a long pole you mount your smartphone to one end of in order to take selfies from farther away. Selfie sticks also make great stabilizers if you are shooting video on your smartphone. To stabilize your smartphone place the handle of your selfie stick on the ground as if it were a monopod. When you are shooting using a selfie stick you can also hold it up in the air to get interesting high angle shots.
Some YouTubers even like to shoot selfie-style vlogs where the hold the selfie stick just like they are taking a photo of themselves.
Part 5. OIS – Optical Image Stabilization
‘Optical Image Stabilization’ is fairly new hardware which is built in to a lot of new smartphones, like the iPhone 6S Plus and the Samsung Galaxy S6 Edge Plus. OIS reduces camera shake by a lot, although it is still a good idea to stabilize your smartphone while you record. OIS will also help you take sharper still photos without using any software.
Part 6. Tables, Desks, Trees, ect
If you do not have equipment, or cannot bring it where you want to shoot, then you can still record steady footage. You just have to get creative with where you put your camera. Any stable surface will do. You can set your camera down on a shelf in your house, a picnic bench, or up in a tree.
If you are able to lean your elbows onto a desk or table while you hold your camera then that will also significantly cut down on camera shake. This works best for footage you are not in, or which you can have a helper film for you. If you are open to shooting a selfie-style vlog then you can use anything you can rest your hand on, like a fence or a railing.
Richard Bennett
Richard Bennett is a writer and a lover of all things video.
Follow @Richard Bennett
Richard Bennett
Mar 27, 2024• Proven solutions
When a YouTube video is shaky it’s hard to focus on what is happening in it. Camera shake is a huge distraction and, if it is a persistent problem in your YouTube videos, it will be hard to get subscribers. Shakiness is an easy problem to correct. With a bit of equipment, or a bit of creativity, it is easy to make sure your YouTube videos are nice and smooth.
Best Camera Stabilizers for YouTube
This article will talk about different types of equipment you can use to stabilize your camera. For vloggers on a budget, there is even one tip on stabilizing your camera without camera equipment. Here are some of the best stabilizers for YouTube videos:
Part 1. Tripod
A tripod is a three-legged stand you can mount your camera to. The height of a tripod can be adjusted so you can set your camera up at the level that works best for you. Because tripods can stand alone you can set your camera up to record yourself without needing a helper.
Tripods are the best choice for vlogs that revolve around you standing (or sitting) and delivering information, like opinion or beauty vlogs.
Part 2. Monopod
A monopod is like a tripod in the sense that you can adjust its height, but unlike a tripod a monopod has only one leg and cannot stand by itself. You will need a helper to stay with your camera if you plan to film yourself using a monopod. A monopod is more portable than a tripod, though, and can be used in a wider variety of places. You can even use a monopod to record aerial shots just by picking it up.
Part 3. Pistol Grip
A pistol grip is a handle you mount your camera to the top of. You can carry your camera around on top of the pistol grip, or you can mount the grip itself to your tripod or monopod. Once the grip is mounted you can use it to more easily control your camera movements. This is a great way to get even, steady, camera pans.
Part 4. Selfie Stick
A selfie stick is a long pole you mount your smartphone to one end of in order to take selfies from farther away. Selfie sticks also make great stabilizers if you are shooting video on your smartphone. To stabilize your smartphone place the handle of your selfie stick on the ground as if it were a monopod. When you are shooting using a selfie stick you can also hold it up in the air to get interesting high angle shots.
Some YouTubers even like to shoot selfie-style vlogs where the hold the selfie stick just like they are taking a photo of themselves.
Part 5. OIS – Optical Image Stabilization
‘Optical Image Stabilization’ is fairly new hardware which is built in to a lot of new smartphones, like the iPhone 6S Plus and the Samsung Galaxy S6 Edge Plus. OIS reduces camera shake by a lot, although it is still a good idea to stabilize your smartphone while you record. OIS will also help you take sharper still photos without using any software.
Part 6. Tables, Desks, Trees, ect
If you do not have equipment, or cannot bring it where you want to shoot, then you can still record steady footage. You just have to get creative with where you put your camera. Any stable surface will do. You can set your camera down on a shelf in your house, a picnic bench, or up in a tree.
If you are able to lean your elbows onto a desk or table while you hold your camera then that will also significantly cut down on camera shake. This works best for footage you are not in, or which you can have a helper film for you. If you are open to shooting a selfie-style vlog then you can use anything you can rest your hand on, like a fence or a railing.
Richard Bennett
Richard Bennett is a writer and a lover of all things video.
Follow @Richard Bennett
Also read:
- [New] Exploring the Reasons Behind Blue Icons in Facebook’s Chat Communication
- [New] Transforming Viewers' Experience with OneStream Broadcasts
- [Updated] In 2024, Digital Dominion #1 to #10 Most Watched YouTube Videos in a Day
- [Updated] In 2024, Understanding the Use of Burst Feature in GoPros
- 2024 Approved FIFA's Favorite Footage Charted on YouTube
- 2024 Approved Stop Automated YouTube Content Rollouts
- 2024 Approved Streaming Content Artist
- 2024 Approved The Ultimate Guide to Charging Up Your Video Empire
- In 2024, Ensuring Easy Download of YouTube's SRT Subs
- In 2024, Mastering FreeFire The 30 Best Tag Strategies to Increase Views
- In 2024, Top Ten Entrepreneurial YouTube Outlets & Tips
- Infusing Vitality Into Text An Animated Adventure for 2024
- Navigating to Platforms for YouTube Influencer Partnerships for 2024
- Resolving High CPU Utilization: Step-by-Step Guide
- Secure Your Data with Windows
- Transforming Visuals The Power of Customized LUTs for 2024
- Zooming In An Intensive Guide to YouTube Live Stream Success
- Title: [New] Pioneering the Perfect Playlist for YouTube Music Enthusiasts
- Author: Thomas
- Created at : 2025-01-06 16:02:13
- Updated at : 2025-01-10 16:11:17
- Link: https://youtube-help.techidaily.com/new-pioneering-the-perfect-playlist-for-youtube-music-enthusiasts/
- License: This work is licensed under CC BY-NC-SA 4.0.