![[New] Quick Recap of Chromakey and Green Screen Processes](https://thmb.techidaily.com/d6c8d5c25a5b3ae8109b2957c3f404be919cf133b41c5b6f6638a7ed5bc1223b.jpg)
[New] Quick Recap of Chromakey and Green Screen Processes

Quick Recap of Chromakey and Green Screen Processes
The world of video-making owes much of its magic to small leaps of innovation. One of these leaps is the use of the chroma key background, which most people know by the more colloquial term—green screen.

Chroma key, also known as green screen or blue screen, is a cool hack for seamless visual storytelling, allowing content creators to replace backgrounds with any image or video they want. This technique is widely embraced in film, television, and online content, and has opened the door to limitless creative possibilities. Aside from its ability to maximize creativity, it is also cheap to employ and convenient to set up, which has made it a staple for everyone who works with visuals.
In this simple guide, we’ll delve into the fundamentals of the chroma key effect, how it is used for video making, and how to leverage that as you perfect your visual content.
YouTube Video Background Creating realistic video scenes at your will is easy to complete with Filmora green screen removal.
Create Video Backgrounds Create Video Backgrounds Learn Green Screen

How Does Chroma Key Work?

Chroma Keying is done by singling out a specific color (usually green or blue) from the foreground, removing it, and replacing it with a different background (for example, a sunset). This process typically follows a series of steps:
- Background Selection:
A solid, single-color background, often green or blue, that contrasts well with the subject must be used. The color chosen should not be present in the subject or any props in the camera field to avoid unintentional transparency.
- Color Keying:
This requires the use of specialized visual effects software to key out the chosen color. The green or blue background is designated as transparent, making everything of that color see-through. The software distinguishes between the keyed color and the subject, creating a mask for the transparent areas.
- Foreground Filming:
This involves filming the subject against the live chroma key background. During filming, the chosen background color (green or blue) won’t appear in the final result due to its transparency. The subject is captured as if separately from the isolated background.
- Post-Processing:
In post-production processing, the editor takes the keyed-out color and replaces it with the new background of their choice. This step creates the illusion that the subject is in a different setting or environment. The transparent areas become filled with the chosen background which, if done right, results in a cohesive and visually appealing composition.
Why Green?
Theoretically, the chroma key background can be any solid color. However, the most commonly used colors are studio blue and bright green, with the latter far more common.
The choice of background color depends on the specific requirements of the production and the colors present in the scenes being filmed.
Free Download For Win 7 or later(64-bit)
Free Download For macOS 10.14 or later
Contrast
The less similar your chosen background color is to natural skin tones, the easier to isolate and replace in your footage. Bright green provides a strong contrast to most human skin tones and is less likely to be present in costumes or natural surroundings, making it easier to isolate subjects during the color separation.
Luminance
The color green emits light with greater intensity than blue, allowing for far more effective isolation by cameras during filming. This also means that blue screens demand increased lighting for proper exposure compared to green. This situation may be less than ideal if you lack powerful lighting or you don’t have the big bucks for them.
Digital Sensors
Many digital cameras and sensors are more sensitive to green wavelengths, resulting in cleaner and more accurate color keying during post-processing. Modern technology has also evolved to optimize for a green background, making it a more practical choice for the chroma key effect.
Wardrobe and Set Design
Bright green occurs less naturally in costumes and set designs than other colors, making green the optimal choice for reducing the likelihood of color spill and keying issues. However, if you know your scene will have lots of green, it is probably best to film with a blue screen, so there’s less risk of color spill and less post-production work.
Setting up Your Own Chroma Key Studio
Setting up your chroma key is convenient and straightforward, but there are some key factors to consider while setting up to ensure maximal performance.
Choosing the Right Background Color
The first step in the chroma key setup is selecting the right background color to be keyed out. This choice determines your effective color separation and ensures a smooth keying process during editing. Choosing a chroma-key background color that contrasts distinctly with the subject’s colors is essential for effective color separation. This prevents unintentional transparency, color spill, and ensures a polished final result.
Lighting Considerations
Lighting is an important part of the chroma-keying process. Bold, uniform, and consistent lighting on both the subject and the background makes it easy to delineate one from the other fully. This minimizes shadows and variations in color, creating a smooth and seamless keying process. Multiple diffuse lights from different angles are often used to illuminate the green screen evenly.
Positioning/Camera
Proper subject and camera placement are necessary to ensure an even color-keying process during post-production. To prevent shadow interference, the green screen should be smooth, tense, and without wrinkles or shadows.
High-quality cameras are essential every time, especially for chroma keying. Images with better definition are easier to key, so camera quality significantly affects the outcome. Even if your camera isn’t the best, merely shooting well can ensure a clean color-keying process during editing, resulting in professional-looking visuals.
Recording Tips for Chroma Key
- Proper Lighting
Maintaining uniform and well-defined lighting during recording is essential for a successful chroma-keying process. This consistency ensures a seamless keying process during post-production.
- Keep Distance from the Green Screen
The optimal distance between the subject and the green screen minimizes color spill and allows for natural movements. Proper distance between subject and background allows for easier isolation of the background and much smoother post-editing. A recommended starting point for the issue is around 6 to 10 feet from the background.
- Subjects and Clothing
As mentioned before, the choice of costume for Selecting appropriate clothing that doesn’t match the chroma key color prevents transparency issues. Subjects also have to be positioned in such a way that there is minimal light interference and reflection. These contribute to a flawless chroma key outcome.
3 Basic Troubleshooting Strategies
- Color Spill
Sometimes, reflected light from your green background can be cast on your subject and may remain so when the background light is keyed out. This phenomenon is known as a color spill. It is usually because of uneven lighting or shooting around reflecting surfaces. Avoiding spill can differentiate between good and lousy chroma key aftereffects.
Human hair is one area where color spill can show up unsuspectingly. Due to the translucency of hair, it is common for some unintended light to seep through. This allows some background visibility, which you do not want with a chroma key. This is especially notable with lighter hair colors like blond hair.
There are ways to account for this. Many video-editing software have features such as spill suppression and screen matte adjustments that can enhance the final footage. Specialized plugins also go a long way in ensuring minimizing spill. Addressing spill correction tackles unwanted green artifacts and ensures a clean keying process.
- Poor Lighting
Suboptimal green screen lighting can lead to inconsistencies in keying and editing, undermining your product. One way to avoid this is to light the screen and subject separately. Another tip, although expensive, is using multiple diffuse light sources and trying to maintain even lighting across every square foot of your scene. Super bright or dark spots can ruin your output, so it’s worth the extra effort if you don’t want to deal with problematic post-production.
- Poorly Refined Edges
Chroma keying should leave your videos with crisp, defined, natural-looking edges. But post-production editing can make all the difference if it doesn’t come out to your taste. Softening and refining edges make a smoother transition between the foreground object and the new background. Light adjustments to edge thickness and screen matte settings can also help enhance overall visual quality and add finesse to your work.
Conclusion
Green screen photography produces excellent results, and its ease of use makes it indispensable for videographers of all levels. In this guide, we’ve discussed chroma key technology, its role in the industry, and how to apply it to your craft to elevate visual content.
Chroma key, also known as green screen or blue screen, is a cool hack for seamless visual storytelling, allowing content creators to replace backgrounds with any image or video they want. This technique is widely embraced in film, television, and online content, and has opened the door to limitless creative possibilities. Aside from its ability to maximize creativity, it is also cheap to employ and convenient to set up, which has made it a staple for everyone who works with visuals.
In this simple guide, we’ll delve into the fundamentals of the chroma key effect, how it is used for video making, and how to leverage that as you perfect your visual content.
YouTube Video Background Creating realistic video scenes at your will is easy to complete with Filmora green screen removal.
Create Video Backgrounds Create Video Backgrounds Learn Green Screen

How Does Chroma Key Work?

Chroma Keying is done by singling out a specific color (usually green or blue) from the foreground, removing it, and replacing it with a different background (for example, a sunset). This process typically follows a series of steps:
- Background Selection:
A solid, single-color background, often green or blue, that contrasts well with the subject must be used. The color chosen should not be present in the subject or any props in the camera field to avoid unintentional transparency.
- Color Keying:
This requires the use of specialized visual effects software to key out the chosen color. The green or blue background is designated as transparent, making everything of that color see-through. The software distinguishes between the keyed color and the subject, creating a mask for the transparent areas.
- Foreground Filming:
This involves filming the subject against the live chroma key background. During filming, the chosen background color (green or blue) won’t appear in the final result due to its transparency. The subject is captured as if separately from the isolated background.
- Post-Processing:
In post-production processing, the editor takes the keyed-out color and replaces it with the new background of their choice. This step creates the illusion that the subject is in a different setting or environment. The transparent areas become filled with the chosen background which, if done right, results in a cohesive and visually appealing composition.
Why Green?
Theoretically, the chroma key background can be any solid color. However, the most commonly used colors are studio blue and bright green, with the latter far more common.
The choice of background color depends on the specific requirements of the production and the colors present in the scenes being filmed.
Free Download For Win 7 or later(64-bit)
Free Download For macOS 10.14 or later
Contrast
The less similar your chosen background color is to natural skin tones, the easier to isolate and replace in your footage. Bright green provides a strong contrast to most human skin tones and is less likely to be present in costumes or natural surroundings, making it easier to isolate subjects during the color separation.
Luminance
The color green emits light with greater intensity than blue, allowing for far more effective isolation by cameras during filming. This also means that blue screens demand increased lighting for proper exposure compared to green. This situation may be less than ideal if you lack powerful lighting or you don’t have the big bucks for them.
Digital Sensors
Many digital cameras and sensors are more sensitive to green wavelengths, resulting in cleaner and more accurate color keying during post-processing. Modern technology has also evolved to optimize for a green background, making it a more practical choice for the chroma key effect.
Wardrobe and Set Design
Bright green occurs less naturally in costumes and set designs than other colors, making green the optimal choice for reducing the likelihood of color spill and keying issues. However, if you know your scene will have lots of green, it is probably best to film with a blue screen, so there’s less risk of color spill and less post-production work.
Setting up Your Own Chroma Key Studio
Setting up your chroma key is convenient and straightforward, but there are some key factors to consider while setting up to ensure maximal performance.
Choosing the Right Background Color
The first step in the chroma key setup is selecting the right background color to be keyed out. This choice determines your effective color separation and ensures a smooth keying process during editing. Choosing a chroma-key background color that contrasts distinctly with the subject’s colors is essential for effective color separation. This prevents unintentional transparency, color spill, and ensures a polished final result.
Lighting Considerations
Lighting is an important part of the chroma-keying process. Bold, uniform, and consistent lighting on both the subject and the background makes it easy to delineate one from the other fully. This minimizes shadows and variations in color, creating a smooth and seamless keying process. Multiple diffuse lights from different angles are often used to illuminate the green screen evenly.
Positioning/Camera
Proper subject and camera placement are necessary to ensure an even color-keying process during post-production. To prevent shadow interference, the green screen should be smooth, tense, and without wrinkles or shadows.
High-quality cameras are essential every time, especially for chroma keying. Images with better definition are easier to key, so camera quality significantly affects the outcome. Even if your camera isn’t the best, merely shooting well can ensure a clean color-keying process during editing, resulting in professional-looking visuals.
Recording Tips for Chroma Key
- Proper Lighting
Maintaining uniform and well-defined lighting during recording is essential for a successful chroma-keying process. This consistency ensures a seamless keying process during post-production.
- Keep Distance from the Green Screen
The optimal distance between the subject and the green screen minimizes color spill and allows for natural movements. Proper distance between subject and background allows for easier isolation of the background and much smoother post-editing. A recommended starting point for the issue is around 6 to 10 feet from the background.
- Subjects and Clothing
As mentioned before, the choice of costume for Selecting appropriate clothing that doesn’t match the chroma key color prevents transparency issues. Subjects also have to be positioned in such a way that there is minimal light interference and reflection. These contribute to a flawless chroma key outcome.
3 Basic Troubleshooting Strategies
- Color Spill
Sometimes, reflected light from your green background can be cast on your subject and may remain so when the background light is keyed out. This phenomenon is known as a color spill. It is usually because of uneven lighting or shooting around reflecting surfaces. Avoiding spill can differentiate between good and lousy chroma key aftereffects.
Human hair is one area where color spill can show up unsuspectingly. Due to the translucency of hair, it is common for some unintended light to seep through. This allows some background visibility, which you do not want with a chroma key. This is especially notable with lighter hair colors like blond hair.
There are ways to account for this. Many video-editing software have features such as spill suppression and screen matte adjustments that can enhance the final footage. Specialized plugins also go a long way in ensuring minimizing spill. Addressing spill correction tackles unwanted green artifacts and ensures a clean keying process.
- Poor Lighting
Suboptimal green screen lighting can lead to inconsistencies in keying and editing, undermining your product. One way to avoid this is to light the screen and subject separately. Another tip, although expensive, is using multiple diffuse light sources and trying to maintain even lighting across every square foot of your scene. Super bright or dark spots can ruin your output, so it’s worth the extra effort if you don’t want to deal with problematic post-production.
- Poorly Refined Edges
Chroma keying should leave your videos with crisp, defined, natural-looking edges. But post-production editing can make all the difference if it doesn’t come out to your taste. Softening and refining edges make a smoother transition between the foreground object and the new background. Light adjustments to edge thickness and screen matte settings can also help enhance overall visual quality and add finesse to your work.
Conclusion
Green screen photography produces excellent results, and its ease of use makes it indispensable for videographers of all levels. In this guide, we’ve discussed chroma key technology, its role in the industry, and how to apply it to your craft to elevate visual content.
Haste in Playlist Distribution: YouTube Guide
YouTube has become the most popular video-sharing platform on the internet, with users from all over the world uploading and watching videos daily. You can find content on just about any topic you can think of on YouTube, making it an excellent resource for entertainment and education.
But what if you’ve created a playlist of your favorite videos and think your friends or family would enjoy it? To help you with this, we’ve put together an extensive guide on how to share a YouTube playlist on your computer and mobile devices.
So, let’s get started with our guide without any further delay!
Why Doesn’t The Share Function In The Playlist Work?
Firstly, let’s figure out why the “Share” function doesn’t work. The “Share” function in the playlist does not work because it is set to “private,” and YouTube doesn’t allow you to share them. To fix this, you must first change the privacy settings of the playlist to “public” in the following way:
Step1 Head to the YouTube website using a browser on your PC and sign in to your account.
Step2
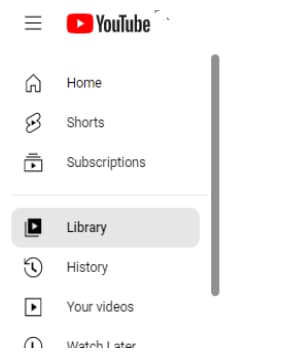
- Click the three-line “Menu” icon at the top-left of your screen.
- Go to “Library.”
- Scroll down to the “Playlist” section.
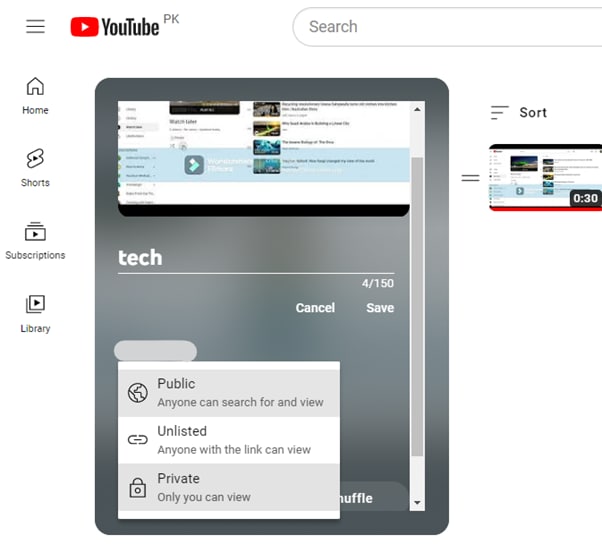
Step3 Select your playlist labeled as “Private.” On the next page, click the “Private” option in the playlist details section and select “Public” to change the visibility of your playlist.
Once the privacy setting has been changed, the “share” function will work as intended.
How To Share The YouTube Playlist?
If you want to share the playlist on YouTube using your computer or mobile device, read the instructions below carefully:
1. For Computers
Here are four different ways to share your YouTube playlist using your laptop or desktop computer:
How To Share Your Own YouTube Playlist With A Link To View?
Sharing your YouTube playlist is a perfect way to increase the number of views and subscribers, allowing your viewers to see all the videos in one place.
This is especially helpful if you have a series of videos that you want viewers to watch. Here are the step-by-step instructions for achieving this task:
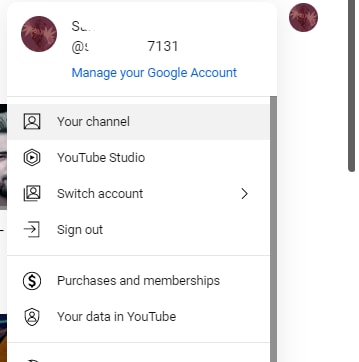
Step1 Visit the YouTube website using a browser on your computer and sign in to your account. Click your Profile in the top-right of the screen and select “Your Channel” from the drop-down menu, which will take you to your YouTube channel’s dashboard.
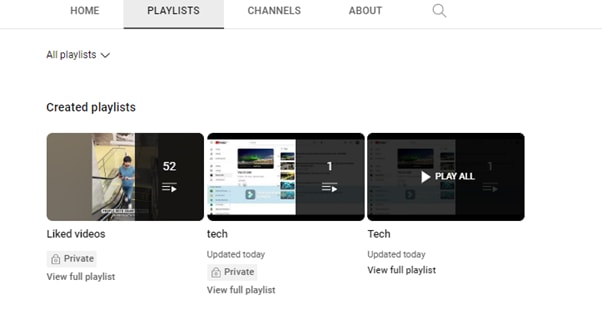
Step2 Next, go to the “Playlist” tab and click the “View Full Playlist” option under your playlist to access it.
Step3 Finally, click the “Share” icon in the playlist’s details section, and a window will pop up. From here, you can either click “Copy” to save the link to your clipboard or share the playlist directly to WhatsApp, Twitter, Facebook, Email, KakaoTalk, Reddit, and more platforms.
How To Share Someone Else’s YouTube Playlist With A Link To View?
If you want to share someone else’s YouTube playlist with a link, do the following steps in sequence:
Step1 In the first step, launch your preferred browser, visit the YouTube website, and sign in to your account using your credentials.
Step2 On the left side of the website’s main interface, click the “Library” option and scroll down to the Playlists section.

Step3 Under the “Playlists” section, click on the playlist you want to share. Now, click the “Share” icon in the playlist’s details section, and a pop-up window will appear. In the “Share” section, copy the URL and paste it into an email, message, or social media post to share.
That’s all there is to it! Anyone you’ve shared the link with can watch the entire playlist.
How To Share The Playlist While Watching?
We all love using YouTube for research or just scrolling through videos to pass the time, and we often share our favorite videos with others. What if you wish to share a whole YouTube playlist while watching it?
Fortunately, there’s a simple and quick way to do this, and here are the step-by-step instructions for this method.
Step1 In the first step, head to the YouTube website using a browser and use the search bar to access the playlist.

Step2 Click the playlist to start watching it. Next, click the playlist title in the grey box on the right-hand side.
Step3 On the playlist page, click the “Share” icon in the details section, and a window will pop-up. Click “Copy” to save the link or directly share the playlist to social platforms.
That’s it! The recipient will now be able to watch the entire YouTube playlist you’ve shared.
How To Share A YouTube Playlist With A Link To Collaborate
Through the “Collaborate on playlists” feature, YouTube allows you to add friends to your playlist, who can then add videos to it.
Here’s how you can share a YouTube playlist with a link to collaborate with your friends:
Step1 In the first step, go to the YouTube website using your preferred browser, and sign in to your channel’s Gmail account using your email address and password.
Step2 Click your “Profile” icon, choose the “Your Channel” option from the drop-down menu and go to the “Playlist.”
Step3 In the next step, click the “View Full Playlist” option under your preferred playlist. This will take you to your playlist page.
Step4 In the details section of your YouTube playlist on the playlist page, click the three dots (ellipsis) icon and select the “Collaborate” option.
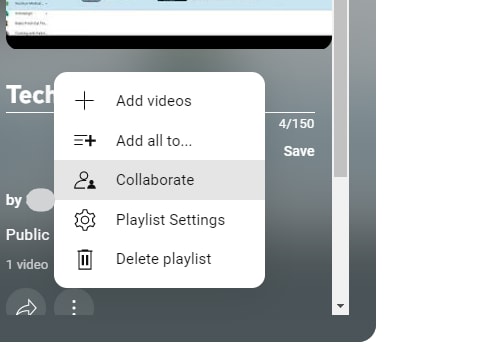
Step5 A pop-up window will appear on your screen. Toggle on the “Collaborators can add videos to this playlist” option to enable it, and the “Allow new collaborators” option will appear.
Toggle on the “Allow new collaborators” option, click “Copy” to save the URL to your clipboard, and click “Done” to apply the changes.
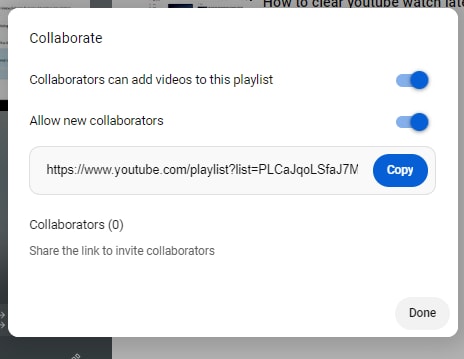
That’s about it! You can now share the playlist link with your friends, who can now add videos to it.
2. For iOS and Android
If you want to quickly share a YouTube playlist using your iOS or Android device, follow these instructions step-by-step:
![]()
Note: The method of sharing the YouTube playlist on an iOS device is the same as mentioned above.
Step1 Since most devices have YouTube already installed, locate the YouTube app in your device’s app drawer and launch it.
Step2 On the app’s main interface/Home screen, tap the “Library” option at the bottom right corner of your device’s screen.
Step3 Now, scroll down to the “Playlists” section and open the playlist you wish to share with your friends.
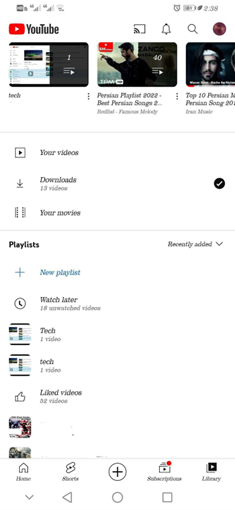
Step4 In the playlist’s details section, tap the “Share” icon above the “Play All” button. Now, tap the “Copy” icon to save the playlist’s URL on your clipboard, or use other available options to share the playlist directly.
Bonus: Do You Want To Create Your Own YouTube Videos?
We hope you have found the solution to share your YouTube Playlist. Supposing you are a common YouTube user and like to share the fantastic things you found on this platform, are you interested in making a YouTube video by yourself? If yes, please watch the video below to start editing your own videos with a user-friendly video editor - Wondershare Filmora . With it, you can create your video with ease:
Free Download For Win 7 or later(64-bit)
Free Download For macOS 10.14 or later
Conclusion
In this comprehensive guide, we’ve explored why the share function in the playlist is not working and how to share a YouTube playlist using your computer and mobile device.
Step1 Since most devices have YouTube already installed, locate the YouTube app in your device’s app drawer and launch it.
Step2 On the app’s main interface/Home screen, tap the “Library” option at the bottom right corner of your device’s screen.
Step3 Now, scroll down to the “Playlists” section and open the playlist you wish to share with your friends.

Step4 In the playlist’s details section, tap the “Share” icon above the “Play All” button. Now, tap the “Copy” icon to save the playlist’s URL on your clipboard, or use other available options to share the playlist directly.
Bonus: Do You Want To Create Your Own YouTube Videos?
We hope you have found the solution to share your YouTube Playlist. Supposing you are a common YouTube user and like to share the fantastic things you found on this platform, are you interested in making a YouTube video by yourself? If yes, please watch the video below to start editing your own videos with a user-friendly video editor - Wondershare Filmora . With it, you can create your video with ease:
Free Download For Win 7 or later(64-bit)
Free Download For macOS 10.14 or later
Conclusion
In this comprehensive guide, we’ve explored why the share function in the playlist is not working and how to share a YouTube playlist using your computer and mobile device.
Also read:
- [New] In 2024, Inshot Tips Achieving Seamless Video Segmentation
- [New] Streamlining Your Gaming Sessions Recording Made Easy
- [Updated] 2024 Approved Child's Play Top 5 Fun Flying Toys Reviewed
- 2024 Approved Craftsmanship Hub Top After Effects Template Deals
- 2024 Approved From One-Off to Firm Follower An Ethical Approach
- 2024 Approved How to Execute Flawless WireCast Broadcasts on YouTube
- Green Screen Mastery on YouTube - Ideas Unleashed for 2024
- How to See Your Subscribers on YouTube, In 2024
- Leveraging YouTube Content for IGTV Prominence for 2024
- Life360 Learn How Everything Works On Realme 12+ 5G | Dr.fone
- Optimize Printing: Roll-Out Latest Windows 7 Dell Updates
- Title: [New] Quick Recap of Chromakey and Green Screen Processes
- Author: Thomas
- Created at : 2024-12-09 18:23:01
- Updated at : 2024-12-16 18:29:13
- Link: https://youtube-help.techidaily.com/new-quick-recap-of-chromakey-and-green-screen-processes/
- License: This work is licensed under CC BY-NC-SA 4.0.