![[New] Reel In Riches A Guide to Earning on YouTube Shorts](https://thmb.techidaily.com/67c52f8f8d1e1c526acfd18d30076a8ec8c694652a5ccde76155c26629dae8fb.png)
"[New] Reel In Riches A Guide to Earning on YouTube Shorts"
Reel In Riches: A Guide to Earning on YouTube Shorts
YouTube Shorts have grown in popularity since the launch of the platform in 2021. At first, they offered a way for creators to share their content in a vertical format. However, YouTube Shorts monetization is also a great way for creators to earn money. When you monetize YouTube shorts, you increase the potential of earning more income on the platform. In this article, we explore what entails monetized YouTube shorts and how to increase your YT shorts earnings.
YouTube Shorts Monetization A cross-platform offers useful features for making your YouTube videos stand out to earn more revenue!
Free Download Free Download Learn More

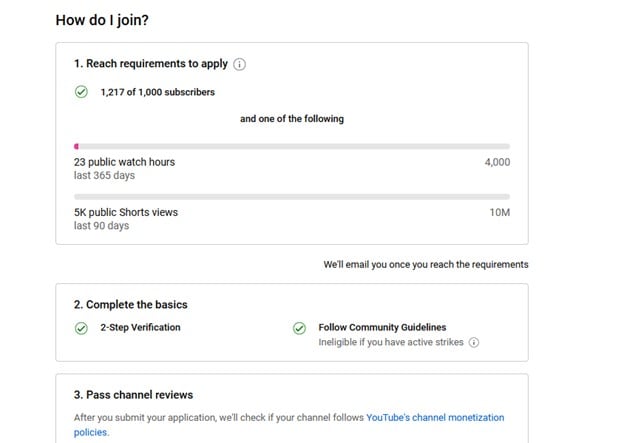
Part 1. YouTube Shorts Monetization: Eligibility Criteria
With short monetization options, you can monetize your short-firm content by joining the YouTube Partner Program (YPP). Being a member of this program gives you access to all tools for making money on YouTube. This includes the ability to place ads on your videos or make money directly from your audience through fan funding.
Eligibility Requirements for Monetizing Shorts
The easiest way to monetize Shorts on YouTube is to access the fan-funding program. This program gives you access to special tools that you can use to generate revenue by interacting with views. This is a great option for creators who primarily make short-form videos. The requirements for this option are as follows:
- At least 500 subscribers to your channels
- At least 3 public video uploads in the last 90 days
- At least 3,000 public watch hours in the last 365 days, or
- At least 3 million public Shorts views in the last 90 days

Eligibility for Monetizing Shorts and Videos
The other way you can monetize shorts is by accessing ad revenue and fan-funding. With this option, you will generate income from ads that appear between Shorts in addition to interacting with viewers. This is a great option for creators who make long and short videos. The requirements for this include:
- At least 1,000 subscribers to your channels
- At least 4,000 public watch hours in the last 365 days, or
- At least 10 million valid public Shorts views in the last 90 days
Additional Guidelines for Creators
Once you meet the eligibility criteria, you will be required to follow certain guidelines or policies to continue earning. The additional guidelines include:
- Follow YouTube’s Advertiser-Friendly Content Guidelines
- Make sure your channel does not have active Community Guidelines Strikes
- Live in a region where the program is available
- Avoid uploading another creator’s content by transforming the content or adding a new perspective to it
- Avoid using unedited clips from TV shows or movies that you don’t have rights to
- Don’t pay for fake or automated views
- Turn on 2-Step verification for your Google Account
- Have an active AdSense account
- Have access to advanced YouTube features by verifying your identity
Part 2. Monetizing YouTube Shorts: Step-by-Step Guide
Can you monetize YouTube shorts? Yes, in more than one way. The easiest is through the ad-revenue sharing model. Follow these steps to become part of the YPP and start monetizing your Shorts on YouTube:
Step 1Sign in to YouTube

Step 2Select YouTube Studio
In the top right of the YouTube page, click on your profile picture. From the pop-up menu that appears, select YouTube Studio.

Step 3In the left menu, Click on Earn

Step 4
If you are eligible for the YPP, you will see an Apply Click on it to go to the next step. If you are not yet eligible, click the Get Notified button to be notified once your channel becomes eligible. That’s when you will have the opportunity to finish the application process.
Step 5
Click Start to review and accept YouTube’s Base terms.

Step 6
Link your existing AdSense account if you have one. If not. Click Start to set up a new one.

Step 7
Wait for YouTube to review and approve your application. The process will normally take a month. Once you are approved for the YPP, go to the Earn section in YouTube Studio. Then accept the Shorts Monetization Module. This will allow you to access ads and other money-making tools on YouTube.

The instructions shared above are for applying for the YPP using a computer or desktop. You will still follow the same steps when using a mobile device, but you will do so using the YouTube Studio app.
The money-making feature monetizes Shorts in exciting ways. To start monetizing with Super Thanks fan funding, click Supers on the Earn tab in YouTube Studio. Then click Get Started, and follow the presented prompts. The same process is applicable for Channel Memberships, and other fan-funding options.
Part 3. YouTube Shorts Monetization: A Realistic Look at Earnings Potential
Monetizing YouTube Shorts has the potential to make decent earnings. Although the amount is not as much as a long-form videos, it is a great way of making money on YouTube quickly. Most YouTube Shorts creators agree that the revenue per thousand views (RPM) for short-form content is currently around $0.05 - $0.07. This means that for a million Shorts views, you will make $50 - $70.
Factors That Influence Earnings
The amount of money you make on YouTube Shorts is not fixed. It will depend on several factors, including the revenue channel and your interactions with viewers
- Ad revenue: A higher view count on Shorts increases ad revenue from the ads that are between Shorts on the platform.
- Viewer engagement: Viewer engagement brings in additional revenue through features like Super Thanks.
- Number of monetized Shorts: Monetizing most of your short-form videos will increase the revenue generated.
- Shopping Revenue: How well you promote your products and the set price point of the products will determine the shopping revenue generated.
Examples of Creators Who Have Earned from Shorts
The revenue-sharing program is the easiest way for creators to earn money on YouTube. Since monetizing their Shorts, these creators earned some decent bonus amounts:
- Hassan Khadair (2.1 million subscribers) - Earned $872.14 in ads from 22 million Shorts views
- Riley Lemon (84,000 subscribers) - Earned $76.23 in ads from 1.9 million Shorts views
- James Seo (573,000 subscribers) - Earned $445.09 in ads from 10.3 million Shorts views
- Matthew King (212,000 subscribers) - Earned $163.73 in ads from 4.2 million Shorts views
Part 4. Editing YouTube Shorts with WonderShare to Boost Revenue Potential
The best way to reap big from Shorts YouTube monetization is to make quality videos that will go viral easily. Videos that generate more views will earn you more revenue and increase the number of subscribers within a short time. With Wondershare Filmora, making such videos is easy. The video editing software offers useful features for making your videos stand out. From jaw-dropping sports videos to cinema-like production, the choice of options is endless.
Free Download For Win 7 or later(64-bit)
Free Download For macOS 10.14 or later
The choice of Filmora features you use on your editing projects will depend on your goals. Here are a few favorites to get you started:
1. Auto Reframe
Before uploading a short-form video on YouTube, you want to make sure it is of the right resolution. The Auto Reframe feature on Filmora allows you to instantly resize your videos while keeping all the important details. You only need to record one video for all platforms, and edit to fit with auto reframe.
2. ** Text to Speech
Narration is an important aspect of YouTube Shorts. You can tell what is happening in the clip in the simplest way for your audience to understand. The Text to Speech (TTS) feature on Filmora allows you to convert your text files to voice-over. This makes your Shorts video more entertaining and enriched with more elements.
3. AI Portrait
Just like other vertical social media videos, Shorts require some bit of personalization. You may want to add a bit of elements or filters. The AI Portrait feature automatically removes background with high accuracy to further enhance your videos. It also comes with over 70 portrait and sticker effects to bring out the mood you are going after. Automatically recognize the faces of your subjects and add AR stickers on the go.
Conclusion
YouTube Shorts have become immensely popular. They tend to have a higher ROI and receive more engagement compared to long-form video content. This makes vertical short-form videos more important and lucrative for content creators. When it comes to YouTube short video monetization, posting quality videos is the key ingredient. We recommend using Wondershare FIlmora to edit your videos. This will make sure they are more entertaining and keep more people engaged.
Free Download Free Download Learn More
Part 1. YouTube Shorts Monetization: Eligibility Criteria
With short monetization options, you can monetize your short-firm content by joining the YouTube Partner Program (YPP). Being a member of this program gives you access to all tools for making money on YouTube. This includes the ability to place ads on your videos or make money directly from your audience through fan funding.
Eligibility Requirements for Monetizing Shorts
The easiest way to monetize Shorts on YouTube is to access the fan-funding program. This program gives you access to special tools that you can use to generate revenue by interacting with views. This is a great option for creators who primarily make short-form videos. The requirements for this option are as follows:
- At least 500 subscribers to your channels
- At least 3 public video uploads in the last 90 days
- At least 3,000 public watch hours in the last 365 days, or
- At least 3 million public Shorts views in the last 90 days
Eligibility for Monetizing Shorts and Videos
The other way you can monetize shorts is by accessing ad revenue and fan-funding. With this option, you will generate income from ads that appear between Shorts in addition to interacting with viewers. This is a great option for creators who make long and short videos. The requirements for this include:
- At least 1,000 subscribers to your channels
- At least 4,000 public watch hours in the last 365 days, or
- At least 10 million valid public Shorts views in the last 90 days
Additional Guidelines for Creators
Once you meet the eligibility criteria, you will be required to follow certain guidelines or policies to continue earning. The additional guidelines include:
- Follow YouTube’s Advertiser-Friendly Content Guidelines
- Make sure your channel does not have active Community Guidelines Strikes
- Live in a region where the program is available
- Avoid uploading another creator’s content by transforming the content or adding a new perspective to it
- Avoid using unedited clips from TV shows or movies that you don’t have rights to
- Don’t pay for fake or automated views
- Turn on 2-Step verification for your Google Account
- Have an active AdSense account
- Have access to advanced YouTube features by verifying your identity
Part 2. Monetizing YouTube Shorts: Step-by-Step Guide
Can you monetize YouTube shorts? Yes, in more than one way. The easiest is through the ad-revenue sharing model. Follow these steps to become part of the YPP and start monetizing your Shorts on YouTube:
Step 1Sign in to YouTube
Step 2Select YouTube Studio
In the top right of the YouTube page, click on your profile picture. From the pop-up menu that appears, select YouTube Studio.
Step 3In the left menu, Click on Earn
Step 4
If you are eligible for the YPP, you will see an Apply Click on it to go to the next step. If you are not yet eligible, click the Get Notified button to be notified once your channel becomes eligible. That’s when you will have the opportunity to finish the application process.
Step 5
Click Start to review and accept YouTube’s Base terms.
Step 6
Link your existing AdSense account if you have one. If not. Click Start to set up a new one.
Step 7
Wait for YouTube to review and approve your application. The process will normally take a month. Once you are approved for the YPP, go to the Earn section in YouTube Studio. Then accept the Shorts Monetization Module. This will allow you to access ads and other money-making tools on YouTube.
The instructions shared above are for applying for the YPP using a computer or desktop. You will still follow the same steps when using a mobile device, but you will do so using the YouTube Studio app.
The money-making feature monetizes Shorts in exciting ways. To start monetizing with Super Thanks fan funding, click Supers on the Earn tab in YouTube Studio. Then click Get Started, and follow the presented prompts. The same process is applicable for Channel Memberships, and other fan-funding options.
Part 3. YouTube Shorts Monetization: A Realistic Look at Earnings Potential
Monetizing YouTube Shorts has the potential to make decent earnings. Although the amount is not as much as a long-form videos, it is a great way of making money on YouTube quickly. Most YouTube Shorts creators agree that the revenue per thousand views (RPM) for short-form content is currently around $0.05 - $0.07. This means that for a million Shorts views, you will make $50 - $70.
Factors That Influence Earnings
The amount of money you make on YouTube Shorts is not fixed. It will depend on several factors, including the revenue channel and your interactions with viewers
- Ad revenue: A higher view count on Shorts increases ad revenue from the ads that are between Shorts on the platform.
- Viewer engagement: Viewer engagement brings in additional revenue through features like Super Thanks.
- Number of monetized Shorts: Monetizing most of your short-form videos will increase the revenue generated.
- Shopping Revenue: How well you promote your products and the set price point of the products will determine the shopping revenue generated.
Examples of Creators Who Have Earned from Shorts
The revenue-sharing program is the easiest way for creators to earn money on YouTube. Since monetizing their Shorts, these creators earned some decent bonus amounts:
- Hassan Khadair (2.1 million subscribers) - Earned $872.14 in ads from 22 million Shorts views
- Riley Lemon (84,000 subscribers) - Earned $76.23 in ads from 1.9 million Shorts views
- James Seo (573,000 subscribers) - Earned $445.09 in ads from 10.3 million Shorts views
- Matthew King (212,000 subscribers) - Earned $163.73 in ads from 4.2 million Shorts views
Part 4. Editing YouTube Shorts with WonderShare to Boost Revenue Potential
The best way to reap big from Shorts YouTube monetization is to make quality videos that will go viral easily. Videos that generate more views will earn you more revenue and increase the number of subscribers within a short time. With Wondershare Filmora, making such videos is easy. The video editing software offers useful features for making your videos stand out. From jaw-dropping sports videos to cinema-like production, the choice of options is endless.
Free Download For Win 7 or later(64-bit)
Free Download For macOS 10.14 or later
The choice of Filmora features you use on your editing projects will depend on your goals. Here are a few favorites to get you started:
1. Auto Reframe
Before uploading a short-form video on YouTube, you want to make sure it is of the right resolution. The Auto Reframe feature on Filmora allows you to instantly resize your videos while keeping all the important details. You only need to record one video for all platforms, and edit to fit with auto reframe.
2. ** Text to Speech
Narration is an important aspect of YouTube Shorts. You can tell what is happening in the clip in the simplest way for your audience to understand. The Text to Speech (TTS) feature on Filmora allows you to convert your text files to voice-over. This makes your Shorts video more entertaining and enriched with more elements.
3. AI Portrait
Just like other vertical social media videos, Shorts require some bit of personalization. You may want to add a bit of elements or filters. The AI Portrait feature automatically removes background with high accuracy to further enhance your videos. It also comes with over 70 portrait and sticker effects to bring out the mood you are going after. Automatically recognize the faces of your subjects and add AR stickers on the go.
Conclusion
YouTube Shorts have become immensely popular. They tend to have a higher ROI and receive more engagement compared to long-form video content. This makes vertical short-form videos more important and lucrative for content creators. When it comes to YouTube short video monetization, posting quality videos is the key ingredient. We recommend using Wondershare FIlmora to edit your videos. This will make sure they are more entertaining and keep more people engaged.
The Best Vocal Transformation Programs for Video Makers
Are you looking for the best voice-changing app for your YouTube channel?
Creating a YouTube video with professional output is straightforward, but many people find it challenging because they do not have the right vlogging tools at their disposal. There are countless vlogging tools and one of them is the voice changer.
With a voice-changing app, you can create multiple voices for one video clip with complete ease. Voice changer supports several background sound effects that you can import to spice up your content before uploading it on YouTube. The app makes your videos fun and interesting to watch that then drives traffic to your channel.
Presently, there is an array of YouTube voice-changers available online. While some are top-notch, others are nothing to write about. In this article, we will share with you some top-level YouTube voice-changers recommended by experts in the industry. Without further ado, let’s dive in.
For Win 7 or later (64-bit)
For macOS 10.12 or later
Part 1. Best Voice Changers for YouTubers
Here are the top 7 YouTube voice-changing apps available on the global market today:
1. AthTek [Online & Free]
AthTek is one the world-leading voice-changing apps suitable for Windows operating systems. This simple yet powerful app is well-customized with powerful features such as pitch and speed enhancer. The app allows you to edit your audio recordings easily and quickly.
It provides you with a comprehensive user interface that lets you switch your voice without stress. Compared to other voice-changers, AthTek stands out. The app integrates perfectly with platforms like Skype, etc.
AthTek is a fantastic voice changer, however, it isn’t without its dark sides. AthTek is not a real-time voice-changing app. Hence, you can only use it with ready-made sound recordings.
How to Use AthTek YouTube Voice Changer
Follow the procedure below to use the AthTek voice changing app on your YouTube channel:
Step1 Download AthTek from the official website. Follow the on-screen instructions to install the app, and launch it. When AthTek opens, the interface below will appear on your display screen:

Locate the Browse button beside File Path, and click on it. AthTek will automatically direct you to your local storage.

Step2 Choose your desired audio file from the list available on your computer, and tap the Open button. AthTek will immediately upload the audio file on its interface. The page below will come up on your screen:

Step3 Now move to the Change Parameter section and make the necessary adjustments. Once that’s set, click on the Play button to preview the audio file. If satisfied, tap on Export, choose a destination path and click on Save.

2. Voicechanger.io
Voicechanger.io is a cloud-based program that enables you to upload and edit audio files conveniently without distorting the quality. The program also allows you to record your voice, and add effects with complete ease. It’s an easy-to-use voice changer with no operating system limitations. Aside from voice changing, Voicechanger.io supports speech-to-text. Thus, you can convert speech to text without stress.
How to Use Voicechanger.io
Step1 With the help of an internet-enabled computer system, navigate to the official webpage for Voicechanger.io. The page below will come up if all goes well:

Step2 Choose your preferred audio input method to proceed. Should you select Upload audio, you will be directed to your local drive where your recordings are stored. Choose an audio file, and click on Open.

However, should you pick the Use microphone option, you will be prompted to grant access to the mic. Click on the appropriate key to complete this step.

3. Voxal Voice Changer
Voxal Voice Changer is another quality app mostly used by Mac owners to manipulate audio recordings. It’s also suitable for editing real-time chat audio recordings. The app provides you with several preset voices that you can select from to make your sound recordings fun to listen to.
Additionally, you have the privilege to customize the background effects that you could be used at any time. Voxal Voice Changer is a simple app with zero restrictions in the free version. It also offers paid versions with additional features for professional YouTubers. Besides editing ready-made audio, the app does allow you to create voice recordings.
How to Use Voxal Voice Changer
Here is the detailed procedure to use the Voxal Voice Changer app:
Step1 From the official website for Voxal, download and install a compatible version of the app on your computer system. Wait until the installation is successful and launch the app for usage.

When the interface above appears, locate the Menu drop-down menu at the top left corner of your display screen. Select File > Import Voice. Your local storage will automatically appear.
Step2 Choose an audio recording or voice to import on the Voxal Voice Changer interface, and tap on Open. After uploading the file, select a voice effect on the left sidebar.

Step3 Now click on the green Preview button at the top menubar. Listen to the audio file with the chosen effect. If satisfied, export the file to your preferred storage path.
4. Skype Voice Changer
As the name implies, this app is built for you to conceal your voice when using Skype social media platform. It can also serve as a voice changer for YouTube content creators. This app permits you to transform your audio recordings into interesting sounds easily and quickly.
Skype Voice Changer offers free and paid services to its end-users. However, the majority of its features are locked in the paid version. The app provides a clean voice editing interface so end-users, including those who aren’t conversant with information technology, can navigate easily.
How to Use Skype Voice Changer
Here is the set of instructions to use Skype Voice Changer:
Step1 Install the Skype Voice Changer app on your PC, and launch it for operation by clicking on the appropriate button.


A window with several easy-to-use options will come up just as below:

Click on the Effects button at the top menu bar.
Step2 Select a voice effect on the left panel of the Skype Voice Changer interface. Once that is set, click on Preview at the lower right corner of your screen.
Now speak into a microphone, and listen to your voice.
5. AV Voice Changer Diamond
AV Voice Changer Diamond is another wonderful voice-changing app with several entertaining effects that you can choose from to pimp your audio recordings or voice. The app provides you with several preset options, so you have control over your output. It’s one of the most versatile apps for YouTubers.
This voice changer offers an easy-to-manage user interface so beginners in the tech space can easily find their way without involving a third party. AV Voice Changer Diamond works perfectly with all VoIP programs and social media platforms like Skype, Viber, YouTube, and more. One challenge you may experience with this app is the very long installation process.
How to Use AV Voice Changer Diamond
Go to the AV Voice Changer Diamond website to install the latest version of the app on your computer system, and follow the steps below to use it:
Step1 Open the app on your Windows or Mac operating system. You will find the interface below on your screen:

Locate the Nickvoices at the top toolbar. Click on it, and a couple of voice effect options will pop up.

Step2 Select from the list to proceed. Alternatively, you could click on Custom on the list to customize a voice effect. However, mind you, you must subscribe to a premium package to create a voice effect.
Step3 On completing the step above, locate the Record button and click on it. A new window will come up. Follow the on-screen instructions to record your voice.

6. Voice Changer HD
If you are looking for a voice-changing app that you can use to modify your YouTube audio tracks at a zero-cost fee, Voice Changer HD is the perfect tool to use. The app allows you to turn boring audio recordings into enjoyable ones with the lovely effects it supports.
In addition to the audio editing features, Voice Changer HD lets end-users create sounds from texts. Thus, it supports text-to-speech. The app comes with an easy-to-manage user interface. It has over 25 preset voices tucked into it.
How to Use Voice Changer HD
Using Voice Changer HD isn’t difficult. Apply the stepwise guide below:
Step1 Download, install, and open Voice Changer HD on your computer. Once it opens, click on the appropriate button to record your voice.
Step2 Click on the Stop button to end the recording. Voice Changer HD will automatically load an interface with several voice effects. Select one to design your recorded file.

Step3 Next, click on Share to send the file to friends and relatives.

Part 2. Best Voice Editors for YouTubers
1. Filmora

Filmora is an industry-leading audio editing software well-designed with an interactive user interface that allows you to edit YouTube recordings before uploading them on the net. This multipurpose software is customized with endless audio editing features. It supports audio ducking, audio visualizer, auto synchronization, speech-to-text, text-to-speech, and lots more.
Free Download For Win 7 or later(64-bit)
Free Download For macOS 10.14 or later
Additionally, end-users can easily detect silence in an audio or video file via the Wondershare Filmora software. Besides audio editing, this software is capable of video editing. It enables you to modify/adjust videos without compromising the quality. This software permits you to add effects, transitions, detach audio, remove background, etc.
Wondershare Filmora has all you need in a video and audio editor as it integrates with several platforms, including YouTube and other social media apps. This audio editing solution is suitable for Windows and Mac operating systems.
2. Adobe Audition

Designed by the first PDF editing platform developer, Adobe Audition is another software you can count on to edit audio tracks with quality output. It edits all audio types, including MP3, WAV, and more, with zero limitations. The software sits at the second position on our list because of the rich editing features it holds. Adobe Audition allows you to mix sounds easily and quickly- a vital reason Disc Jerkers (DJs) use the software. Another feature you stand to enjoy when using this software is the freedom to design sound effects.
Part 3. FAQs
Q1. Can I change my voice for YouTube videos?
Yes!
With voice-changing apps, you can quickly change your voice for YouTube videos. These apps come with lots of incredible sound effects that you need to pimp your audio tracks on YouTube. Some of the top-rated voice changers available in the market presently have been introduced above. Check them out.
Q2. What voice changers do YouTubers use?
As earlier stated, there are countless voice-changing apps for YouTubers. Depending on the sound effect you need, you may need to try two or more. You can select one from the ones mentioned in the article.
Conclusion
Now you have the top 7 voice changers for YouTubers, select one of them and use it in your next project. All voice-changing apps are simple to use, fast and reliable. However, we advise that you consider the pricing before investing in it. If you need an audio/video editing software program, Filmora is the right tool to use. The software is well-known for excellent results.
For Win 7 or later (64-bit)
For macOS 10.12 or later
Part 1. Best Voice Changers for YouTubers
Here are the top 7 YouTube voice-changing apps available on the global market today:
1. AthTek [Online & Free]
AthTek is one the world-leading voice-changing apps suitable for Windows operating systems. This simple yet powerful app is well-customized with powerful features such as pitch and speed enhancer. The app allows you to edit your audio recordings easily and quickly.
It provides you with a comprehensive user interface that lets you switch your voice without stress. Compared to other voice-changers, AthTek stands out. The app integrates perfectly with platforms like Skype, etc.
AthTek is a fantastic voice changer, however, it isn’t without its dark sides. AthTek is not a real-time voice-changing app. Hence, you can only use it with ready-made sound recordings.
How to Use AthTek YouTube Voice Changer
Follow the procedure below to use the AthTek voice changing app on your YouTube channel:
Step1 Download AthTek from the official website. Follow the on-screen instructions to install the app, and launch it. When AthTek opens, the interface below will appear on your display screen:
Locate the Browse button beside File Path, and click on it. AthTek will automatically direct you to your local storage.
Step2 Choose your desired audio file from the list available on your computer, and tap the Open button. AthTek will immediately upload the audio file on its interface. The page below will come up on your screen:
Step3 Now move to the Change Parameter section and make the necessary adjustments. Once that’s set, click on the Play button to preview the audio file. If satisfied, tap on Export, choose a destination path and click on Save.
2. Voicechanger.io
Voicechanger.io is a cloud-based program that enables you to upload and edit audio files conveniently without distorting the quality. The program also allows you to record your voice, and add effects with complete ease. It’s an easy-to-use voice changer with no operating system limitations. Aside from voice changing, Voicechanger.io supports speech-to-text. Thus, you can convert speech to text without stress.
How to Use Voicechanger.io
Step1 With the help of an internet-enabled computer system, navigate to the official webpage for Voicechanger.io. The page below will come up if all goes well:
Step2 Choose your preferred audio input method to proceed. Should you select Upload audio, you will be directed to your local drive where your recordings are stored. Choose an audio file, and click on Open.
However, should you pick the Use microphone option, you will be prompted to grant access to the mic. Click on the appropriate key to complete this step.
3. Voxal Voice Changer
Voxal Voice Changer is another quality app mostly used by Mac owners to manipulate audio recordings. It’s also suitable for editing real-time chat audio recordings. The app provides you with several preset voices that you can select from to make your sound recordings fun to listen to.
Additionally, you have the privilege to customize the background effects that you could be used at any time. Voxal Voice Changer is a simple app with zero restrictions in the free version. It also offers paid versions with additional features for professional YouTubers. Besides editing ready-made audio, the app does allow you to create voice recordings.
How to Use Voxal Voice Changer
Here is the detailed procedure to use the Voxal Voice Changer app:
Step1 From the official website for Voxal, download and install a compatible version of the app on your computer system. Wait until the installation is successful and launch the app for usage.
When the interface above appears, locate the Menu drop-down menu at the top left corner of your display screen. Select File > Import Voice. Your local storage will automatically appear.
Step2 Choose an audio recording or voice to import on the Voxal Voice Changer interface, and tap on Open. After uploading the file, select a voice effect on the left sidebar.
Step3 Now click on the green Preview button at the top menubar. Listen to the audio file with the chosen effect. If satisfied, export the file to your preferred storage path.
4. Skype Voice Changer
As the name implies, this app is built for you to conceal your voice when using Skype social media platform. It can also serve as a voice changer for YouTube content creators. This app permits you to transform your audio recordings into interesting sounds easily and quickly.
Skype Voice Changer offers free and paid services to its end-users. However, the majority of its features are locked in the paid version. The app provides a clean voice editing interface so end-users, including those who aren’t conversant with information technology, can navigate easily.
How to Use Skype Voice Changer
Here is the set of instructions to use Skype Voice Changer:
Step1 Install the Skype Voice Changer app on your PC, and launch it for operation by clicking on the appropriate button.
A window with several easy-to-use options will come up just as below:
Click on the Effects button at the top menu bar.
Step2 Select a voice effect on the left panel of the Skype Voice Changer interface. Once that is set, click on Preview at the lower right corner of your screen.
Now speak into a microphone, and listen to your voice.
5. AV Voice Changer Diamond
AV Voice Changer Diamond is another wonderful voice-changing app with several entertaining effects that you can choose from to pimp your audio recordings or voice. The app provides you with several preset options, so you have control over your output. It’s one of the most versatile apps for YouTubers.
This voice changer offers an easy-to-manage user interface so beginners in the tech space can easily find their way without involving a third party. AV Voice Changer Diamond works perfectly with all VoIP programs and social media platforms like Skype, Viber, YouTube, and more. One challenge you may experience with this app is the very long installation process.
How to Use AV Voice Changer Diamond
Go to the AV Voice Changer Diamond website to install the latest version of the app on your computer system, and follow the steps below to use it:
Step1 Open the app on your Windows or Mac operating system. You will find the interface below on your screen:
Locate the Nickvoices at the top toolbar. Click on it, and a couple of voice effect options will pop up.
Step2 Select from the list to proceed. Alternatively, you could click on Custom on the list to customize a voice effect. However, mind you, you must subscribe to a premium package to create a voice effect.
Step3 On completing the step above, locate the Record button and click on it. A new window will come up. Follow the on-screen instructions to record your voice.
6. Voice Changer HD
If you are looking for a voice-changing app that you can use to modify your YouTube audio tracks at a zero-cost fee, Voice Changer HD is the perfect tool to use. The app allows you to turn boring audio recordings into enjoyable ones with the lovely effects it supports.
In addition to the audio editing features, Voice Changer HD lets end-users create sounds from texts. Thus, it supports text-to-speech. The app comes with an easy-to-manage user interface. It has over 25 preset voices tucked into it.
How to Use Voice Changer HD
Using Voice Changer HD isn’t difficult. Apply the stepwise guide below:
Step1 Download, install, and open Voice Changer HD on your computer. Once it opens, click on the appropriate button to record your voice.
Step2 Click on the Stop button to end the recording. Voice Changer HD will automatically load an interface with several voice effects. Select one to design your recorded file.
Step3 Next, click on Share to send the file to friends and relatives.
Part 2. Best Voice Editors for YouTubers
1. Filmora
Filmora is an industry-leading audio editing software well-designed with an interactive user interface that allows you to edit YouTube recordings before uploading them on the net. This multipurpose software is customized with endless audio editing features. It supports audio ducking, audio visualizer, auto synchronization, speech-to-text, text-to-speech, and lots more.
Free Download For Win 7 or later(64-bit)
Free Download For macOS 10.14 or later
Additionally, end-users can easily detect silence in an audio or video file via the Wondershare Filmora software. Besides audio editing, this software is capable of video editing. It enables you to modify/adjust videos without compromising the quality. This software permits you to add effects, transitions, detach audio, remove background, etc.
Wondershare Filmora has all you need in a video and audio editor as it integrates with several platforms, including YouTube and other social media apps. This audio editing solution is suitable for Windows and Mac operating systems.
2. Adobe Audition
Designed by the first PDF editing platform developer, Adobe Audition is another software you can count on to edit audio tracks with quality output. It edits all audio types, including MP3, WAV, and more, with zero limitations. The software sits at the second position on our list because of the rich editing features it holds. Adobe Audition allows you to mix sounds easily and quickly- a vital reason Disc Jerkers (DJs) use the software. Another feature you stand to enjoy when using this software is the freedom to design sound effects.
Part 3. FAQs
Q1. Can I change my voice for YouTube videos?
Yes!
With voice-changing apps, you can quickly change your voice for YouTube videos. These apps come with lots of incredible sound effects that you need to pimp your audio tracks on YouTube. Some of the top-rated voice changers available in the market presently have been introduced above. Check them out.
Q2. What voice changers do YouTubers use?
As earlier stated, there are countless voice-changing apps for YouTubers. Depending on the sound effect you need, you may need to try two or more. You can select one from the ones mentioned in the article.
Conclusion
Now you have the top 7 voice changers for YouTubers, select one of them and use it in your next project. All voice-changing apps are simple to use, fast and reliable. However, we advise that you consider the pricing before investing in it. If you need an audio/video editing software program, Filmora is the right tool to use. The software is well-known for excellent results.
Also read:
- [New] 2024 Approved Content Creation in Today’s Revenue Landscape
- [New] Advanced Steps to Record Silent Videos
- [New] Explore Free YouTube Channel Imagery Tools
- [New] Spearheading Groundbre Folks In VR Space
- [Updated] The Ultimate Guide to Professional Screen Capture Using Adobe Captive Software
- 2024 Approved Revolutionizing the Way You Engage Early on in Listening
- 2024 Approved Smooth Integration of YouTube Playlists via Web Tech
- 2024 Approved The Ultimate Tutorial on Editing YouTube Videos
- 2024 Approved Unlocking YouTube Studio's Power for Professional Edits
- 2024 Approved Unlocking YouTube's Potential Title and Tag Best Practices
- Creating Stunning Time-Lapse Videos Made Simple: Two Effective Techniques
- Hunter & Whois Explorer: The Latest Updates on Top Email Scraping Tools From MassMail Software
- In 2024, How to Unlock Tecno Pova 5 Pattern Lock if Forgotten? 6 Ways
- In 2024, Prime Hashtag Combo for 6-Figure Youtube Traffic Surge
- In 2024, Spreading Beauty Wisdom Setting Up Your Vlogger's Virtual Space
- In 2024, The Stepwise Route to Discovering Elusive YouTube Footage
- In 2024, Top 10 Must-Watch Global Journey Vids on YouTube
- Microsoft Flight Simulator 2020: Overcoming Persistent Update Errors - Solutions Included
- Updated Top 8 AI Titles Generators for Creating Catchy Titles For All Platforms
- Title: [New] Reel In Riches A Guide to Earning on YouTube Shorts
- Author: Thomas
- Created at : 2024-11-27 16:08:04
- Updated at : 2024-12-03 16:04:17
- Link: https://youtube-help.techidaily.com/new-reel-in-riches-a-guide-to-earning-on-youtube-shorts/
- License: This work is licensed under CC BY-NC-SA 4.0.