![[New] Sharpen Your Content for Unlimited YouTube Exposure](https://thmb.techidaily.com/2e5cadcabaa5bc146e9286cd6ccf5e30c43742afdff538e1080a5add013b39bf.jpg)
[New] Sharpen Your Content for Unlimited YouTube Exposure
Sharpen Your Content for Unlimited YouTube Exposure
Easy Ways To Get Free Views on YouTube! Alternative Methods

Richard Bennett
Oct 26, 2023• Proven solutions
If you’re looking to get free views on YouTube, rather than just assuming views are free, it probably means you’re looking into alternative ways to jumpstart the growth of your channel (i.e. buying views ). The best way to grow your channel is to focus on putting out quality content consistently. We do not recommend the following methods, but they do exist. Here are a couple of alternatives to purchasing views which are along those same lines (if you want to know how to grow organically without resorting to tactics like these, click here ) When YouTube first started, getting views and subscribers was a lot easier. That’s not to say that creator didn’t have to work hard on their channels, just that they had a lot less competition.
YouTube has become so popular now that it is not uncommon for creators to look for alternative ways to stand out. Some might choose to buy views to kick start the organic growth of their channels (which is not a good idea), while others are looking for free ways of getting those views.
Two of these alternative methods are:
Part 1: Get More Views with View Exchange Platforms
Part 2: Get More YouTube Views with Bots
#1: View Exchange Platforms
There are a variety of websites to choose from, but the main purpose is the same: you watch other people’s videos in order for them to watch your videos.
Here are the most popular view exchange platforms:
1. View2be
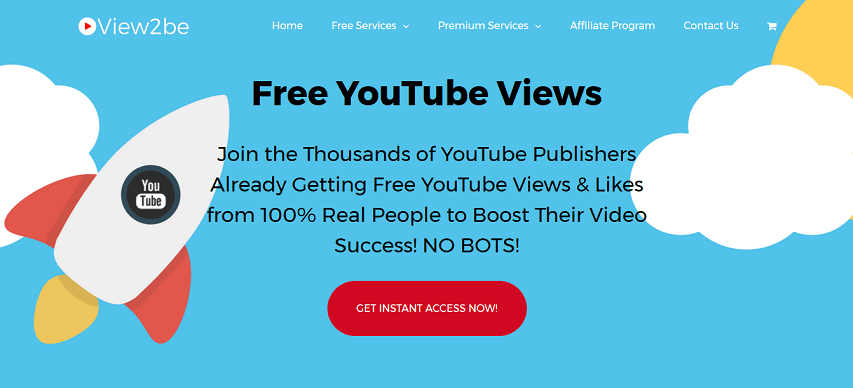
View2be accounts are free. After you sign up, you will need to start watching videos from other YouTube publishers who are also members at View2be in order to earn coins. One of the differences between View2be and other view exchange platforms is that here, you can also complete some other tasks such as liking videos in order to earn more coins.
You can then spend the coins on views and likes for your own videos.
2. GrowViews
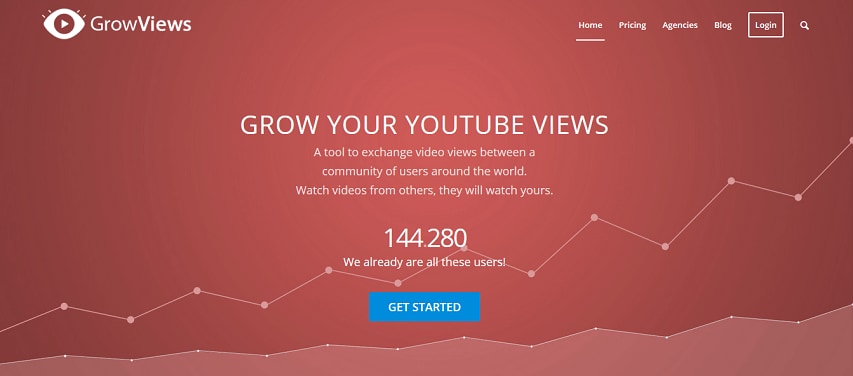
With GrowViews, you will need to login with your YouTube account. This is how the platform lists your YouTube videos.
After signing in, you just need to click on the Play button. The site’s player will work on the background, playing videos from other YouTube creators.
For each video that you watch, you will get 1 credit that you can then exchange for views on your own videos.
3. YTMonster
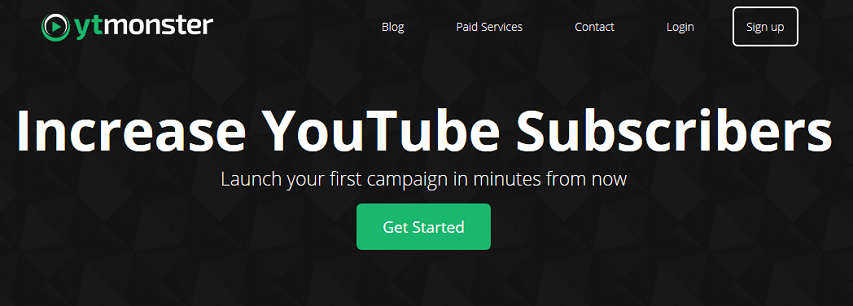
Just like with the previous two view exchange platforms mentioned, you can also create a free account with YTMonster. This will give you access to a dashboard where you can choose how to use the credits that you earn as well as keep track of what you have already spent credits on.
With YTMonster, you will be able to contact other video publishers like you and exchange not only views but comments, likes, and even subscriptions as well. You can even start campaigns to grow your YouTube channel as quickly as you can.
4. KingdomLikes

At KingdomLikes, you also create a free account. This platform isn’t only for YouTube views, it is for the exchange of social actions across multiple websites. One of the main advantages of using the KingdomLikes is that you can also use this same platform to get likes or views on Facebook, Twitter, or Instagram, as well as on YouTube.
Just like with the other platforms, you will need to watch other people’s videos in order to earn views for yourself.
5. AddVisits
After creating your free account on AddVisits you’ll get to a dashboard where you’ll need to enter the URL of the YouTube video you want free views for.
AddVisits reviews each video submitted in this way to ensure that it complies with YouTube’s Terms of Service. Once your video is approved, you define how many points you are willing to give to people who watch your videos or like them. In exchange, you watch other people’s videos and get points as compensation. You can then exchange those points for more views or likes.
#2: Get More Views with YouTube View Bots
When most people think about getting free views on YouTube, they immediately think about bots.
Bots can be dangerous for your channel. The wrong bot can really hurt your search rankings and if you get caught using bots you can lose your account.
If you are going to try a bot, make sure you choose one that offers high retention views (most can’t, but may say they can). High retention views mean YouTube interprets the data as someone watching your video for a period of time, vs just clicking on it and then leaving the page. A bot that can’t offer high retention views just ends up making it look like a lot of people clicked on your video, but none of them liked it enough to watch. That will cause YouTube to rank your video very low in its search results.
Making great content and polishing up your YouTube SEO skills will help you grow your channel over time, and this is probably the best way to go. However, you have a lot of options for how to get free views on YouTube if you want to try to kick start that growth. Besides, using a good video editing software is also important. Filmora provides lots of templates and effects which allows you to edit YouTube videos faster and better.


Richard Bennett
Richard Bennett is a writer and a lover of all things video.
Follow @Richard Bennett
Richard Bennett
Oct 26, 2023• Proven solutions
If you’re looking to get free views on YouTube, rather than just assuming views are free, it probably means you’re looking into alternative ways to jumpstart the growth of your channel (i.e. buying views ). The best way to grow your channel is to focus on putting out quality content consistently. We do not recommend the following methods, but they do exist. Here are a couple of alternatives to purchasing views which are along those same lines (if you want to know how to grow organically without resorting to tactics like these, click here ) When YouTube first started, getting views and subscribers was a lot easier. That’s not to say that creator didn’t have to work hard on their channels, just that they had a lot less competition.
YouTube has become so popular now that it is not uncommon for creators to look for alternative ways to stand out. Some might choose to buy views to kick start the organic growth of their channels (which is not a good idea), while others are looking for free ways of getting those views.
Two of these alternative methods are:
Part 1: Get More Views with View Exchange Platforms
Part 2: Get More YouTube Views with Bots
#1: View Exchange Platforms
There are a variety of websites to choose from, but the main purpose is the same: you watch other people’s videos in order for them to watch your videos.
Here are the most popular view exchange platforms:
1. View2be
View2be accounts are free. After you sign up, you will need to start watching videos from other YouTube publishers who are also members at View2be in order to earn coins. One of the differences between View2be and other view exchange platforms is that here, you can also complete some other tasks such as liking videos in order to earn more coins.
You can then spend the coins on views and likes for your own videos.
2. GrowViews
With GrowViews, you will need to login with your YouTube account. This is how the platform lists your YouTube videos.
After signing in, you just need to click on the Play button. The site’s player will work on the background, playing videos from other YouTube creators.
For each video that you watch, you will get 1 credit that you can then exchange for views on your own videos.
3. YTMonster
Just like with the previous two view exchange platforms mentioned, you can also create a free account with YTMonster. This will give you access to a dashboard where you can choose how to use the credits that you earn as well as keep track of what you have already spent credits on.
With YTMonster, you will be able to contact other video publishers like you and exchange not only views but comments, likes, and even subscriptions as well. You can even start campaigns to grow your YouTube channel as quickly as you can.
4. KingdomLikes
At KingdomLikes, you also create a free account. This platform isn’t only for YouTube views, it is for the exchange of social actions across multiple websites. One of the main advantages of using the KingdomLikes is that you can also use this same platform to get likes or views on Facebook, Twitter, or Instagram, as well as on YouTube.
Just like with the other platforms, you will need to watch other people’s videos in order to earn views for yourself.
5. AddVisits
After creating your free account on AddVisits you’ll get to a dashboard where you’ll need to enter the URL of the YouTube video you want free views for.
AddVisits reviews each video submitted in this way to ensure that it complies with YouTube’s Terms of Service. Once your video is approved, you define how many points you are willing to give to people who watch your videos or like them. In exchange, you watch other people’s videos and get points as compensation. You can then exchange those points for more views or likes.
#2: Get More Views with YouTube View Bots
When most people think about getting free views on YouTube, they immediately think about bots.
Bots can be dangerous for your channel. The wrong bot can really hurt your search rankings and if you get caught using bots you can lose your account.
If you are going to try a bot, make sure you choose one that offers high retention views (most can’t, but may say they can). High retention views mean YouTube interprets the data as someone watching your video for a period of time, vs just clicking on it and then leaving the page. A bot that can’t offer high retention views just ends up making it look like a lot of people clicked on your video, but none of them liked it enough to watch. That will cause YouTube to rank your video very low in its search results.
Making great content and polishing up your YouTube SEO skills will help you grow your channel over time, and this is probably the best way to go. However, you have a lot of options for how to get free views on YouTube if you want to try to kick start that growth. Besides, using a good video editing software is also important. Filmora provides lots of templates and effects which allows you to edit YouTube videos faster and better.

Richard Bennett
Richard Bennett is a writer and a lover of all things video.
Follow @Richard Bennett
Richard Bennett
Oct 26, 2023• Proven solutions
If you’re looking to get free views on YouTube, rather than just assuming views are free, it probably means you’re looking into alternative ways to jumpstart the growth of your channel (i.e. buying views ). The best way to grow your channel is to focus on putting out quality content consistently. We do not recommend the following methods, but they do exist. Here are a couple of alternatives to purchasing views which are along those same lines (if you want to know how to grow organically without resorting to tactics like these, click here ) When YouTube first started, getting views and subscribers was a lot easier. That’s not to say that creator didn’t have to work hard on their channels, just that they had a lot less competition.
YouTube has become so popular now that it is not uncommon for creators to look for alternative ways to stand out. Some might choose to buy views to kick start the organic growth of their channels (which is not a good idea), while others are looking for free ways of getting those views.
Two of these alternative methods are:
Part 1: Get More Views with View Exchange Platforms
Part 2: Get More YouTube Views with Bots
#1: View Exchange Platforms
There are a variety of websites to choose from, but the main purpose is the same: you watch other people’s videos in order for them to watch your videos.
Here are the most popular view exchange platforms:
1. View2be
View2be accounts are free. After you sign up, you will need to start watching videos from other YouTube publishers who are also members at View2be in order to earn coins. One of the differences between View2be and other view exchange platforms is that here, you can also complete some other tasks such as liking videos in order to earn more coins.
You can then spend the coins on views and likes for your own videos.
2. GrowViews
With GrowViews, you will need to login with your YouTube account. This is how the platform lists your YouTube videos.
After signing in, you just need to click on the Play button. The site’s player will work on the background, playing videos from other YouTube creators.
For each video that you watch, you will get 1 credit that you can then exchange for views on your own videos.
3. YTMonster
Just like with the previous two view exchange platforms mentioned, you can also create a free account with YTMonster. This will give you access to a dashboard where you can choose how to use the credits that you earn as well as keep track of what you have already spent credits on.
With YTMonster, you will be able to contact other video publishers like you and exchange not only views but comments, likes, and even subscriptions as well. You can even start campaigns to grow your YouTube channel as quickly as you can.
4. KingdomLikes
At KingdomLikes, you also create a free account. This platform isn’t only for YouTube views, it is for the exchange of social actions across multiple websites. One of the main advantages of using the KingdomLikes is that you can also use this same platform to get likes or views on Facebook, Twitter, or Instagram, as well as on YouTube.
Just like with the other platforms, you will need to watch other people’s videos in order to earn views for yourself.
5. AddVisits
After creating your free account on AddVisits you’ll get to a dashboard where you’ll need to enter the URL of the YouTube video you want free views for.
AddVisits reviews each video submitted in this way to ensure that it complies with YouTube’s Terms of Service. Once your video is approved, you define how many points you are willing to give to people who watch your videos or like them. In exchange, you watch other people’s videos and get points as compensation. You can then exchange those points for more views or likes.
#2: Get More Views with YouTube View Bots
When most people think about getting free views on YouTube, they immediately think about bots.
Bots can be dangerous for your channel. The wrong bot can really hurt your search rankings and if you get caught using bots you can lose your account.
If you are going to try a bot, make sure you choose one that offers high retention views (most can’t, but may say they can). High retention views mean YouTube interprets the data as someone watching your video for a period of time, vs just clicking on it and then leaving the page. A bot that can’t offer high retention views just ends up making it look like a lot of people clicked on your video, but none of them liked it enough to watch. That will cause YouTube to rank your video very low in its search results.
Making great content and polishing up your YouTube SEO skills will help you grow your channel over time, and this is probably the best way to go. However, you have a lot of options for how to get free views on YouTube if you want to try to kick start that growth. Besides, using a good video editing software is also important. Filmora provides lots of templates and effects which allows you to edit YouTube videos faster and better.
Richard Bennett
Richard Bennett is a writer and a lover of all things video.
Follow @Richard Bennett
Incorporating Visual Media Into Free Writings
How to Add Video to Text

Liza Brown
Mar 27, 2024• Proven solutions
It may be challenging to capture the attention of your audience if the video openings or PowerPoint presentations contain too much text. Striking a perfect balance between the visual and textual elements isn’t always easy, especially if the text is the only way to convey essential information to the audience.
Luckily, video editing and presentation software products offer the tools you will need to combine video and text. In this article, we are going to show you how to add a video to text in PowerPoint and Filmora.
Part 1: How to Add Video to Text for Free with PowerPoint?
An effective PowerPoint presentation should contain proportionate amounts of textual and visual elements. Using too many images, videos or animations can make following a presentation difficult, just as too much text can render a presentation too static.
Adding videos to titles or subtitles you include in a slideshow you’re creating in PowerPoint can help you create a presentation that is both informative and visually entertaining. The process of combining videos with text in PowerPoint isn’t overly complicated, but you will still need to go through it several times in order to become familiar with it.
You should start by creating a new slide and adding a textbox to it. Proceed to type the word or phrase into the textbox and go on to format the text. Pick the font that matches the style of your presentation and make sure that the text size is large enough for the video to be visible.
Head over to the Insert tab, select Rectangle from the Shapes menu, and create a rectangular shape over the entire slide. Right-click on the slide and choose the Send to Back option from the menu. In this manner, you will position the rectangle you created behind the textbox.

The next step you will have to take is to create the cut-out of the text within the rectangle. Select both the text and shape you placed in the background before clicking on the Format tab that is located near the end of PowerPoint’s ribbon.
Find the Insert Shape option and choose Subtract from the Merge Shapes drop-down menu. The shape of the text in the textbox will be applied to the object in the background, which enables you to add a video to that text.

Click on the Insert tab, and then choose the Video option from the Media menu. You can insert a video that is stored on a local hard drive or the Internet to PowerPoint. The video will cover the entire slide, so you must right-click on it and select the Send to Back option.
You can then fine-tune the video playback settings from the Playback tab. Preview the results before you move on to the next slide in your presentation, and make necessary adjustments if you don’t like how the video merged with the text.
Part 2: Adding Video to Text in Filmora
Besides presentation software, you can also use video editing software products to add a video to text. Filmora lets you add a video to text in just a few simple steps. You can first make a text video with animation first, and then use the picture in picture feature to add the video to text. Here are the detailed information about how to add a video to text in Filmora.
You should start by creating a new project in Filmora and importing the video you want to add to the text into the project. Click on the Titles tab, and choose the title that matches the visual style of your project.

Set the preferred duration of the title by dragging one of its ends to the left or right after you place it on the timeline, and then double-click on it to customize it. Click on the Advanced button once the Text tab opens and insert the text into the Input Text box.

Proceed to select a font and adjust the text size before deciding if you want to animate the text . When done, you should export the title as a video file, and then import it back into your project.
Now it’s time to add the text video and the background video to the project media library, and then place the two videos one above the other. Since we’re adding video to text, the text video should be placed above the background video.

Click on the video that contains text to gain access to the Video tab of the Editor panel and then expand the Compositing menu. Change the Blending Mode to Multiply, and the text in the overlaying video should be filled with the parts of the footage from the video below it.
Optionally you can enhance the colors in the background video or adjust the size of the text before exporting your project from Filmora.
Conclusion
There are so many different ways to create visually striking content, and adding videos to text is just one among numerous techniques that enable you to make a PowerPoint presentation or an opening of a video more interesting to watch.
Merging text with video is equally easy in PowerPoint and Filmora, so you just have to choose which software better suits your needs and select the materials that fit the style of your project. Learning how to add a video to text won’t take too much of your time, as this process can be completed in just a few quick steps. Which software are you using to add a video to text? Leave a comment below and let us know.
Liza Brown
Liza Brown is a writer and a lover of all things video.
Follow @Liza Brown
Liza Brown
Mar 27, 2024• Proven solutions
It may be challenging to capture the attention of your audience if the video openings or PowerPoint presentations contain too much text. Striking a perfect balance between the visual and textual elements isn’t always easy, especially if the text is the only way to convey essential information to the audience.
Luckily, video editing and presentation software products offer the tools you will need to combine video and text. In this article, we are going to show you how to add a video to text in PowerPoint and Filmora.
Part 1: How to Add Video to Text for Free with PowerPoint?
An effective PowerPoint presentation should contain proportionate amounts of textual and visual elements. Using too many images, videos or animations can make following a presentation difficult, just as too much text can render a presentation too static.
Adding videos to titles or subtitles you include in a slideshow you’re creating in PowerPoint can help you create a presentation that is both informative and visually entertaining. The process of combining videos with text in PowerPoint isn’t overly complicated, but you will still need to go through it several times in order to become familiar with it.
You should start by creating a new slide and adding a textbox to it. Proceed to type the word or phrase into the textbox and go on to format the text. Pick the font that matches the style of your presentation and make sure that the text size is large enough for the video to be visible.
Head over to the Insert tab, select Rectangle from the Shapes menu, and create a rectangular shape over the entire slide. Right-click on the slide and choose the Send to Back option from the menu. In this manner, you will position the rectangle you created behind the textbox.
The next step you will have to take is to create the cut-out of the text within the rectangle. Select both the text and shape you placed in the background before clicking on the Format tab that is located near the end of PowerPoint’s ribbon.
Find the Insert Shape option and choose Subtract from the Merge Shapes drop-down menu. The shape of the text in the textbox will be applied to the object in the background, which enables you to add a video to that text.
Click on the Insert tab, and then choose the Video option from the Media menu. You can insert a video that is stored on a local hard drive or the Internet to PowerPoint. The video will cover the entire slide, so you must right-click on it and select the Send to Back option.
You can then fine-tune the video playback settings from the Playback tab. Preview the results before you move on to the next slide in your presentation, and make necessary adjustments if you don’t like how the video merged with the text.
Part 2: Adding Video to Text in Filmora
Besides presentation software, you can also use video editing software products to add a video to text. Filmora lets you add a video to text in just a few simple steps. You can first make a text video with animation first, and then use the picture in picture feature to add the video to text. Here are the detailed information about how to add a video to text in Filmora.
You should start by creating a new project in Filmora and importing the video you want to add to the text into the project. Click on the Titles tab, and choose the title that matches the visual style of your project.
Set the preferred duration of the title by dragging one of its ends to the left or right after you place it on the timeline, and then double-click on it to customize it. Click on the Advanced button once the Text tab opens and insert the text into the Input Text box.
Proceed to select a font and adjust the text size before deciding if you want to animate the text . When done, you should export the title as a video file, and then import it back into your project.
Now it’s time to add the text video and the background video to the project media library, and then place the two videos one above the other. Since we’re adding video to text, the text video should be placed above the background video.
Click on the video that contains text to gain access to the Video tab of the Editor panel and then expand the Compositing menu. Change the Blending Mode to Multiply, and the text in the overlaying video should be filled with the parts of the footage from the video below it.
Optionally you can enhance the colors in the background video or adjust the size of the text before exporting your project from Filmora.
Conclusion
There are so many different ways to create visually striking content, and adding videos to text is just one among numerous techniques that enable you to make a PowerPoint presentation or an opening of a video more interesting to watch.
Merging text with video is equally easy in PowerPoint and Filmora, so you just have to choose which software better suits your needs and select the materials that fit the style of your project. Learning how to add a video to text won’t take too much of your time, as this process can be completed in just a few quick steps. Which software are you using to add a video to text? Leave a comment below and let us know.
Liza Brown
Liza Brown is a writer and a lover of all things video.
Follow @Liza Brown
Also read:
- [Updated] A Peek Into the Best Mac Applications for Sniping Perfectly for 2024
- [Updated] In 2024, Beyond Playfulness A Closer Look at Snapchat's Emojis
- 2024 Approved Seamless Addition of YouTube Video Selections for Sites
- 2024 Approved Step-by-Step Guide to Protected YouTube-to-MP3 Conversions
- Exploring Differences Between IGTV and YouTube for Effective Posts for 2024
- How to Track WhatsApp Messages on Samsung Galaxy M34 5G Without Them Knowing? | Dr.fone
- In 2024, 5 Solutions For Vivo Y100 5G Unlock Without Password
- In 2024, Mastering YouTube Live Imagery A Comprehensive Overview
- In 2024, Transforming Data Into Strategic Content Moves
- In 2024, Tutorial to Change Realme Narzo 60 5G IMEI without Root A Comprehensive Guide
- In 2024, Unveiling the Mystery of Proper Lighting in YouTube Vids
- One-Click Setup: A Step-by-Step Guide to Adding the Top M-E-T-V Addon to Your Kodi 19 or 20 Devices
- Seamless Transfer of Social Media Videos From Twitter to WhatsApp
- Title: [New] Sharpen Your Content for Unlimited YouTube Exposure
- Author: Thomas
- Created at : 2024-10-31 18:57:07
- Updated at : 2024-11-05 02:48:06
- Link: https://youtube-help.techidaily.com/new-sharpen-your-content-for-unlimited-youtube-exposure/
- License: This work is licensed under CC BY-NC-SA 4.0.