![[New] Steps to Prevent Thumbnail Absence on Shorts Videos](https://thmb.techidaily.com/37be59bd79492103146c553d037e355365677b2067dd8fea4392e3520b311142.jpg)
[New] Steps to Prevent Thumbnail Absence on Shorts Videos
Steps to Prevent Thumbnail Absence on Shorts Videos
Video thumbnails are important since they encourage people to click and watch the video. But what if your set YouTube Shorts thumbnail is not showing? YouTube will use a random part of the video as the thumbnail. It may be an unflattering or uninteresting shot. Then, your Shorts video is doomed.
That said, it is a problem you want to solve. Here are 7 FAQs about YouTube Shorts thumbnails. They may help you with fixing this issue.
Q1. Can I Customize YouTube Shorts Thumbnails?
Yes, you can. YouTube did allow short-form video creators to upload custom thumbnails for their Shorts. However, they aren’t that optimized. For instance, some people may not see them on the Shorts shelf. Also, if you share a link to the video somewhere else, the old video thumbnail may show instead of the new one.
Adding a custom thumbnail for YouTube Shorts is the same as adding one for long-form videos on the platform. Follow these steps:
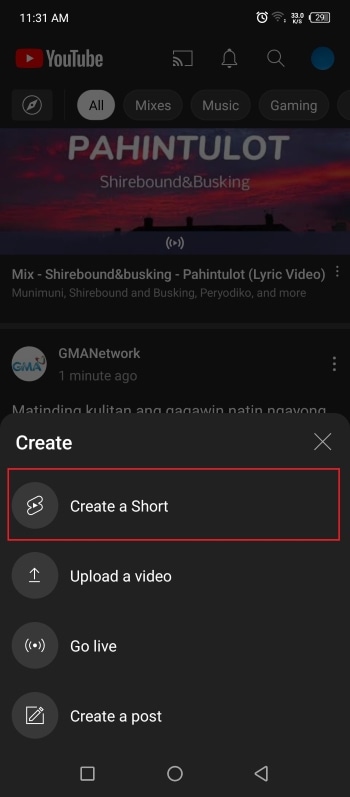
- Open the YouTube mobile app. Click the “Plus” icon at the bottom center > “Create Short.” Upload, edit, and post your video.
- Get to your desktop computer or laptop. Open your channel’s YouTube Studio.

- On the left navigation menu, click “Content.”

- Click the “pencil” icon next to the Shorts you just uploaded. This video should be at the top of the list.
- Navigate to the Thumbnail section. Click “Create Thumbnail.”

Q2. Why Are YouTube Shorts Thumbnails Not Showing?
It’s not you who’s the only one with Shorts thumbnails not showing. Many short-form content creators on the platform are also facing this issue. A YouTuber took to Reddit to complain about how he uploaded custom thumbnails for all his videos. The thumbnails are correct in the editor. However, YouTube still displays a random frame as the thumbnail on the Shorts shelf.
“They ALL have randomly selected different parts of each video I have uploaded & somehow generated a new/unknown thumbnail that was neither what I uploaded as the custom option nor 1 of the 3 that YouTube auto populated.”
The reason behind this is the difference in the thumbnail size. Regular YouTube video thumbnails are in the ratio of 16:9. Meanwhile, Shorts uses a ratio of 9:16. The thing is that YouTube does not yet allow you to upload 9:16 thumbnails. Thus, the thumbnail for Shorts may show correctly on the video section but not on the Shorts shelf.
Q3. How to Fix YouTube Shorts Thumbnail Problem?
Unfortunately, there is no reliable fix to this problem yet. YouTubers have tried different things in hopes that YouTube will display the correct thumbnail for their Shorts.
Some YouTubers have tried using different images. Others have experimented with changing the aspect ratio of the thumbnail or using Adobe editor for ratios. Clearing histories and cache, using different browsers, resizing, and changing the images’ resolution have also been done. Sadly, these are all failed attempts.
Q4. How To Boost Views When I Have no Control Over YouTube Shorts Thumbnails?
Attracting viewers on Shorts is the same as attracting viewers on the main YouTube. You use interesting thumbnails and video titles. Since thumbnails are out of the options, selecting great video titles has become even more important.
Here are some pointers. Your title should be at most 40 characters. Also, it should be concise and irresistible. And forget about SEO since no one is searching for YouTube Shorts anyway. People consume what they see in their feeds. So instead, the title should be “snappy.” It should intrigue, entertain, or enlighten the viewers. That will net you some views for your Shorts content.
Q5. How To Get More Views on YouTube Shorts?
Forgoing the intro is the way to go. An intro will just prolong the video when people are in Shorts to find bite-sized videos. So jump right into the video content. You can also start the video with a still frame instead. Using hashtags, captions, and text effects are also recommended. And interacting with your audience through comments and pinned comments will keep them coming back to your Shorts channel.
Of course, ensuring that the video quality is high is key to getting more views. For that, you need a good video editor. You can try Wondershare Filmora , a powerful and easy-to-use video editor.
Free Download For Win 7 or later(64-bit)
Free Download For macOS 10.14 or later
The best thing is that you don’t need to transfer the video from your phone to your computer and back. Wondershare Filmora is available on mobile. And it’s one of the best tools for enhancing a short-form video.
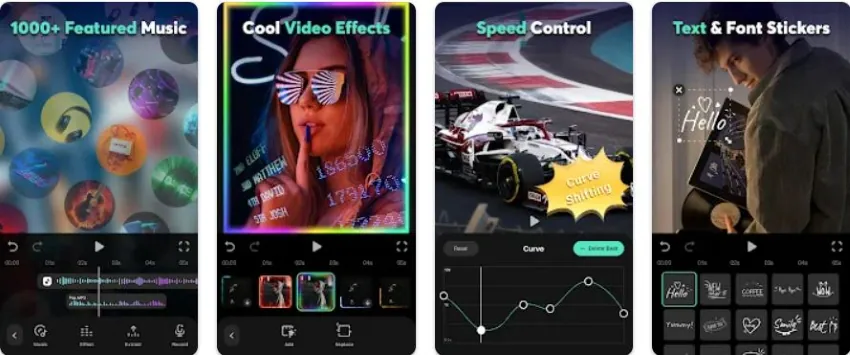
Short-form video watchers love filters, transitions, and effects. And Filmora gives you access to all of that. It provides you with fun and amazing filters, effects, transitions, and stamps that can add a wow factor to your short-form video.
Q6. Do YouTube Shorts Make Money?
Making money from YouTube Shorts was challenging. The platform pays content creators who are doing well through the Creator Fund. However, as Shorts grew, the payout became smaller.
Luckily, that’s going to change. Starting this year, Shorts will be a part of the YouTube Partner Program. This means that you can make money from the ads that people watch on Shorts. According to YouTube, creators will keep 45% of the revenue. It will be distributed based on your share of total Shorts views.
YouTube also adjusted the requirements to qualify for the YPP. They made it easier for Shorts content creators to get into the program.
Q7. How Do You Make YouTube Shorts Play Normal?
You can watch Shorts like normal YouTube videos where you can rewind when you want to. Follow these steps.
On a Desktop Computer
- Open a Shorts video on YouTube.

- Pause the video.

- Click “Library” on the left panel.

- Select the Shorts you just watched. It should be on the top and first on the list.

On a Mobile Phone
- Open the YouTube app. Watch a Shorts video.
- Like the Shorts video.

- Tap “Library”

- Scroll down to find “Liked Videos.” Click on it.

- Select the Shorts video you just watched. It should be at the top of the list.

Conclusion
Unfortunately, custom thumbnails not showing on Shorts does not have a fix yet. So to attract viewers, you must leverage the things in your control. You must title your videos in a way that will make users click the video. Also, adding effects and filters on the video using an editor like Wondershare Filmora can help.
Users can subscribe to Shorts channels. And if they see that your videos are well-edited and high-quality, they’ll be more likely to do so. Once they are subscribed, they will see and watch your videos more often.
Free Download For macOS 10.14 or later
The best thing is that you don’t need to transfer the video from your phone to your computer and back. Wondershare Filmora is available on mobile. And it’s one of the best tools for enhancing a short-form video.
Short-form video watchers love filters, transitions, and effects. And Filmora gives you access to all of that. It provides you with fun and amazing filters, effects, transitions, and stamps that can add a wow factor to your short-form video.
Q6. Do YouTube Shorts Make Money?
Making money from YouTube Shorts was challenging. The platform pays content creators who are doing well through the Creator Fund. However, as Shorts grew, the payout became smaller.
Luckily, that’s going to change. Starting this year, Shorts will be a part of the YouTube Partner Program. This means that you can make money from the ads that people watch on Shorts. According to YouTube, creators will keep 45% of the revenue. It will be distributed based on your share of total Shorts views.
YouTube also adjusted the requirements to qualify for the YPP. They made it easier for Shorts content creators to get into the program.
Q7. How Do You Make YouTube Shorts Play Normal?
You can watch Shorts like normal YouTube videos where you can rewind when you want to. Follow these steps.
On a Desktop Computer
- Open a Shorts video on YouTube.
- Pause the video.
- Click “Library” on the left panel.
- Select the Shorts you just watched. It should be on the top and first on the list.
On a Mobile Phone
- Open the YouTube app. Watch a Shorts video.
- Like the Shorts video.
- Tap “Library”
- Scroll down to find “Liked Videos.” Click on it.
- Select the Shorts video you just watched. It should be at the top of the list.
Conclusion
Unfortunately, custom thumbnails not showing on Shorts does not have a fix yet. So to attract viewers, you must leverage the things in your control. You must title your videos in a way that will make users click the video. Also, adding effects and filters on the video using an editor like Wondershare Filmora can help.
Users can subscribe to Shorts channels. And if they see that your videos are well-edited and high-quality, they’ll be more likely to do so. Once they are subscribed, they will see and watch your videos more often.
Self-Filmed Brilliance: Secrets for YouTube Success
4 Ways To Set Up Your Talking-Head Shots For YouTube

Richard Bennett
Oct 26, 2023• Proven solutions
A big part of being a YouTuber involves talking to the camera. How you set up your talking-head shot depends on many factors, including how much space you have, what kind of look you’re going for, and how many people you want to fit in one frame. Here are four ways to set up your talking-head shots for YouTube.
| Table of Contents 1. Close Quarters Wide-Angle Vlog Set-Up2. Medium Vlog Set-Up3. Two Person Vlog Set-Up4. Long Teleprompter Vlog Set-Up |
|---|
How to Set Up Your Talking Heads Shots for YouTube Video [Infographic]
We’ve summarized the key points about setting up talking head style video shots with the Infographic below. It is welcomed to share on social media.

How to Set Up Your Talking-Head Shots for YouTube [4 Ways]
1. Close Quarters Wide-Angle Vlog Set-Up
Don’t have a lot of space to set up your camera and lighting equipment? No problem! You can be within an arm’s length away from your camera with a close quarters wide-angle vlog set-up.
With this set-up, you’re going to need a camera with a wide-angle lens, a tripod, a camera-mounted shotgun mic for sound, and a ring light for light.
Set your camera on the tripod and mount the shotgun mic directly on the camera shoe (the electronic bracket on the top of the camera). Inside the circular space of your ring light, position your camera right in the middle of it so that you can shoot your video through it without getting any part of the lighting equipment in your shot.
In the video above, Sean Cannell demonstrates this set-up. As you can see from this example, the wide-angle lens is able to squeeze in a lot of what’s in front of the camera into the shot.
Objects and people that just make it into the sides of the frame will appear more stretched out as the wide-angle causes distortion and enhances perspectives.
If you look closely into Sean’s eyes, you can also see a specular highlight in the shape of a circle. Many people like the way eyes look against a ring light.
2. Medium Vlog Set-Up
If you have more space and want to shoot a more professional-looking talking-head shot with more realistic perspectives, a medium vlog set-up may be a better alternative for you.
For this set-up, you’ll be using a slightly longer standard/normal lens (like a 35mm or a 50mm lens) attached to your camera which would be set on a tripod. Since this longer lens will show less of the surrounding areas as it “zooms” closer into whatever is in front, you will need to sit further back, away from your camera.
Now that you’re further away from your camera, a camera-mounted shotgun mic may not be the best mic for you. For better sound recording, you’ll need a shotgun mic fixed on a mic stand that is set up like a boom mic, positioned just outside of your camera frame.
At the 39 second mark of the above video, electronic music producer deadmau5 is positioned right in the center of this particular set-up.
You can see from how even the background and couch looks across the entire camera frame that there is no distortion or enhanced perspective.
It appears that, to the right of deadmau5 (camera left), there is a key light and to his left (camera right) there may be a fill light for additional lighting. Behind the couch, there’s also a background uplight to create depth between the subject and the background. At the 1:30 mark of this trailer video, you can briefly see how the Masterclass camera crew set up their shot.
3. Two Person Vlog Set-Up
If your talking-head shot has got to include two people, you can use a similar set-up as the medium vlog set-up detailed above.
If you look back at the 39-second mark of deadmau5’s Masterclass trailer, you can see that there’s a lot of space to the left and right of deadmau5. Now imagine the same shot but with two people.
With two people, though, you’ll want to set up your mic slightly differently. Rather than using a directional shotgun mic with a narrow area of sensitivity, you’ll want to use a directional mic with a wider area of sensitivity.
4. Long Teleprompter Vlog Set-Up
If you want to read over a script but still make it appear like you’re looking straight into the camera, you’ll need to use a long teleprompter vlog set-up.
For this set-up, you’ll need all the same equipment as the medium vlog set-up, but you’ll additionally need a teleprompter placed in front of your camera equipped with a long telephoto lens.
You will have to sit much further back away from your camera for two main reasons. Firstly, you want to be able to fit yourself in your much more zoomed-in camera frame (effect of the long telephoto lens). Secondly, you want to be far enough that the camera cannot detect your eyes reading from left to right. You’ll want to be around six meters away from a 17” teleprompter monitor or around four meters away from a 10” teleprompter monitor.
In the above video, Jared Polin uses a long teleprompter vlog set-up.
In the video, he says there’s about 8 feet (2.4 meters) between himself and his lens. At the 1:15 mark of his video, Jared demonstrates how this set-up works.
It is difficult to know whether the movement in his eyes is caused by not being far enough from the lens or from his horizontal nystagmus condition in his eyes.
Looking to find the right lights for your video recording set? Check out our Top 17 Video Lighting Equipment For YouTubers .
Tips for Making a Talking Head Video Better
To make a talking-head video more interesting, you can add some background music to the video, apply some interesting texts or elements. Filmora has built-in royalty-free music tracks and sound effects as well as text templates , filters and motivating elements. Download the free trial version below and release your creativity.


Richard Bennett
Richard Bennett is a writer and a lover of all things video.
Follow @Richard Bennett
Richard Bennett
Oct 26, 2023• Proven solutions
A big part of being a YouTuber involves talking to the camera. How you set up your talking-head shot depends on many factors, including how much space you have, what kind of look you’re going for, and how many people you want to fit in one frame. Here are four ways to set up your talking-head shots for YouTube.
| Table of Contents 1. Close Quarters Wide-Angle Vlog Set-Up2. Medium Vlog Set-Up3. Two Person Vlog Set-Up4. Long Teleprompter Vlog Set-Up |
|---|
How to Set Up Your Talking Heads Shots for YouTube Video [Infographic]
We’ve summarized the key points about setting up talking head style video shots with the Infographic below. It is welcomed to share on social media.
How to Set Up Your Talking-Head Shots for YouTube [4 Ways]
1. Close Quarters Wide-Angle Vlog Set-Up
Don’t have a lot of space to set up your camera and lighting equipment? No problem! You can be within an arm’s length away from your camera with a close quarters wide-angle vlog set-up.
With this set-up, you’re going to need a camera with a wide-angle lens, a tripod, a camera-mounted shotgun mic for sound, and a ring light for light.
Set your camera on the tripod and mount the shotgun mic directly on the camera shoe (the electronic bracket on the top of the camera). Inside the circular space of your ring light, position your camera right in the middle of it so that you can shoot your video through it without getting any part of the lighting equipment in your shot.
In the video above, Sean Cannell demonstrates this set-up. As you can see from this example, the wide-angle lens is able to squeeze in a lot of what’s in front of the camera into the shot.
Objects and people that just make it into the sides of the frame will appear more stretched out as the wide-angle causes distortion and enhances perspectives.
If you look closely into Sean’s eyes, you can also see a specular highlight in the shape of a circle. Many people like the way eyes look against a ring light.
2. Medium Vlog Set-Up
If you have more space and want to shoot a more professional-looking talking-head shot with more realistic perspectives, a medium vlog set-up may be a better alternative for you.
For this set-up, you’ll be using a slightly longer standard/normal lens (like a 35mm or a 50mm lens) attached to your camera which would be set on a tripod. Since this longer lens will show less of the surrounding areas as it “zooms” closer into whatever is in front, you will need to sit further back, away from your camera.
Now that you’re further away from your camera, a camera-mounted shotgun mic may not be the best mic for you. For better sound recording, you’ll need a shotgun mic fixed on a mic stand that is set up like a boom mic, positioned just outside of your camera frame.
At the 39 second mark of the above video, electronic music producer deadmau5 is positioned right in the center of this particular set-up.
You can see from how even the background and couch looks across the entire camera frame that there is no distortion or enhanced perspective.
It appears that, to the right of deadmau5 (camera left), there is a key light and to his left (camera right) there may be a fill light for additional lighting. Behind the couch, there’s also a background uplight to create depth between the subject and the background. At the 1:30 mark of this trailer video, you can briefly see how the Masterclass camera crew set up their shot.
3. Two Person Vlog Set-Up
If your talking-head shot has got to include two people, you can use a similar set-up as the medium vlog set-up detailed above.
If you look back at the 39-second mark of deadmau5’s Masterclass trailer, you can see that there’s a lot of space to the left and right of deadmau5. Now imagine the same shot but with two people.
With two people, though, you’ll want to set up your mic slightly differently. Rather than using a directional shotgun mic with a narrow area of sensitivity, you’ll want to use a directional mic with a wider area of sensitivity.
4. Long Teleprompter Vlog Set-Up
If you want to read over a script but still make it appear like you’re looking straight into the camera, you’ll need to use a long teleprompter vlog set-up.
For this set-up, you’ll need all the same equipment as the medium vlog set-up, but you’ll additionally need a teleprompter placed in front of your camera equipped with a long telephoto lens.
You will have to sit much further back away from your camera for two main reasons. Firstly, you want to be able to fit yourself in your much more zoomed-in camera frame (effect of the long telephoto lens). Secondly, you want to be far enough that the camera cannot detect your eyes reading from left to right. You’ll want to be around six meters away from a 17” teleprompter monitor or around four meters away from a 10” teleprompter monitor.
In the above video, Jared Polin uses a long teleprompter vlog set-up.
In the video, he says there’s about 8 feet (2.4 meters) between himself and his lens. At the 1:15 mark of his video, Jared demonstrates how this set-up works.
It is difficult to know whether the movement in his eyes is caused by not being far enough from the lens or from his horizontal nystagmus condition in his eyes.
Looking to find the right lights for your video recording set? Check out our Top 17 Video Lighting Equipment For YouTubers .
Tips for Making a Talking Head Video Better
To make a talking-head video more interesting, you can add some background music to the video, apply some interesting texts or elements. Filmora has built-in royalty-free music tracks and sound effects as well as text templates , filters and motivating elements. Download the free trial version below and release your creativity.
Richard Bennett
Richard Bennett is a writer and a lover of all things video.
Follow @Richard Bennett
Also read:
- [New] 2024 Approved Dynamic Delivery Dissection - Episode 8 Revision
- [New] How to Quickly And Easily Share A YouTube Playlist
- [New] In 2024, Humor Havens Discovering Comedy Gems on YouTube
- [Updated] Perfectly Sized Videos for Maximum Engagement on Instagram for 2024
- 2024 Approved Optimizing Final Viewers' Interactions on YT
- Embrace Literary Adventures with Style: Review of Kobo Clara HD's Unmatched Portability and Ease
- Free Download: Realtek USB WiFi Dongle Driver for Windows 10
- Get the Latest Driver Software for Brother MFC-9130CW
- In 2024, Guide to 10 Top-Ranked Entrepreneurial YouTube Platforms
- Navigate Through Green Screen Muddle on Mac for Smooth YouTubing for 2024
- Snowdrift Scribes Celebrating Beijing's Olympic Spotlight for 2024
- Unveiling the Leading YouTube to Mp3 Tools for 2024
- Title: [New] Steps to Prevent Thumbnail Absence on Shorts Videos
- Author: Thomas
- Created at : 2025-01-12 03:15:53
- Updated at : 2025-01-15 18:21:09
- Link: https://youtube-help.techidaily.com/new-steps-to-prevent-thumbnail-absence-on-shorts-videos/
- License: This work is licensed under CC BY-NC-SA 4.0.