
![[New] Strategic Timing for Virality in Video Content Sharing](https://www.lifewire.com/thmb/WanOrBzMbmKuKTq2JkOVxbgoo5c=/400x300/filters:no_upscale():max_bytes(150000):strip_icc()/how-to-use-remote-access-on-your-samsung-smart-tv-4688935-01-29c7de5dc77e4747a8070d12f0c3d84c.jpg)
[New] Strategic Timing for Virality in Video Content Sharing
Strategic Timing for Virality in Video Content Sharing
Create High-Quality Video - Wondershare Filmora
An easy and powerful YouTube video editor
Numerous video and audio effects to choose from
Detailed tutorials provided by the official channel
Creators have one thing in mind when posting their content online. To be viewed by numerous followers and potential subscribers. For this, you need to run your channels tactfully. There are days when people throng the social media to watch upcoming content and videos. Perhaps you can make your best bets on such days. And is there any best day to post YouTube video?
Probably yes! People will settle on social media sites when they are more relaxed and off heavy duties on the weekdays. Let’s now dive into posting your videos and attaining some good leads.

In this article
01 Why is it important to post your YouTube video on the best days?
02 Best Days to Post on YouTube - General Practices
03 Best Days to Post on YouTube - Individual channel
Why is it important to post your YouTube video on the best days?
You are better off with best days to post on YouTube to increase the chances of getting more views. You want to make the biggest catch, and putting in a little effort will help you yield good results.
1) Your content never dies
The major advantage of posting on best days is that they hit the wall right from the onset of posting. You won’t need a lot of time to invest in expensive equipment. Remember, when viewers see your content immediately, they are posted, there are high chances of them sharing along with friends.
2) You’ll grow your audience worldwide
Growing a worldwide audience is every content creator’s dream. Posting your videos on the best days will open doors to new visitors who perhaps haven’t heard about you. It is even better to include captions so that people of all walks get your message deeply.
3) You’ll appear more on Google searches
Posting at the right time will help Google identify your content and make it appear on Google searches. Google uses an algorithm to check on many concepts of video posting. It means that posting your videos to YouTube on the best days will spike the graph and automatically get noticed by Google.
4) Your audience will promote you
Remember, when viewers go on searches, they look for something important to them. So, coming across your content at the right time will make an instant catch. They only want to fulfill their needs at that specific time. Hence will buy or promote you as long as what you sell is what they are looking for.
5) Increased subscribers
People want to associate themselves with new content. Anyone would be thrilled to hit the button on content that just popped up when they are online at their relaxed moments. You never know; you may just hit that 1,000 subscribers list by posting your videos on the best days.
Best Days to Post on YouTube - General Practices
How then do you know the best day to upload on YouTube? You can use general practices to pinpoint when your viewers are online or when your channel is at its peak.
- Weekday evenings
Weekdays are very busy days for everyone. People feel relaxed and ready to catch up on social media’s trending in the evening. So, posting in the evenings on weekdays may instantly help you get some increased views.
- Target Thursdays and Fridays
Depending on your YouTube content, you can target school-age children these days. If your content is about kid’s stuff and other online learning skills, then pushing it just before the weekend could give you some good visits. Kids tend to have various activities over the weekend and so, the best time for them to embark on online learning is just before the weekend kicks off.
- Weekends
Weekends will suit content that needs to sell products to the middle-class. Since they are busy the whole week with other duties, they probably find time over the weekend to chill and check out what’s happening around them and the world at large.
- End year
When it comes to the best months to post on YouTube, the end-year period tends to be the best. Usually, this is when companies and individuals are winding up on their busy schedules of the year. They want to get improvements and tips to start the next year. It is wise to spend more time online, giving the necessary tips and probably hooking up some potential customers.
Best Days to Post on YouTube - Individual channel
Stop guessing and find the facts right. Hitting on the road at the right time can get you as many viewers as possible. YouTube makes getting the facts right quite easy. Just use YouTube studio to know when your viewers are online.
First, go to YouTube Studio
Check in the “YouTube Studio” > “Analytics” > “Audience” option. Remember that your channel should have enough views for this option to give you relevant data.
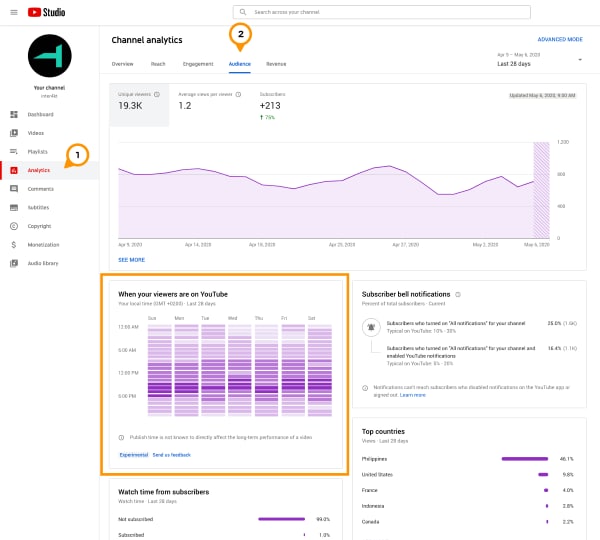
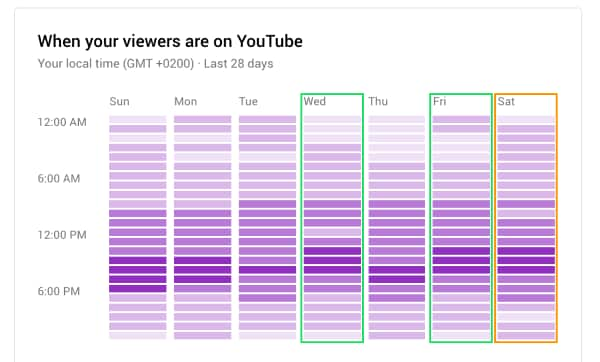
Find the hours with the darkest purple bars
You’ll realize that there are dark bars and light ones. The latter represent when few viewers are on your channel. Avoid posting during such times and focus when you have many viewers on site. Also, try to post a few hours before the peak time.

Focus on the days with the darkest bars
Apart from specific times of the day, you can focus on days of the week when your viewers are on your channel. You will mostly realize that the best days of the week to post to your channel are on weekends. It is quite typical as it’s the days when viewers are more relaxed and can find new things online. However, you can monitor your statistics and learn the number of days per week you need to emphasize more on posting your videos.
Post videos a day before the peak day
You can also dwell on the narrative; the early bird catches the worm. You can make an early catch since you know the day when your viewers will throng’ your channel, but you don’t know the time. Post videos a day before your channel goes busy. By this, you won’t leave any viewers outside your new postings.
A few hours before prime time
Another trick is to get your videos posted in good time. Once you have known the best hour of the day when viewers are likely to be active, make your video available a few hours before then. They’ll then get it rolling once they land into the channel for the newest updates. If not, you may miss out on views you would have gotten by making your video go public earlier.
Upload your videos in private a few hours before publishing
Yes, mistakes do happen, and you don’t want to be caught up in the mix of errors. You can increase perfection by uploading your videos for some hours before publishing them. It will give you a good time to check it out privately and iron out any concerns. You don’t want your video going viral with tons of mishaps.
Create High-Quality Video with Filmora to Ensure Video Engagement
Besides knowing the best days to post on YouTube, you have to give your audience quality for their time. Composing the best video is the killer for this course. Learn how to get high-quality videos with Filmora. It is a widely used video editing tool that comes in hand with lots of templates and effects. These features enable you to compose high-end videos in 4K and HD resolution. The effect of quality videos is that they’ll help you get many views because users will understand your video first. Filmora has an intuitive interface that will give you an easy time.
- Edit your videos with minimal effect. You can easily merge, crop, tilt, and perform more with Filmora.
- Easily do motion tracking from the main interface.
- It supports 4K and HD editing ability./li>
- Use the speed control feature to make your clips up to ten times faster or slower.
- Make magical moves with the Reverse feature. You can flip your videos and play them backward.
- Create stunning video colors in your video using the color tuning feature. You can adjust the white balance and the dynamic range of colors.
- Get quality sound with the noise removal feature.
For Win 7 or later (64-bit)
For macOS 10.12 or later
Conclusion
● You don’t have to guess the best days to upload to YouTube anymore. You can use YouTube algorithm Studio to calculate and give you the exact hours and days when your viewers are at bay. But again, this will only be effective if you have already gathered a substantial number of viewers. It will, therefore, not work for you if you are starting on YouTube. Usually, there isn’t enough data yet for the system to know the best time to publish, and neither know how your content performs in general.
● But all in all, you can use general practices to know when to post your content. Most likely, combine your efforts and don’t dwell on specific hours or days. Use both combined to reach as many audiences as possible.
Creators have one thing in mind when posting their content online. To be viewed by numerous followers and potential subscribers. For this, you need to run your channels tactfully. There are days when people throng the social media to watch upcoming content and videos. Perhaps you can make your best bets on such days. And is there any best day to post YouTube video?
Probably yes! People will settle on social media sites when they are more relaxed and off heavy duties on the weekdays. Let’s now dive into posting your videos and attaining some good leads.
In this article
01 Why is it important to post your YouTube video on the best days?
02 Best Days to Post on YouTube - General Practices
03 Best Days to Post on YouTube - Individual channel
Why is it important to post your YouTube video on the best days?
You are better off with best days to post on YouTube to increase the chances of getting more views. You want to make the biggest catch, and putting in a little effort will help you yield good results.
1) Your content never dies
The major advantage of posting on best days is that they hit the wall right from the onset of posting. You won’t need a lot of time to invest in expensive equipment. Remember, when viewers see your content immediately, they are posted, there are high chances of them sharing along with friends.
2) You’ll grow your audience worldwide
Growing a worldwide audience is every content creator’s dream. Posting your videos on the best days will open doors to new visitors who perhaps haven’t heard about you. It is even better to include captions so that people of all walks get your message deeply.
3) You’ll appear more on Google searches
Posting at the right time will help Google identify your content and make it appear on Google searches. Google uses an algorithm to check on many concepts of video posting. It means that posting your videos to YouTube on the best days will spike the graph and automatically get noticed by Google.
4) Your audience will promote you
Remember, when viewers go on searches, they look for something important to them. So, coming across your content at the right time will make an instant catch. They only want to fulfill their needs at that specific time. Hence will buy or promote you as long as what you sell is what they are looking for.
5) Increased subscribers
People want to associate themselves with new content. Anyone would be thrilled to hit the button on content that just popped up when they are online at their relaxed moments. You never know; you may just hit that 1,000 subscribers list by posting your videos on the best days.
Best Days to Post on YouTube - General Practices
How then do you know the best day to upload on YouTube? You can use general practices to pinpoint when your viewers are online or when your channel is at its peak.
- Weekday evenings
Weekdays are very busy days for everyone. People feel relaxed and ready to catch up on social media’s trending in the evening. So, posting in the evenings on weekdays may instantly help you get some increased views.
- Target Thursdays and Fridays
Depending on your YouTube content, you can target school-age children these days. If your content is about kid’s stuff and other online learning skills, then pushing it just before the weekend could give you some good visits. Kids tend to have various activities over the weekend and so, the best time for them to embark on online learning is just before the weekend kicks off.
- Weekends
Weekends will suit content that needs to sell products to the middle-class. Since they are busy the whole week with other duties, they probably find time over the weekend to chill and check out what’s happening around them and the world at large.
- End year
When it comes to the best months to post on YouTube, the end-year period tends to be the best. Usually, this is when companies and individuals are winding up on their busy schedules of the year. They want to get improvements and tips to start the next year. It is wise to spend more time online, giving the necessary tips and probably hooking up some potential customers.
Best Days to Post on YouTube - Individual channel
Stop guessing and find the facts right. Hitting on the road at the right time can get you as many viewers as possible. YouTube makes getting the facts right quite easy. Just use YouTube studio to know when your viewers are online.
First, go to YouTube Studio
Check in the “YouTube Studio” > “Analytics” > “Audience” option. Remember that your channel should have enough views for this option to give you relevant data.
Find the hours with the darkest purple bars
You’ll realize that there are dark bars and light ones. The latter represent when few viewers are on your channel. Avoid posting during such times and focus when you have many viewers on site. Also, try to post a few hours before the peak time.
Focus on the days with the darkest bars
Apart from specific times of the day, you can focus on days of the week when your viewers are on your channel. You will mostly realize that the best days of the week to post to your channel are on weekends. It is quite typical as it’s the days when viewers are more relaxed and can find new things online. However, you can monitor your statistics and learn the number of days per week you need to emphasize more on posting your videos.
Post videos a day before the peak day
You can also dwell on the narrative; the early bird catches the worm. You can make an early catch since you know the day when your viewers will throng’ your channel, but you don’t know the time. Post videos a day before your channel goes busy. By this, you won’t leave any viewers outside your new postings.
A few hours before prime time
Another trick is to get your videos posted in good time. Once you have known the best hour of the day when viewers are likely to be active, make your video available a few hours before then. They’ll then get it rolling once they land into the channel for the newest updates. If not, you may miss out on views you would have gotten by making your video go public earlier.
Upload your videos in private a few hours before publishing
Yes, mistakes do happen, and you don’t want to be caught up in the mix of errors. You can increase perfection by uploading your videos for some hours before publishing them. It will give you a good time to check it out privately and iron out any concerns. You don’t want your video going viral with tons of mishaps.
Create High-Quality Video with Filmora to Ensure Video Engagement
Besides knowing the best days to post on YouTube, you have to give your audience quality for their time. Composing the best video is the killer for this course. Learn how to get high-quality videos with Filmora. It is a widely used video editing tool that comes in hand with lots of templates and effects. These features enable you to compose high-end videos in 4K and HD resolution. The effect of quality videos is that they’ll help you get many views because users will understand your video first. Filmora has an intuitive interface that will give you an easy time.
- Edit your videos with minimal effect. You can easily merge, crop, tilt, and perform more with Filmora.
- Easily do motion tracking from the main interface.
- It supports 4K and HD editing ability./li>
- Use the speed control feature to make your clips up to ten times faster or slower.
- Make magical moves with the Reverse feature. You can flip your videos and play them backward.
- Create stunning video colors in your video using the color tuning feature. You can adjust the white balance and the dynamic range of colors.
- Get quality sound with the noise removal feature.
For Win 7 or later (64-bit)
For macOS 10.12 or later
Conclusion
● You don’t have to guess the best days to upload to YouTube anymore. You can use YouTube algorithm Studio to calculate and give you the exact hours and days when your viewers are at bay. But again, this will only be effective if you have already gathered a substantial number of viewers. It will, therefore, not work for you if you are starting on YouTube. Usually, there isn’t enough data yet for the system to know the best time to publish, and neither know how your content performs in general.
● But all in all, you can use general practices to know when to post your content. Most likely, combine your efforts and don’t dwell on specific hours or days. Use both combined to reach as many audiences as possible.
Integrating iMovie Productions Into YouTube
How to Upload a Video from iMovie to YouTube?

Liza Brown
Aug 18, 2022• Proven solutions
“Is iMovie good for YouTube?”
The iMovie is not only good for YouTube but various other social media platforms. The thing is, you have to compromise with the quality offered by Apple’s video editor iMovie. Well, iMovie is perfect for getting started for beginners. But, the professionals and ones who want a bit high features than basic ones should look elsewhere. Thus, we always recommend alternatives to a particular software for our audience. In this article, there is a mention of Wondershare Filmora to overcome the drawbacks of iMovie.
Without further ado, let’s begin with how to upload a video from iMovie to YouTube. We want to lead with the best iMovie export settings, specific troubleshooting issues, and our alternative intro section to overcome iMovie’s limitations.
Part 1: How to Upload a Video from iMovie to YouTube?
iMovie is ideal for making YouTube videos if you are too basic and are not looking for advanced features. Remember that professionalism pays in these platforms and helps you stand better among others. If you’re still interested in making introductory videos, here is a step-by-step guide on uploading a video to YouTube from iMovie on Mac first and leading with iPhone.
Step-by-Step Tutorial on how to upload a video from iMovie to YouTube on Mac
Step 1: Create a Project
On the first step, go to iMovie on Mac and click the Create New tab below.
Step 2: Import Media
Click the Import Media button and browse the files on your computer, as shown below.
Step 3: Edit Clips
It’s time to edit video footage. Drag your video to the timeline, as shown below.
Then, you can trim and drag the edges of video clips to allow editing.
Step 4: Add Titles
You can add titles by clicking the Title tab and further drag the Title’s template into the timeline.
Step 5: Export the Video
Click the Export button as follows after editing is over.
Select YouTube to upload your video over the platform directly.
Step 6: Save
After selecting the desired platform, click the Next tab to proceed with saving the file.
At last, save your video as shown below.
Step-by-Step Tutorial on how to upload iMovie to YouTube from iPhone
Step 1: Share the iMovie Project
Go to iMovie on your iPhone. Open the iMovie project on your iPhone and tap the Share button to select YouTube. Enter the information of Title, Description, Size, Tags, Privacy, and Location (optional).
Step 2: Upload iMovie Files
For ease of use, you can upload saved videos in Photo Library on your iPhone. Then, you can upload iMovie videos via the YouTube iOS app. Sign In to YouTube and click the Camera icon at the top of the Home page. Select your iPhone Photo Library file and set the video Title, Description, Size, Tags, and Privacy. Then, hit the Upload button to confirm.
Part 2: The Best iMovie Export Settings for YouTube Videos
As we all know that iMovie consists of a bit long procedure to export projects. Here are some tips on the best iMovie export settings to avoid an unnecessary headache.
- Set small resolution: Small resolution plays a more significant role, especially while uploading. Thus, you can set the smallest resolution in the Email tab of the Export button.
2. Change Export settings in the File tab: There is a File tab under the Export button. Click it and find various settings that you need to change to get the best export settings for YouTube 2021. Make the Title of the video as small as possible. Set the resolution at 1080P than 4K.
However, it isn’t going to upgrade the resolution if your video is already in the 1080P definition. Now, the last setting that will crazily offer you the best quality and lots of space-saving. You have to select Best (ProRes) in quality settings for this purpose. These settings also take less time to upload to YouTube.
3. Compress is not for speed: Various options you see in the Compresstab are not for speed. They are for how you save the video on a desktop. Thus, always choose the Better Quality tab than Faster.
- Do not export directly to YouTube: iMovie is pretty basic and doesn’t offer great settings to upload your video instantly. You may have to make changes to the uploaded video even if you do this as per our step-by-step guide mentioned above.
Part 3: How to fix the “Failed to Upload to YouTube” Error on iMovie?
The “iMovie to YouTube failed” problem occurs when you directly upload a YouTube video from iMovie. The issue will result if you upload from any third-party uploader. That is why the direct upload doesn’t work, especially in iMovie. You can opt to share your video to the desktop first and then drag it to upload to the YouTube platform.
Part 4: Upload Videos to YouTube with the Best Alternative to iMovie - Wondershare Filmora
“What can I use instead of iMovie to overcome its limitations?”
When you see that iMovie is not uploading to YouTube or iMovie upload to YouTube got stuck, go for a better alternative. In this section, we’d like to recommend Wondershare Filmora that offers the best export settings compared to iMovie. It is the go-to solution if you can’t upload video from iMovie to YouTube directly. Filmora further provides intuitive editing tools that professionally make your YouTube video projects.
Export Key Aspects of Wondershare Filmora in comparison to iMovie:
- It offers a long list of export resolutions to choose from.
- You get separate video and audio settings such as Encoder, Channel, Frame Rate, Bit Rate, Resolution, etc.
- It is further compatible with export to various devices including the iPhone, Samsung, iPod, Apple TV, iPad, Google Pixel, PSP, Smart TV, etc.
Step-by-Step Guide on how to upload a video from iMovie to YouTube via Wondershare Filmora
Step 1: Click the Export button and select resolution
After your project in Wondershare Filmora is over, click the Export tab and select video resolution from the Local tab, as shown below.
It has a list of formats. You can also edit the Name and saving location here.
Step 2: Select Quality
Select the Settings button and choose from three quality levels of Best, Better, and Good. You can also adjust video and audio parameters, including the Encoder, Frame Rate, Resolution, Bit Rate, etc.
Step 3: Select platform
Select the YouTube tab, Sign In to your YouTube account, and hit the Export button after modifying the Title and Quality if needed. Also, make sure to check the Enable GPU accelerated video encoding tab.
Select Wondershare Filmora as the ultimate solution even if iMovie upload to YouTube not showing up.
Conclusion
Hopefully, we’ve informed you of the relevant facts on how to upload a video from iMovie to YouTube. We have also examined the number of troubleshooting issues involved in the iMovie video editor. Well, you will get to face similar kinds of export difficulties in the iMovie editor. Also, the entire procedure to end the exporting task is a bit long in iMovie compared to any other video editing software. Thus, it’s crucial to check out what other alternatives the technological world has today. We can’t state to you a better beginner-friendly yet advanced editing option than Wondershare Filmora that rightly outtakes the iMovie video editor in all aspects.
Liza Brown
Liza Brown is a writer and a lover of all things video.
Follow @Liza Brown
Liza Brown
Aug 18, 2022• Proven solutions
“Is iMovie good for YouTube?”
The iMovie is not only good for YouTube but various other social media platforms. The thing is, you have to compromise with the quality offered by Apple’s video editor iMovie. Well, iMovie is perfect for getting started for beginners. But, the professionals and ones who want a bit high features than basic ones should look elsewhere. Thus, we always recommend alternatives to a particular software for our audience. In this article, there is a mention of Wondershare Filmora to overcome the drawbacks of iMovie.
Without further ado, let’s begin with how to upload a video from iMovie to YouTube. We want to lead with the best iMovie export settings, specific troubleshooting issues, and our alternative intro section to overcome iMovie’s limitations.
Part 1: How to Upload a Video from iMovie to YouTube?
iMovie is ideal for making YouTube videos if you are too basic and are not looking for advanced features. Remember that professionalism pays in these platforms and helps you stand better among others. If you’re still interested in making introductory videos, here is a step-by-step guide on uploading a video to YouTube from iMovie on Mac first and leading with iPhone.
Step-by-Step Tutorial on how to upload a video from iMovie to YouTube on Mac
Step 1: Create a Project
On the first step, go to iMovie on Mac and click the Create New tab below.
Step 2: Import Media
Click the Import Media button and browse the files on your computer, as shown below.
Step 3: Edit Clips
It’s time to edit video footage. Drag your video to the timeline, as shown below.
Then, you can trim and drag the edges of video clips to allow editing.
Step 4: Add Titles
You can add titles by clicking the Title tab and further drag the Title’s template into the timeline.
Step 5: Export the Video
Click the Export button as follows after editing is over.
Select YouTube to upload your video over the platform directly.
Step 6: Save
After selecting the desired platform, click the Next tab to proceed with saving the file.
At last, save your video as shown below.
Step-by-Step Tutorial on how to upload iMovie to YouTube from iPhone
Step 1: Share the iMovie Project
Go to iMovie on your iPhone. Open the iMovie project on your iPhone and tap the Share button to select YouTube. Enter the information of Title, Description, Size, Tags, Privacy, and Location (optional).
Step 2: Upload iMovie Files
For ease of use, you can upload saved videos in Photo Library on your iPhone. Then, you can upload iMovie videos via the YouTube iOS app. Sign In to YouTube and click the Camera icon at the top of the Home page. Select your iPhone Photo Library file and set the video Title, Description, Size, Tags, and Privacy. Then, hit the Upload button to confirm.
Part 2: The Best iMovie Export Settings for YouTube Videos
As we all know that iMovie consists of a bit long procedure to export projects. Here are some tips on the best iMovie export settings to avoid an unnecessary headache.
- Set small resolution: Small resolution plays a more significant role, especially while uploading. Thus, you can set the smallest resolution in the Email tab of the Export button.
2. Change Export settings in the File tab: There is a File tab under the Export button. Click it and find various settings that you need to change to get the best export settings for YouTube 2021. Make the Title of the video as small as possible. Set the resolution at 1080P than 4K.
However, it isn’t going to upgrade the resolution if your video is already in the 1080P definition. Now, the last setting that will crazily offer you the best quality and lots of space-saving. You have to select Best (ProRes) in quality settings for this purpose. These settings also take less time to upload to YouTube.
3. Compress is not for speed: Various options you see in the Compresstab are not for speed. They are for how you save the video on a desktop. Thus, always choose the Better Quality tab than Faster.
- Do not export directly to YouTube: iMovie is pretty basic and doesn’t offer great settings to upload your video instantly. You may have to make changes to the uploaded video even if you do this as per our step-by-step guide mentioned above.
Part 3: How to fix the “Failed to Upload to YouTube” Error on iMovie?
The “iMovie to YouTube failed” problem occurs when you directly upload a YouTube video from iMovie. The issue will result if you upload from any third-party uploader. That is why the direct upload doesn’t work, especially in iMovie. You can opt to share your video to the desktop first and then drag it to upload to the YouTube platform.
Part 4: Upload Videos to YouTube with the Best Alternative to iMovie - Wondershare Filmora
“What can I use instead of iMovie to overcome its limitations?”
When you see that iMovie is not uploading to YouTube or iMovie upload to YouTube got stuck, go for a better alternative. In this section, we’d like to recommend Wondershare Filmora that offers the best export settings compared to iMovie. It is the go-to solution if you can’t upload video from iMovie to YouTube directly. Filmora further provides intuitive editing tools that professionally make your YouTube video projects.
Export Key Aspects of Wondershare Filmora in comparison to iMovie:
- It offers a long list of export resolutions to choose from.
- You get separate video and audio settings such as Encoder, Channel, Frame Rate, Bit Rate, Resolution, etc.
- It is further compatible with export to various devices including the iPhone, Samsung, iPod, Apple TV, iPad, Google Pixel, PSP, Smart TV, etc.
Step-by-Step Guide on how to upload a video from iMovie to YouTube via Wondershare Filmora
Step 1: Click the Export button and select resolution
After your project in Wondershare Filmora is over, click the Export tab and select video resolution from the Local tab, as shown below.
It has a list of formats. You can also edit the Name and saving location here.
Step 2: Select Quality
Select the Settings button and choose from three quality levels of Best, Better, and Good. You can also adjust video and audio parameters, including the Encoder, Frame Rate, Resolution, Bit Rate, etc.
Step 3: Select platform
Select the YouTube tab, Sign In to your YouTube account, and hit the Export button after modifying the Title and Quality if needed. Also, make sure to check the Enable GPU accelerated video encoding tab.
Select Wondershare Filmora as the ultimate solution even if iMovie upload to YouTube not showing up.
Conclusion
Hopefully, we’ve informed you of the relevant facts on how to upload a video from iMovie to YouTube. We have also examined the number of troubleshooting issues involved in the iMovie video editor. Well, you will get to face similar kinds of export difficulties in the iMovie editor. Also, the entire procedure to end the exporting task is a bit long in iMovie compared to any other video editing software. Thus, it’s crucial to check out what other alternatives the technological world has today. We can’t state to you a better beginner-friendly yet advanced editing option than Wondershare Filmora that rightly outtakes the iMovie video editor in all aspects.
Liza Brown
Liza Brown is a writer and a lover of all things video.
Follow @Liza Brown
- Title: [New] Strategic Timing for Virality in Video Content Sharing
- Author: Thomas
- Created at : 2024-05-31 12:43:17
- Updated at : 2024-06-01 12:43:17
- Link: https://youtube-help.techidaily.com/new-strategic-timing-for-virality-in-video-content-sharing/
- License: This work is licensed under CC BY-NC-SA 4.0.
